Cheer Hair Bow Tutorial
- Posted on 05 November, 2014
- Long Hair
- By Anonymous
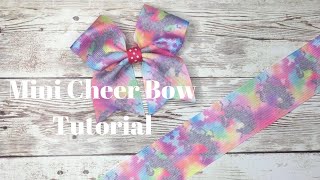
Learn how to make this glitter flake cheer hair bow. You will need cheer bow ribbon, glitter flake iron-on material, iron-on fabric strip, elastic pony tail holder and a salon clip. The Cheer Bow Supplies used are available at https://www.cheerbowsupply.com
Hi everybody I'm Laura from Hair-Hardware.com. Today, I'm gon na show you how I made this cheer bow using our new glitter vinyl cheer bow rolls., So lets get started.. The first thing i have done is: i have cut my 3 inch grosgrain ribbon to 30 inches long.and fold it in half. and i'm going to iron a center crease. To help me make sure my bow is not lopsided.. So all you need is just a crease in the center.. Now I'm going to take one, my fabric strips. and I'm going to place it on the end of my ribbon. Since my ribbon is pre cut, I'm just lining up the fabric strip with the end of the ribbon.. You never want to iron your fabric directly. You want to make sure you have some kind of pressing sheet on top. The fabric strips have heat and bond already applied to the back., so they iron on pretty quickly with a medium-high for high heat setting on your iron.. That should be on there pretty good.. On the other side, I'm going to use silver glitter, flake vinyl.. We have these glitter flake rolls.. We have them in silver and in other widths and vinyl types. and other vinyl types., and I'm going to use this on the other side of my bow., and these are nice easy to use because they are already cut to the width that you need. You don't have to trim them down.. They are about 5 yards long and real easy to work with to make cheer bows.. You can use just the amount you need. If you are just covering the tail, then you can just cut off a little bit and use that on the tail of your bow. Or if you are doing what I'm doing, you can cut a bigger piece for full coverage. So I'm going to trim this to about 12 or 13 inches long. and the vinyl that we sell for cheer bows has a plastic carrier sheet on one side.. That'S what give it this super shiny, look right, now. and on the other side it is dull where the adheasive is.. So you are going to lay this on your ribbon, so you have it even. and then again use a cover sheet before you iron. It on.. It does take a little longer to iron vinyl on to your ribbon.. It depends on the kind of vinyl you use. Some require higher temperature, lower temperature or different pressures or different times. They're, very forgiving on ironing it on it sticks very well to ribbon.. Just make sure that you check the instructions that come with your vinyl., make sure that you iron it on correctly. The carrier sheet on most of the vinyl we sell can be peeled off when it is hot or cool for or cool. I have to do its separates very easily., Just peel that off and you have your glitter on the other side.. Now I'm going to use a peace of the vinyl, that is one and one half inches wide and I'm going to make a glitter vinyl stripe down the other side.. So I'm gon na measure out what I need. and I'm going to center on my ribbon carefully cover it with a cover sheet so that it does not slip. If you are layering vinyl on top of fabric., pretty much all of our vinyls can iron. On top of smooth fabric., But if you're layering vinyl on top of vinyl., because this glitter flake kind of has sand papery texture that gives it sparkly look very texture to it, which is what gives superstar. You can't put anything on top of glitter flake vinyl.. It just won't stick. because of the texture. Just make sure the glitter flake is your top layer.. Now that this is ironed on, you can peel away the carrier sheet. And I can go and put my bow together.. So I'm going to trim my tails first. Fold. It in half. Make a V cut for this side. Gon na fold this side in half too, with a V cut.. You could of course, always have straight ends to your tails or just angle.. However, you prefer. and now I have my ribbon ready to fold into my cheer bow.. So the first thing you need to do is decide which side is going to be the top. So I'm going to take my ribbon, and this is where having creases in the center is helpful.. Take my bottom layer and fold it in first and the other side goes on top. Your going to want to measures your tails make sure that they're even see your bow is not lopsided.. This side is 5 inches long, and this side is about 5 inches long too, so I don't have to have make adjustments.. Then you're, going to look for your crease hold your cross center there, the lift your crease and move it to the back.. So on the back, it should look like this Make sure your crease is straight and down the center.. Then your going to take it back and forth a few times to create your crease., usually fold it back and forth 3 times. So you get about a couple mountains and valleys in there.. Just get that fold back and forth. Then take a zip tie and hold the center tight. So you don't loose that crease.. Take your zip tie, bring it around and pull it half way, tight. That way. If anything is not quite right, you still have a little bit of wiggle room to make adjustments., So you are going to look at your bow and make sure your tails look even. and that your loops look even. and if you did not make this all the Way tight, you should be able to move this back-and-forth a bit If you need to make some minor adjustments. Once you have it just the way you want it pull your zip tie just a tight as you can get it.. If you want, you can use needle nosed pliers to make this tight., You won't break it. Trim. The end of your zip tie. Off. Then add whatever hardware that you want to use on the back. In this case I'm using a pony tail holder. For cheer bows. I usually use the ones with metal clamp because it gives me a nice surface to glue to the back of the zip tie. It holds on secure.. Then I'm going to use a 3/8 silver glitter velvet wrap in silver.. So I'm going to add a little glue to the back of the pony tail holder.. You only need a small piece. to cover the center., Just put it on the back and wrap it all the way, around. And glue the other end down.. Now you have your completed cheer bow using the easy-to-use glitter vinyl cheer bow strips on a roll.. You can cut them to any length you want. We have them in lots of colors and vinyl types., Please be sure to like and subscribe to our channel. So you don't miss out on any tutorials. We offer. Thanks for watching

Comments
Sweet Sunshine, Splendid Sunset: I love making bows and your website has helped me so, so much! The tutorials are awesome and now I'm only making basic bows but I think I'll save up enough money to make a vinyl bow and it's so amazing and cute!
Maritza Barrios: This is so pretty and so easy to do. Thanks for the tips. Defiantly helped me out.
Chris Langdon: Great tutorial...thanks for sharing! Perfect colors too for my daughter's squad!! Have a great day!
Jeanette Sifuentes: Thank you for making things a little easier now!!!
47malone: Quick, cute, and simple gotta it!
Marilyn Moses: Nice idea! My granddaughter will love it.
Allison Knudsen: What kind of fabric did you use for the one side? excellent tutorial. thank you for sharing.
Yvette Jania: Love the glitter flake and the stripped design.
Rachel Tambascio: Love the colors you used too!
Shermin Leong: Wow! It's so nice!!
Emily: How did you get the stuff on the back of the fabric strip?
Linda Yanicheck: One more question what size zip ties do you use?
Nahid Shahab: Beautiful
Linda Mckinney: I thought you weren't allowed to have ANY metal like the metal in the pony O you used in true official cheer bows
Craig Nolke: Please send me a bow and I am a girl
Solana Cook: My turned out horrible