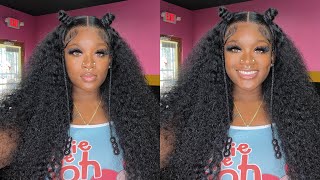
Side Pinned Curly Hair Tutorial
Learn how to recreate this Side pinned curly hair tutorial, step by step:
1. Put hair into velcro rollers.
2. Curl hair with 1" curling iron.
3. Take rollers out and curl remaining hair.
4. Pull hair to the side and pin in place.
For more makeup and hair tips & tricks visit my website www.deepaberar.com
For the jewelry seen in the video shop under the "Shop" tab at my site!
Hey guys, so what we're doing today is a hair tutorial. This is the look that I wore last week to one of the functions for my brother's upcoming wedding and it just turned out to be like such a beautiful look and stayed so beautifully throughout the evening. So I just want to share some tips on how to achieve this look and how to get it to stay at the place in terms of the pinning in the back of the hair, so we're get right into it. Here we go okay, so the first thing that we're gon na do is section off the hair, because we're gon na put the middle section into velcro rollers, so we're gon na take about the width of a Velcro roller. So you can measure kind of like that and we're gon na section this off and I'm gon na pin this side out of the way and I'm gon na do the same thing on the other side. So now that we've got the middle section, we've gone far back enough to hit the crown of the head right here, I'm going to take a section about an inch thick and then what you want to do is use any sort of root, boosting sprays and this One that I'm using over here is the bamboo volume and it's there uplifting root blast and I'm gon na spray. The underside right over here concentrate on the roots and then I'm gon na take a giant, velcro roller and just roll that down, and I have these metal clips that you can find and they're really great for holding these things in I'm gon na put two in So one on either side and I'm just going to repeat that with the rest of the hair and when it comes to my bangs because they're a little bit shorter, I'm gon na use a smaller velcro roller and spring it in, and then I've got the smaller Roller and then just pin that in place as well. So what that's gon na do is just gon na give more volume at the roots and I'm gon na. Let that set for a while. So I'm gon na do to the rest of the hair, is now curl it and I'm using a one-inch curling iron for this, and I'm just gon na go ahead and just curl the hair randomly in different directions come to the first start by spraying. The hair with a hair spray and I'm using a strong, hold hairspray for this look this one that I'm using today is the Pantene medium thick, hair spray, it's good for anti humidity, so just take section by section and I'm not going all the way up. So just remember to leave a few inches at the root of the hair and just keep doing that all around the hair. So I'm just gon na go ahead and skip forward to the next part. Okay, I'm just going to spray all of that just to set it and then we're going to start taking out our velcro roller. So I'm taking the last one out. First, I'm gon na spray that lightly and curl that as well do the same thing with the next roller and I'm just going to spray those two curls and with the last one take out the velcro roller and you'll notice that from a being in the velcro Roller, it's kind of curled really nicely itself, so I'm just pulling it nice and neatly to the side, I'm just combing it with my fingers. You can always use a proper comb if you want it very like clean. Looking, I'm gon na grab some black bobby pins. So just go with whatever matches your hair color, they do have a lot of different colors from bobby pins. Now, so that's the good thing. I'M gon na grab a black bobby pin and I'm gon na pin the very bottom I'm gon na start from the bottom. So we've got the first pin in so what I'm gon na do now is I'm going to attach the second pin into the top of the first pin so kind of like overlapping? If you take two pins, so if this is the first pin, I'm just going to go to the very top I'm going to overlap and go up kind of like that and then I'm going in. So I'm just going to keep repeating this with more pins. So it's going to end up looking kind of like a zigzag pattern, so the first pin is gon na be in the hair this way and then the second pin is gon na go through the top of the first pin that way, and then we're just gon Na keep going all the way to the top, and I'm just gon na go ahead and spray it all just to set it and that's how to get this beautiful curly side to a pinned hair. Look! So thanks very much for watching guys, see you next time and blue volume in its the up loose uplifting over here is the bamboo volume in its there up loose is the bamboo volume and it's there uplifting root look root, oh my god.

Comments
Hope Anne: Love this! I might do this for my sister in laws wedding this summer. Great look for summer!
traceyshines: Bravo! So much searching on how to do this look & I finally found a perfect technique, thank you! :)
Mrs.Potato Head: Your hair looks great! ❤
Shayleen Gilmore: Looks beautiful :)
masaabza: Love it. Thanks.
fars: I love it!
Winpreet Deora: Thank u so much for the pinning part .. No one tells that .. I always wanted to try this
Simi D: Great style!
Trishna Desai: Hi Deepa! I'm a new subscriber and just saw you video on concealer under-eye circles and bags video. I'm an NC 35 in MAC foundations and I have heavily pigmented under eye circles! they have a purple-ish hue to them. I'm confused as to what shades I should try in the Studio Finish & Select Moisture Cover. I'd appreciate any help you can provide Thank you!
Ram Fennell: Love your ombré hair. Can you do a tutorial on your eye make up please?
Megan VG: what an amazing curler if i attempted this my hair would look horrid
Shubsybear: You are absolutely stunning
Sonya Blade: Nice. Thank you.
justaksh: very pretty.. can be much easier for naturally curly hair?
Danna Lopez: Just got a new sub i may do this for the my first day of school
sugryrain: can you do $20 makeup challenge. :}