How To Blend Leave Out With Curly V Part Wig Start To Finish Detailed Tutorial Ft. Alipearl Hair
- Posted on 01 March, 2023
- Medium Hair
- By Anonymous
Shop Now➤https://bit.ly/3vpJ9eP
Hair Info: 26inch kinky curly v part wig 200% density
❤#AlipearlHair Official Store:➤https://bit.ly/3xwZC3t
1.Invisible HD Lace Wig➤http://bit.ly/3YbLMgq
2.Glueless Wear&Go Wigs!➤http://bit.ly/3mgNPm5
3.Extra 10% Off, New Arrival➤http://bit.ly/3Z9sxFP
#alipearlhairwig #alipearlupartwig #alipearlbodywavehair
Instagram @alipearl_hair: https://bit.ly/34I3Oyd
Youtube @Ali Pearl Hair: http://bit.ly/2H0Gmmc
Facebook @Ali Pearl Hair: https://bit.ly/3aKwxX3
WhatsApp: +86 15890076489 E-mail: [email protected]
P R O D U C T S U S E D
C O N N E C T W I T H M E:
My Website
Hair Appointment Booking
https://wynnejean.com/pages/hairtour
Instagram @WynneJean
https://www.instagram.com/wynnejean/
Facebook @WynneJean
https://m.facebook.com/WynneJean/?ref...
Twitter @WynneJeann
https://twitter.com/WynneJeann?s=09
For business inquiries [email protected]
F A Q:
Ethnicity: African American
Height: 5'7
Age: 23
Measurements: Bust 36'' Waist 26'' Hip 38''
Shoe Size: 8
F A V C A M E R A G E A R:
Camera - https://amzn.to/2NJcPPs
Camera remote - https://amzn.to/2CDAsm2
SD card - https://amzn.to/2Qim76w
Umbrella lights - https://amzn.to/351lJxv
Soft Box Lights - https://amzn.to/2O9zzXF
Full size ring light - https://amzn.to/2XcmDo4
Traveling ring light - https://amzn.to/2XaDLdQ
Traveling Tabletop Ring Light - https://amzn.to/2NJbisG
Lighting & Backdrop Kit - https://amzn.to/2OgmTP4
Backdrop - https://amzn.to/2CHxA7W
Mic - https://amzn.to/2KlQrcJ
*This video may include affiliate links / paid promotional content & product placements. However, all opinions are my own*
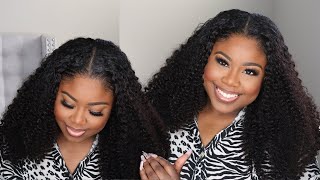
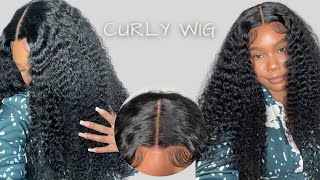
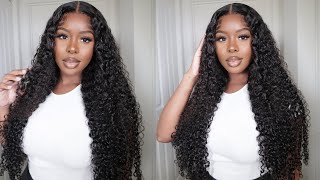
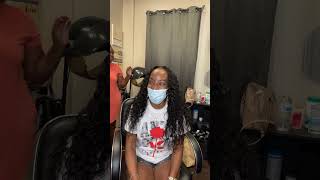
Hey loves. Welcome to my channel. My name is Winnie Jean, if you're new here and if you're returning, then hey girl, how you doing today's video is sponsored by Ali Pearl. They sent me this really pretty curly B, part wig, and I am literally on my way out of town, so I'm trying to show you guys how I would apply my hair on a normal basis. I'Ve really been trying to get into that a lot more lately, because I want to make tutorials that are easy to follow and that you guys will actually use so comment down below. And let me know if you guys have any ideas or, if there's anything that you guys want to see in today's video I'm going for a middle part, curly bust down middle part moment. So I'm starting with my hair freshly washed and conditioned. I forgot to mention that I applied a little bit of insta10 Miracle leave-in as well as a heat protectant. I went in with a little bit of oil. I believe I used grape seed oil and now I'm just going to go ahead and blow dry. My hair out using my chi hand, blow dryer with the brush attachment. It'S the easiest way for me, and I found that I don't have to put as much heat on my hair because I blow dry, my hair on medium so to prep to install the wig. I'M going ahead and parting out my edges and twist the nose down, so we could kind of have them out of the way and keep everything organized and I just kind of popped the wig on my head to see about how much hair I need to leave Out, of course, we're going to go in and adjust it, but just to get a good starting point. I like to do that and I'm parting out a relatively thin middle section of hair and a V shape. This isn't the lace part V. Part wig is more of like a track, so I want to leave out a decent amount of hair to cover the tracks, but I also like this method because it happens to be a lot thicker. This wig was nice and full, and it looked really pretty once I had the curls defined so now that I have an idea of how much hair to leave out I'm gon na go ahead and twist it out of the way. So we can try to wig on one more time before we actually braid our hair down. You want to make sure that your leave out is perfect before you braid your hair, because once it's braided, it's no change in it. So take your time and make sure that you organize everything as best as you can foreign, it's fitting pretty well, but I can use a few adjustments so I'll go ahead and part a little bit more hair out and kind of smooth the part out a little Bit more and once we have the leave out together, we can go ahead and start braiding. The rest of the hair that'll be under the wig V Parts always come with this clip in the back. I go ahead and trim it out just because I never know how to clip it in so I'll. Just go ahead and trim that out and then I'm going to go ahead and part out my hair about an inch along the edges on three sides. So I potted it down the edges of my hair, then down the nape of my neck and then across the bottom. I'M going to show you guys the back, so it makes a little bit more sense, but I like to use this braiding pattern for V part. Wigs when I'm going to go ahead and apply a comb in the back because it kind of gives it something to hold on to so, as you can see, I'm braiding down the perimeter of my head all the way around and now I'm braiding right across the Back and I do the exact same thing with the rest of the braids and once I have the braiding pattern, finished I'm going to go in with my crochet hook and crochet the end of the braids through each other. Until everything is kind of just up and out of the way, my hair is really thick if you're familiar with my channel, you know it's a little crazy, so I have to just finesse a braiding pattern, any kind of way - and this is what I'm left with, Which works because the wig is Curly. If it was a straight wig, I would have to make some adjustments, but for now we'll make it work like. I said I'm on my way to the airport girl, so I'm clipping the wig in all the way around the part and as you can see, it's laying really nice and flat and I'm just tucking those combs in around the edges, like I told you guys about Earlier so everything can be nice and secure, and now we can get into the actual styling of the wig. So I'm taking my edges down, so I can go ahead and curl those and blend those in I'm going to use my mini flat iron. I think it's like a three quarters or a half an inch plate and I'm just using this to add a little bit of curls to my edges. This will also prep my hair for baby hairs and smooth my hair out a little bit, so it Blends in with the curl pattern of the wig, and I like to curl the parts around my face towards my face. I think it just Blends in and looks a little bit more natural than everything going straight back now to blend in the top of my hair, with the curls I'm going to use my wand, but, as you can see, these curls are so pretty and fluffy. So I want to kind of keep that Vibe going. I don't want the top to be too perfect, so I'm parting out one section going straight back. You never want to forget to cover your tracks in the back, usually because, if you're doing your own hair - and you can't see it - you don't think about it, but it's mandatory. So I'm using my tiny wand and I'm just wand curling, my hair, blended, with a tiny piece of the wig so that the hair Blends together a lot better and I'm going in medium to small sections. I don't want a bunch of tiny curls, because the curls on the actual wig aren't super small. So I'm splitting my leave out into about four to five sections and again I'm making sure to blend a little bit of the weave with my hair and just make sure that everything Blends a lot better, especially when your hair has the same texture as some of The extension hair - I hope that makes sense, but just trust me, curl your hair and extension hair together, no matter what the texture is all right, foreign. So once we have all of the curls finished, I'm going to go ahead and brush everything out. So it's nice and big and blends together and then to finish off the hairstyle, I'm using a little bit of edge control and just swooping my baby hairs. This is a must, especially for me. I don't know. This is just what polishes that look up for me. So I'm doing two swoops on either side, one swoop in the middle and then my little Sideburn pieces. Nothing too crazy. But if you want to, you can really get creative with this part, and this is the finished look. I hope that you guys really enjoyed today's video, and I will see you guys in my next one. Thank you again to Ali Pearl for working with me. All of the hair information will be down below the description bar. If you pick up this wig tag me on Instagram, I definitely want to see, and I will see you guys in my next video bye, babes
Comments
Ali Pearl Hair: Period Thank you so much for trying Alipearl Hair.
STEFFAN SUCCESS SESSION: Soooo pretty!!!!