27 Piece Pixie Cut Lace Frontal Tutorial No Glue, No Bald Cap Method!
- Posted on 18 December, 2020
- Pixie
- By Anonymous
Welcome to my channel! In this video, I will demonstrate how to do a 27 piece pixie cut lace frontal wig, sewing machine method. Be sure to stay tuned for part #2 on how I cut, and colored, this 27 piece pixie cut lace frontal wig. #NoGlueNoBaldCapMethod
Click link for part #2 The CUT and COLOR
https://www.youtube.com/watch?v=4siGA0...
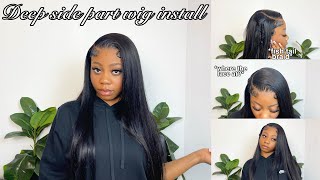
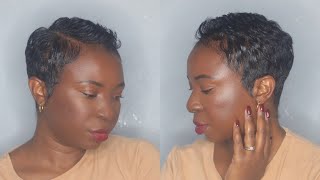
Hey everybody: it's here to stay by, miss e. Welcome to my channel, i'm going to be showing you how i created this fixie cut wig on the sewing machine. If you are interested in seeing how i created this wig keep watching this wig is a 13 by 6 inch lace, frontal wig. It has a lot of versatility and styling and parting space. I created this wig with a 20 second piece and also a 13 by 6 inch lace front. This wig can be very versatile in styling, as i said before, you can style this wig into several different styles. It is one wig with several different styling capabilities. Please make sure that you stay tuned for part two on how i cut colored and styled this pixie cut wig. As you can see, this wig has a very realistic hairline. It looks very natural, that's one of the things that i like about the lace front, as opposed to the lace closure. You have a lot of versatility as far as styling, with your hairline being exposed at certain times. You can pull the wig back all the way. Back the hair can be combed all the way back, as you will see in part two of this video and, as you can see, i've already done about three different styles or three different looks already with this wig. So right here, i'm starting out with my lace. Frontal and i'm creasing the lace that's going to, let me know where the middle of the lace is. That is important because i am going to place it on my wig head on my cap, and i need to make sure that this is centered in order for it to lay smoothly on the head. While i prepare to sew it down, you also want to make sure that the lace frontal is about an inch away from the edge of the cap. If you decide to bring it down a little bit lower, that's totally up to you, but just make sure that it lays down flat when you're done - and here i am double - checking again - making sure that this lace, frontal is centered. So i'm going ahead and putting it in the back, i'm also making sure the back is centered as well. You want to make sure that there are no lumps no bumps no puckers. As you see here, you don't want that. You want to make sure that it lays completely flat on the wig head and on to your cap i am using t fins, i'm sorry. I am using push pins because i misplaced my t-pins, but i'm just being uh creative and using what i have available. As you can see here, i am making sure that the lace frontal is laying nice and flat and flush to the wig cap. Everything looks nice and centered, and now i can prepare to make my markings. I'M also making sure that the center of the back of the closure is balanced with the center back of the head, and this is what it should look like in the front. I'M gon na go ahead and start sewing the lace frontal on i'm gon na start from the left side and i'm gon na work my way up to the center and then i'll proceed on the right side and work my way up to the center. If you have not already subscribed hit that subscribe, button make sure you hit the like button and share this video. Don'T forget to hit the notification bell so you'll be notified. When i have another video make sure you leave a comment below so i did go ahead and make my chalk markings off camera. It'S basically self-explanatory, but i did use about a half inch of spacing in between, and i know a lot of people say you have to make sure that you don't put your partings very close together. Putting them close together actually really works for me. I don't have any shrinkage in my cap, but because i'm using the 27 piece, i need the hair to be really tapered and really close, laying really closely in the back and that's the reason why my partings are a half inch apart and so i'm going to Go ahead and sew the the 27 piece on to the wig cap i used. I did not double my tracks up until i got to the middle of the of the cap and that's when you're going to see that i started to double my tracks. But right now in the nape of the neck, where the hair is going to be in the nape, i'm i'm going to only use single tracks. You also want to make sure that you back stitch when you begin your stitching and also when you end each section or each line, you want to make sure that you double stitch. Please make sure you keep a seam ripper handy, because there are times when you may have to take your tracks off of your wig cap. Make sure you have that seam ripper ready in order to remove the tracks if necessary and as you can see here, i am just laying the tracks on each line and making sure that i'm sewing very carefully. The video was sped up, so you want to really take your time when you're doing this. You want to also make sure that the hair and the wig cap is nice and smooth, as you are sewing, and if you watched my other videos where i made wigs on the sewing machine, i said that the reason why i yoke i chose to use chalk Is because, by the time i get to the top of the cap, the chalk has basically disappeared. I personally do not like the permanent markers um, the metallic permanent markers, because they are permanent, and i just don't think that that's a good look um personally for me. Um, when i'm done with my wig to have that permanent marker inside of my wig, so i choose to use just regular chalk because it disappears really easily um by the time. I'M done sewing the hair on to the wig cap. But if it's your preference use whatever works for you, so as you can see, i am more than halfway done with sewing um. The lace. Frontal is kind of getting a little loose with all of the manipulation going on, but no worries because i'm going to reinforce what i hand sewed on with the sewing machine. So i'm going to go over my lace, frontal, with the sewing machine to reinforce it. So, as you can see, there is a double track, and this is right about the time where i started to double my tracks, i'm more than halfway done and i decided to start doubling my tracks at this point, as you can see, i'm being very diligent to Make sure everything is laying nice and smooth so that i can sew the tracks on to the cap without there being any puckering or any um hair getting caught in between the tracks or in the sewing machine, and as you can see, i am showing you how I am doubling my tracks here so right here i am going through the area that is closest to my lace, frontal um, so that i can access this area where i need to sew more tracks on. It gets really tight and a little challenging. But if you go in through the area where the end of your lace frontal is it makes it easy for you to access this area, i'm pulling it out through the other side of the opening foreign make sure you stay tuned for part. Two, where i show you how i colored cut and styled this wig also, if you have not already subscribed hit that subscribe button hit that subscribe button, the notification bell leave a comment below make sure you share and hit the like button and right now you can See that i am reinforcing my lace, frontal, i'm taking my time, i'm going over the area that i've already hand sewed on and i'm reinforcing that lace frontal so that it stays down nice and secure and smooth foreign. So the wig is complete. I'M going to begin to cut away the excess cap and i hope that you stay tuned for part two, and i also hope you enjoyed this video and we will see you in the next video you


Comments
Beauty Is My Forte: Thank you so much for this video. I am starting my wig line and I want to specialize in short cut wigs. This has helped me tremendously!
Dr. Joycelyn Williams Thomas: What stitch are you using? (Straight or zigzag, etc)
Nohemy Wilkes: Thankyou , God blessed your hands.
Denise Willis: Hi...I would love to be able to purchase this wig in that exact color, with the burgundy in the front. Would you please give me the information?
Doris Small: Where can i get this wig
Melody Duncan: Pretty
Elnora Downing: What's type of wigs that you are using. Because I am completely bald and would like to try this out
Brenda Watson: Do you have wig making classes?
Rose Poindexter: How do I order this wig?
Charmaine Noel: Awesome
estella buck: hi how can I get this wig
Shaunte Lang: Do you sell units?
Shaunte Lang: What happened to part 2
Maxine Soares: Looks good i love it how.can.i.get one to buy im jamaican.tell me.how can.i.buy one price pleade
Dianna Ferguson: What your price on your wigs
Brenda James: CT