Cutting And Styling A Short Wig Beginner-Friendly Pixie Cut Transformation
Hello everyone, welcome back to my channel!
So in today's video, I'll be transforming my 10'' wig into a beautiful pixie cut wig. Please don't forget to give the video a big thumbs up if you enjoy the video.
Here is the link to the wig video
JUST ONE BUNDLE NO PRE-MADE CLOSURE: How-to/ DIY Closure Wig Side Part https://youtu.be/-oQXwQ49lrc
Thanks for watching!
https://instagram.com/vivianbeautyands...
[email protected] ( For business inquiries)
My second channel https://youtube.com/c/StylebyViv ( Sewing channel )
More videos
How To Natural Texture Hair: DIY U-part Crochet Wig With Leave Out https://youtu.be/kXzGeAApKGs
HOW-TO: Lace Frontal Crochet Wig Using One Pack Of Braiding Hair! |Straight Crochet Wig https://youtu.be/bVY7Ulf9LfU
How To Make A Lace Frontal Crochet Wig | Yaki Straight Hair https://youtu.be/3PMboDarNCs
DIY 2*5 Lace Closure Straight Crochet Wig Using Braiding Hair https://youtu.be/FbjtbxL_1xU
HOW-TO Braided Lace Front Wig With Baby Hair Using All My Leftover Braiding Hair | DIY Ombre: https://youtu.be/dtU2WsZGsBE
HOW-TO: DIY 8x6 Lace Closure Wig With Kinky Curly Human Hair Bundles https://youtu.be/6BKSo9sNpGE
Cutting And Styling A Short Wig Beginner-friendly Pixie Cut Transformation
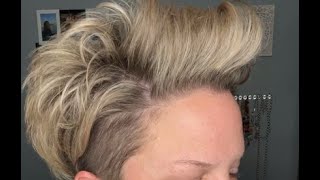
Hello, everyone welcome back to my channel if you're new you're welcome - and i hope you all are doing well so in today's video i'm going to be cutting and styling this beautiful wig right here. So i'm going to be cutting the 10 inch wig into a pc cut. Okay, so i have a separate video that i'm going to be posting on friday, on how i make this beautiful wig right here so once that video is ready, i'm going to put the link in the description box down below so for now, i'm just going to Show you guys how i'm going to be cutting this hair, so to start, i'm going to go ahead and session off the hair, so the part that i'm session of right now i want this very session to be longer than the rest of the of the wig. So i'm just going ahead to um session it and i'm going to braid it just to get just to get it out of the way. While i walk with the rest of the hair so right now, i'm just go so for the first one right here. I'M sectioning off three tracks because i want the back to be like thick, so i'm just section of three tracks at the first line, which is the fourth session. So i'm just gon na go ahead and pull the rest of the hair away just to get it out of the way. While i walk with the bottom section - okay, so now that that is done, i'm going to take my scissors, no scissors, i'm going to take the razor in the comb and first you want to make sure that the hair is tangle free. Oh, i think i did that off camera i've already combed the hair off camera. So, to start again, i'm going to be cutting the hair session by session working with a little session at a time. So by doing it this way you will have your perfect cut. Your perfect pc cut hair so again, i'm just taking my time to gently, cut the hair and also maintaining the length that i want for the wig. That'S right, okay! So now that that is done, i'm moving on to the next session and also doing the same thing, starting by combing, the hair first to make sure it's tangle free. So next i'm going to take the razor and begin cutting. So i'm just going to let you guys watch this video for now and i'll be back when it's time to explain a little bit more! Oh, don't! Let me please be very careful when cutting the hair, because well you don't want to cut yourself so be careful when using the razor to cut the hair cut, hold the hair a little bit further than where you want your hair to stop. So that way, you won't accidentally cut yourself, so just pay attention to what you're doing don't be cutting the hair and doing and looking in the different spots, because you can easily cut your finger off or okay. You won't cut your finger off, but you might cut yourself, so you want to make sure to pay attention to what you're doing let go of my fears and lose my you put it on the inside. So, no matter where the darkness, my praises okay, so i'm done with the back section. So i'm just going in with the scissors to trim up the bottom just to get rid of the fly aways that are poking out so yeah. So you can see it looks. Layered, so by doing by cutting the hair section by session, help you to get a perfect basic cut, especially when you're walking with a long hair. So the one i'm working with in this video is 10 inch, uh hair. So that's why i did a session by session. Okay, so moving on to the next part, i'm gon na go ahead and repeat the same process on this very session, just that on this very part right here. I want the hair to be a bit longer, so that way it can fall towards the front. So, for this middle part or the front part right here, i'm going to be cutting it in a direction on how i want the hair to fall or how i want the hair to look by the time. I'M done so for the ear side, i'm making sure to maintain the same length that i have on the back and also when cutting this part. You don't want to cut it too short. You want to cut it a bit longer and take a look at it and see. If that's the length you want, if you don't like the length or you want the length to be a bit shorter, then you can go ahead and cut a little bit more. But you always want to cut it a bit longer just so, you have the uh you at the end of it, you will have the exact length that you want so again, i'm just going back into cut and trim the hair to the way i want it To look so again, i want the hair to kind of do like a swap motion. That'S why i'm cutting the hair this way and also make sure to comb the hair while cutting the hair so cut a little bit comb it and comb it towards the direction of where you want the hair to fall and see how it's looking, if you're not Liking, how it's looking go ahead and do your adjustment. So that's why you need to cut the hair session by session, because if you make mistake on the first session you cut on the bottom, you can use the next one on top to kind of correct the mistake again, you want to make sure to cut it. A bit longer at the beginning, so that way you can go back in and re-adjust the length if you want okay, so right now, i'm going ahead to uh work on the last session, almost done so right. Now, i'm just going ahead with the scissors again to trim the bottom part of the hair. So here's how the wig is looking after cutting the hair. So next i'm going to be styling it to my liking. So to do that, i'm going to be using a styling mousse to kind of mold the hair and shape it the way. I want it to look so i just pump the uh the foam on my palm so right now, i'm just going ahead to apply it on the hair so to distribute the most on the hair, i'm going to be using comb and i'm going to take the Mousse, just as you can see right here and comb through the hair, so this will ensure that the most get into every single strand, so the styling must we have to start shape the hair and also straighten the hair. So by the time the hair dry. I comb it, it will stay straight and if you don't have the styling most, you can use a flat iron to straighten the hair, save my life, and now i see something new. Don'T let me run for you. You gave me okay, so i'm done applying the uh, the mousse on the hair, so i'm just gon na let this air dry overnight and in the morning once it's dry, fully dry, i'm gon na comb out the hair okay. So it's still wet. So it's not morning yet this is just a close-up of the uh of the hair. Okay, all right! The hair is fully dry and it's the next day, so i'm just going to take out the clip and comb the hair. Just look at that. It'S so soft. Just look at that so beautiful as you can see, the hair is straight and flat, so that would definitely do it. If you want your hair to be flat, if you want the wig to be flat using this, the styling modes will help you get. That will help you achieve that flat. Look on the hair, as you can see, the waves are going nowhere because the styling moves already, you know, tamed everything in place. I love it. Okay, so, like i said earlier at the beginning of the video i'm going to be posting the video on how i made this wig using just one bundle of hair guys. Yes, i made this beautiful wig with just one bundle of hair, so you see the closure part right there. I made that closure from that same bundle of hair, so the video will be up on friday, so be sure to tune in on friday. If you want to know how to make a wig with just one bundle of hair, how to make a natural looking wig with just one bottle of hair, when i say natural, looking wig, i don't mean the blue one, the the outcome will be natural. You can use whatever color you want, but the results is what i'm talking about just one bundle of hair, all right. Okay! So thank you guys so much for watching. Thank you so much for popping in today, if you're new to my channel, please don't forget to hit the subscribe button down below if you already subscribed. Thank you so much for subscribing and don't forget tune in on friday for the juicy video all right.

Comments
Claudette Ellis: Perfectly done,gods given talent bless up sister.♀️
Jmac: Looking forward to seeing how you made it and mostly looking forward to seeing you styling it.
JoyVera Nwokoye: Vivian... You're amazingly unique
Pixie Dust: Damn your so talented. I literally can't deal with all this talent. Thanks for sharing
K Frank: Nooooo you never show us how to wear and style it in the same vid lol It turned out beautifully ! I love your channel
Immaculeta Ebere: Beautiful
Asantewaa Victoria: Beautiful
Miss k: Can you do the same wig with a crochet wig method ?
Stellamaris Alex: Do you have a tutorial on pixie cut without closure?
A&O WALES: Can you share what materials to use to make a TOPPER THERE'S A LOT OF PEOPLE STRUGGLING WITH THINING HAIR BUT CAN NOT TOLERATE A FULL WIG. And prices are too high but checking many many videos . And YOURS ARE SO EASY TO UNDERSTAND & your skills are OUTSTANDING. PLEASE KEEP THEM COMING .
Emmanuella Oyoyo: Is there a video on how to style the cap to the sharp of your head ?
Apim Shulammite: Can u use the styling mousse for the crochet extension braid hair
Lanna Janae: wow
Zoey To The World: Please do a tutorial on how you made the wig
king unknown: My boss I love this
Dante Velasquez: Technically that style is called a shag. That is some precision cutting and styling there!
Cynthia Diogo: U re 2 good...love u
Konah Tarpeh: We're you located please and are you selling it?
Nzeh Victoria: Please help me spell that styling moss....Is my spelling right?