How To Clip In And Blend Hair Extensions For Short Hair
#CLIPHAIRLIMITED #CLIPINHAIREXTENSIONS #HAIRTUTORIAL
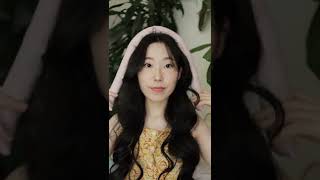
Today I'm going to show you how to blend short hair into clip in hair extensions using Clip Hair Limited 18" Double Weft Extensions in their Lightest Blonde Shade, as well as how I style my hair everyday! This video was NOT sponsored by Clip Hair Limited.
Want to purchase a set of these extensions?
Shop Here: https://www.cliphair.co.uk
Watch Clip in Hair Extensions for Red Hair here: https://youtu.be/m24LaIGLCZc
Watch Messy Buns For Short Hair here: https://youtu.be/xs63zPewCzw
Watch Fall Hairstyles Video here: https://youtu.be/cTMtAeFDIk4
Say Hi on Social Media!
♥ instagram - https://www.instagram.com/emilyyorland...
♥ SHOP MY STYLE - https://liketoknow.it/emilyyorlando
♥ facebook - https://www.facebook.com/EmilyOrlando...
♥ snapchat - em.catherine
♥ twitter - https://twitter.com/emilyyorlando
S U B S C R I B E ⇨ https://www.youtube.com/channel/UCKYD...
BUSINESS INQUIRIES & SPONSORSHIPS ⇨ [email protected]
D I S C O U N T C O D E S:
Chloe vs Tank Boutique:
15% OFF Your Purchase
use code EMILY15
Teami Blends: Use Code
EMILYO15 for 15% off Purchase!
SIGMA BRUSHES:
Want to grab some of my favorite Sigma Brushes?
USE CODE -EMILY- AT CHECKOUT
Click the link: http://sigma-beauty.7eer.net/c/372445...
LOVING TAN
USE CODE emilyyorlando
FOR FREE MITT WITH MOUSSE PURCHASE
DOLL 10 BEAUTY
USE CODE : EmilyDoll15
for 15% off your purchase!
*some codes or links used may result in a small commission for me*
What'S up guys and welcome back to my channel so for today's video I'm going to be sharing with you guys, my everyday hair routine, using my all-time like favorite extensions, I've had a lot of people request. This video requests. How I do my hair, because I've been wearing my hair like this for about two months now, and so many people want to see a tutorial so today I have done that for you. So, if you'd like to see how I achieve my hair just like this and just keep on watching, because we're gon na get started so in today's video, I'm gon na be sharing with you guys how to apply extensions properly, while hiding your hair, especially if you Have short hair like me, it is almost impossible to make it look like you're, not wearing extensions with short hair, because you usually get those pieces that show or it just looks like you have a line of hair and then long extensions, and you don't want that Because it's super obvious that you're wearing extensions and there's really no point in wearing extensions if it's super obvious, so I'm gon na show you some techniques. I'Ve learned along the way about how to hide your hair and how to get it to blend these extensions that I'm wearing are from cliphair limited now. I have talked about these in the past before when I had red hair. Since then, I've learned a lot more tricks, so I wanted to do another video, showing you guys, like an updated version of how to apply clip-in extensions to short hair. These extensions that I'm wearing are in their shade lightest blonde. They are the 18 inch remy double wefted clip in so, if you have thick hair double wefted is what you want to do, because you need as much hair as possible, and these are pretty thick. So these are the lightest blonde shade. I do want to note that I did tone them. They came a little bit yellow for my liking. My hair is usually toned very cool tone, so today, I'm gon na show you guys how to properly blend these in and also how to get this curled hair. Look alright, so the first thing that I do to get ready for my extensions. It'S obviously brush through my hair and I'm going to start by parting super-low at the very bottom of my neck. So there's just like a tiny little area of hair just enough for some extensions to grab onto and I'm just gon na take a ponytail and just you know keep my hair called up like that. So I hope this little section down here of hair and instead of a clipping the extension on top of it, I'm actually going to lift up this piece and clip the extensions at the very nape of my neck. The one that I'm going to use is the there's two three clipped wefts one is longer than the other I'm going to take the shorter of the two. So this one here and I'm going to lift up this piece of my hair and clip it into basically like the roots there. So there's no hair underneath this extension, it's just being kind of secured right underneath in that section of hair. So you can see now pretty long, but you can see now how that section of hair is now sitting on top and there's no short pieces that are going to show underneath here. So I'm gon na take another section up, I'm not doing anything yet with styling and I'm going to take another section still below where my ears are so we're not going like any higher. Probably like, I don't know middle of where my ear is and I'm taking. I'M gon na pin this up again, but now what I'm going to do is take this section of hair that is hanging out and I'm not gon na curl it I'm actually going to pin it really tight to my head. So I'm going to twist it into a really small bun. Another option is you can braid it if you want, but the point of what we're doing right now is to hide all this hair, so I'm actually twisting it into a small bun. In the back of my head right, along where the weft is sitting, so it's really close to where it was clipped in and I'm gon na take some bobby pins. Now you can take a rubber band and pin it, but you want to make sure these buns are really tight to your head. So I prefer to use bobby pins to pin it down and keep it out of the way and when it's finished, I'll kind of show you what it looks like it's gon na look like a mess but you're, not even gon na see it in the hair And no one's gon na notice that you have all your hair pinned up. It'S just gon na be like your little secret, so I always have tons of bobby pins. It'S probably best to use ones that are your hair color, but all of mine are just mixed. In a jar right now so do as I say not as I do you know, so it's it feels pretty secure and I'm gon na show it to you what it looks like. So hopefully you can see sort of what it looks like it's just a very small pin of hair just tucked away. So once I have that going and it's pinned now, I'm gon na focus on this section of hair. So I'm using my one inch, hair wand from Lund. You guys notice my favorite hair one. I'Ve been using it for like three years now. I think it's been and what I'm gon na do is take very small sections. So it's already kind of pretty cool curled from a last style. I did I'm gon na actually do something different from this style. So I'm gon na take very tiny sections about that. Big and my first section I'm just going to curl around, but I'm gon na leave a good amount of hair out at the end. You can see how much a good section of hair and I'm going to let it sit for a little while only because my last style I did, I have a different curl in so I want to make sure that it really gets the curl that we're going For so I do very piecey curls when I use these extensions and now you can see that's pretty tight and it's totally fine, let it be. I know it looks ridiculous. We will fix it. It'S not gon na, be this like crazy little Shirley Temple curl, we're gon na do something with it. So the next piece what I do is I actually am going to curl it the inverse way. So I'm curling this piece towards my face and again leaving out the ends, so it's very similar to how I curl my normal natural hair, I'm just doing it with my extensions. This is gon na create a very beachy PC, like sexy, looking hair and especially for the ones that are the opposite direction. If the extensions or your hair is already curled, give it a little bit extra time, so it can really fall into that shape. All right. So the hats on that piece looks still very crazy, but you can see now they're both going separate ways and you're literally just taking very small pieces. It does take a lot of time, but this is how I've been doing my hair for the past few weeks, and this is like what everyone has been commenting on and asking for tutorials on. So this is how I achieve it's a lot of work, but ends up looking just so good at the end, all right so now that that is completely curled. You can see how it looks, we're still gon na leave it how it is so. I showed you that there were two sets of three clip weft one shorter one. Longer we just put the shorter one in now, I'm gon na go in with the longer one. So this I'm gon na clip right over top of the bun. So we almost pretty much, can hide it or conceal it. I'M going to show you how it looks in the back now hiding the bun, and you may still be able to see bobby pins, keeping her and stuff, because there's only two layers of extensions and but those will be hidden later on. So here is a back view, so hopefully you can't see too much, but obviously you guys know what's there so again, I'm going to do the same thing with me next set, so I'm just gon na take small pieces and I'm going to curl them the same Way, I did the bottom layer just alternating the way that you curl so either away or towards from your face every other curl and leaving out a good amount of hair towards the end, all right. So we're done with the next layer and now we're going to move on by taking the next section of hair. So at this point I am going to start taking hair just above the ear and again I'm gon na pin that up just to keep it out of the way. However, you prefer to do it, so we have a little bit of hair down a little bit of hair down in the back, and the next step, I'm going to do is take a shorter three clip wet, so we're going back to the one just like the Very first one we put in and we're going to clip that into the back the key it's a blending. Shorthair is to have most of the hair that you're working with covering the back of your hair, because, typically, we don't have tons of short layers in the back. They'Ll probably be more towards around our face like face frame and stuff that looks more natural, but also to sort of camouflage this hair into the mix. I'M going to take these two very small clipped website have two clips, so I'm going to clip this right in here and I'm going to take this piece and it same on that side and we're just gon na do the same thing with that hair. We'Re just going to start by taking small pieces and any time you are close to the edge of your face, always curl away for this look instead of towards your face. I have also included my natural hair into this curl right here, so it should blend nicely because we didn't take a huge, thick chunk of hair. We just took very fine little like face cream hairs when you're dealing with pieces that you put in the back and can't see. I always just part my hair down the center and then push it all forward so that I can see any piece that needs to be curled. Okay, so I'm finished with my this layer and now I'm going to move on so at this point I'm gon na take some hair just near my temples and go all the way back and again just pin up tie up the rest of the hair. So now I'm gon na take the next longest, three clip weft, so there's two shorter ones and two longer ones. So this is one of the longer ones and I'm going to place this in the back. I'M not going to add any clips to this section of my hair, so I actually am just going to take these pieces and curl them first and then that way they can just kind of tuck right in and blend in. So after that, I'm going to start curling my hair, the same way we've done it we're just gon na take that weft of hair and curl it into the natural hair that has been left out. Okay, so at this point is when I take the rest of my hair down, and I part it the way that I want it to be so. However, you part your hair is fine. I usually do mine a little bit, off-center a little bit more side parted. So we have all this hair up top. It'S super obvious that I have extensions in so at this point is when I take the last two wefts that I have so these are two clip weft, but they are longer than the two could clip wefts that I put here. So these go, I'm going to show you exactly where these go. I'M gon na figure out which one goes on, which side? I think this one belongs on that side. So how I usually part this is. I take some hair towards the front and I just clip it close to the front as possible without it like being noticed, and then what I do is I start curling the hair into my natural hair. That was just underneath that and because this side is so close to my face, I'm gon na take a few pieces and curl them away before I take a piece to curl it towards, because I don't want it to be too close to my face that we're Changing up the texture and then what I do once I get towards the back where my natural hair is is where I start to curl some of those pieces with the short ones. I do. I don't leave quite as much out at the ends because then I feel like it gets to PC with the short hair, and then it sticks out all different ways. So I do tend to curl the ends just a little bit closer than what I do with my extensions all right so now that that layer is done, I'm just going to pull the hair array over top and it looks so crazy right now. It'S not blended, but we will get to it. It just takes some time so with the top layer. I also like to add a little bit of texture as well, so I take small pieces and I just wrap them very delicately. It'S up to you, like you know how much curl you want on the top. If you just want a little, if you want a lot and with the top layer, I don't do every other piece going different directions, I'll just sort of mostly do them away from my face, but I will take a few pieces and curl them towards just to Give that texture I feel like when you add texture, it helps to hide the weft a lot okay. So now I have finished curling the top layer of my hair and at this point now all the extensions have had time to cool off. So what I'm going to do is actually run my fingers through the curls to smooth them out a little bit, make them look a little bit more relaxed, but they're still going to have that like really pretty wave to them all right. So at this point in my hair and now that everything is done, I actually do take a flat iron and I'm going to smooth out and straighten the ends of the hair, to give it more of a beach, your piece, your vibe, so I'm going to show You they already are kind of straight, but I feel like when you just run it through really gently. It just gives it a little bit more definition at the ends and then also I'm going to take it at the pieces up top and I feel like it. Just kind of softens it a little bit so now it's a little bit more relaxed and I'm gon na add a little bit more texture and I feel like this is really what makes it all look the way that it does so take some sea salt spray. You can take any sea salt spray that you want. This is the caviar resort to see tousled texture to hair spray or spray, not hair spray. So I've just been using this because it's just what I have in my collection, so I'm just going to kind of spray those pieces. Now I don't do this every time, because this sea salt spray is going to make it them very dirty. So if you are using the salt spray too often, then the extensions are gon na get dirty. You'Re gon na have to wash them more frequently and it can be a little bit damaging and drying to the hair. So just be careful not to do it. Every time - but I haven't done the salt spray since I've washed these, so I feel fine to apply a little bit right now, I feel like it helps give them a little bit more texture, a little bit more life. So finally, what I like to do is take some hair spray and I spray the front of my hair just to keep those pieces down. So if the wind blows, you don't see my tracks and just kind of spray, the top with it. You can spray a little bit throughout the hair. But now I feel like you've got this great texturized hair and it makes it a little bit fluffier and voluminous and I feel like it doesn't tend to look like hair extensions, so that is it for this video. Hopefully it was helpful to you guys. This definitely can be obtained like this hairstyle, even if you don't have clip in hair extensions. Obviously, if your hair is long enough to curl, you can still do the same thing. It'S the same steps. Obviously, your hair, just gon na be longer or shorter, but it's going to be giving you this like very piecey texturized beachy vibe, and this is really honestly how I've been doing my hair for the past like two months, so I've been really enjoying it, I'm getting So many compliments if you want to pick up a pair of these extensions, make sure to go down below in the links below again. It'S not sponsored. I don't get anything from you guys shopping through these links clicking on the links, nothing. I just genuinely really love these extensions. Thank you guys so much for watching and as always, if you are not already subscribed, make sure to hit that subscribe button down below give this video a big thumbs up, and I will see you guys next time,

Comments
kim f: Gorgeous! Did you apply any products before curling? I have fine, thin hair that doesn’t hold curls very well. Do you think the sea salt would be good to use or what do you suggest?
kanika Johnson: clear small elastic bands where you put the clips tie tiny piece of hair and underneath so you cant see your own coming through
emily calyn: Wow it looks amazing! I can’t even tell...I’m a small youtuber too! We should support each other!!
Katerina Gketi: Adorable!!!
Mary Mosley: Wish you would have shown the back