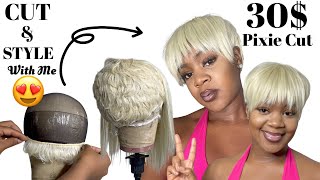
Watch Me Slay This Blunt Pixie Cut Wig | Featuring Outre Velvet
Hey Guys!
Please subscribe to my channel. Click the link below.
https://www.youtube.com/channel/UCKs2G...
In todays video I am showing you some of my key techniques and methods I use to construct my custom pixie cut units. This is only my 3rd time constructing a DIY unit and the 3rd time is most definitely a charm. This unit is constructed with human hair, so I am able to apply heat when and if necessary. I plan to keep this unit for quite some time. Below I provided a direct link to my previous pixie cut video and that gives you a different style option for your pixie cut. Also, below is the link to a video I would suggest you watch to help with cutting and using a razor properly for your unit. Thank you for stopping by and I will see you in my next video.
Previous Pixie Cut Video:
Watch this video for help with cutting:
LIKE - COMMENT - SUBSCRIBE
_____________________________________________________________________________________
Social Media:
Instagram https://www.instagram.com/gabbysqueend...
For business please use my email:
#pixiecutwig #27piecewig #outre
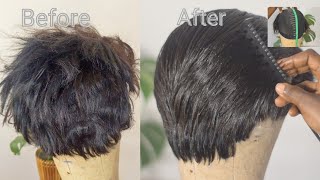
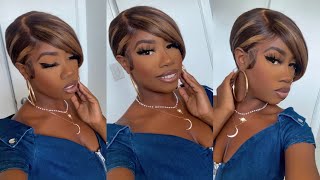
Hey beautiful people, its Gabi, welcome back to my channel, so I'm gon na go ahead and just get right into the video. So for today's video I decided to switch it up a little bit. I have had a protective style in for four weeks. It is my previous style that I posted on my youtube channel, but the style was so cute and so low-maintenance that I decided to keep it in for four weeks. I am a natural girl, so typically I do natural hairstyles and then protective hairstyles, such as braids twist or any other protective style. Now this cut is transformable in this video. I'M going to show you the two Styles: you can do with this pixie wig and now have it featured another pixie wig on my youtube channel before, and it was basically like, I believe, my second time trying to attempt a pixie cut and actually being somewhat successful. So this go-around - I was like you know, I'm a parole or whatever, but basically I felt a little bit more comfortable attempting this particular hairstyle this go-around. So I'm definitely feeling this love definitely is going to be rocked this summer, rocked this spring perfect for both occasions and my birthday is coming up May 16th. So I might just switch it up and do something different and outside of the box similar to this. But I haven't made a complete decision on that. Yet if you don't already know, I did not go to cosmetology school, so everything that I am doing, I'm just you know watching a youtube, video and trying to mimic whatever techniques that I see them doing. Basically, and then you know just a little bit of freestyle at it in there as well, so of course, this style is not meant to be perfect, but it's definitely perfect for me and I am definitely going to rock this unit. Ok, so if you guys attempt to try out this style based on this video, let me know how you how it turned out, either on instagram or down in the comment section below. So I'm excited to share this video with you guys today. So, let's get into the video, so here's a look at the hair that I'll be using to construct this unit. It is by altre and it in the lens two four and six, and it's in the color of one B, I'm going to be using all three lengths which you see here and we're gon na start off. First, with the four inch and move to the two inch and then place the six inch alright, so here is the dome cap that I'm using to construct this units. This is the same dome cap that I showed you the exact name of it in my previous video, so check that out for additional details, but it's just a normal mesh dome cap now here outlined on the dome cap. I have some guidelines for you in the back. You want to make sure that you are using the guidelines to basically help with track placements and make sure that your tracks are not too close or not too far apart and then also when it comes to laying your hair. And you want to make sure that you start off with the two with the four inch in the back first move on to the two-inch and stop at this guideline that you see right here and then, of course, I'm freezing frame here, because you want to use This horseshoe guideline, which goes from your two eyebrow arches, a little outside of your eyebrow arches. You want to use this to construct that blunt cut in the front. Okay, so make sure that it's wide enough so that it'll give you that full coverage you're looking for now in this area. Here I align my ear where I'm going to cut this off at the end of the video to help with the fitting of this unit and to make sure that it fits right over and my ear very comfortably. Alright. So when it comes to constructing this unit, he's just gon na start off exactly like how I have here we're gon na go ahead and take this four inch bundle and we're gon na work it from ear to ear. So here I'm just gon na speed. It up a little bit, but you're gon na take this straight from ear to ear. It will, like you, see me doing here all right and, as you can see here, I've made it to the other side of the ear and we're just going to cut off the excess hair all right and then just secure that area and we're just going to Move forward with the rest of the construction so again we're gon na start off with the four-inch first and make sure that we're going around the ear, not through the ear, because we want to cut off the air at the end for a much more secure fit. All right so make sure that your placement is exactly how easy it here. I did go a little bit more detailed in my previous pixie cut video as far as the construction. I'M so definitely refer to that video. If you need to alright - and as you can see here, I'm just showing you how I'm going straight through after I've applied the other two tracks previously we're going straight on top of the arch of the ear that we made on that outline so yeah. This is just gon na help with making sure that the unit is custom to your ear shape and making sure that it fits comfortably. So once you are done with the four inch which you see, only the four inch is right here. We'Re gon na move on to applying the two inch and again we're gon na take this two inch bundle which you see in my hand and I'm gon na move it. I'M gon na work this in straight up to that horseshoe and we're gon na stop at that horseshoe. Okay. So I just I'm trying to emphasize that when it comes to the placement of the tracks, you want to make sure that you place the four inch bundle. First, you can use all of it. You can use some of it. There are five tracks. What you see here per bundle, although I did have six tracks for the six inch, so that was really really awesome. Alright, so here I'm just laying the two-inch and we're gon na take that all the way up to the horseshoe and then it within the horseshoe we're only gon na use the six inch and trust me. One pack is enough: it's gon na work out and all you have to do at that point once you're done, constructing the unit is just focus on cutting the unit. So here is the back with the four inch at the bottom and the two inch at the top, so yeah really full and definitely had some hair left over as well, and I'm just finger combing the unit. So you can see how full it is alright. So here I'm just showing you how I'm gon na start to lay the tracks parallel to the edge of the dome cap. So I'm just gon na lay it parallel until I get to a certain point and then we're gon na circle it out and finish it off with our closure piece, which I will show you alright. So, as you can see here, I've laid my first track and we're just gon na keep going up and then at a certain point you want to stop and start to form a circle which you see here so that track piece. I'M going to start to go around in a circle with the rest of the hair and then we're just gon na secure it down with a closure piece which you see here. It definitely fits right in and it's actually relatively large. So it definitely gives you a flatter install and you don't have to do much work. So when it comes to cutting this unit guys, I went a little bit more detailed in my previous pixie cut video, but I want to show you how I cut the back. Just a little bit just make sure that you use a razor comb when it comes to constructing this unit and, honestly, just just follow what I'm doing here. This video is not a how to do a pixie cut video, but just my methods and some techniques that I use to construct my units. Of course, if you are looking for detailed information when it comes to cutting the back of your hair, make sure that you refer back to my previous video, but when it comes to this video, this is basically how I cut it. So I did one cut in the front a little longer, then I actually wanted the hair to lay, and then this is my second cut where I want the hair to basically fall okay. So after this we just want to start to kind of form the bow cut in the front, so I'm just gon na keep cutting, and you know this is just my process. I'M sure that once you get started, you know just take your time and eventually you will get through this process. Just like I did and just see, you know, add a little bit of freestyle in there as well also to help you out with cutting and razoring. This unit, I'm gon na refer, refer you to a video from Million Dollar Baby, where she shows you perfectly how to cut and construct a unit similar to this so definitely check that out in the description box below alright. So here is the unit flat iron and then we have the unit completely constructed. So this is how the hair looks and I'm absolutely satisfied with the finished result. I think I did really good when it came to the construction of this unit and it looks really really amazing and fits so snug on my head, so that is super awesome, alright, so yeah. I really think that this this unit came out perfect. So, as I mentioned earlier, you can do two different styles with this unit, so you can either wear it straight like this. Okay, you can do a soft combing of the layers or you can feather it out even more it's up to you, but it's all there for you to be able to do whatever feels comfortable for you here. I just did some light layers. Alright, and as you can tell, I am really filling this unit - I am definitely loving how it came out. I feel so comfortable constructing these units going forward and you'll definitely see a couple more pixie wigs coming soon, but I really hope that you guys enjoy today's video. Definitely stay tuned for more content from me. Subscribe leave your comments down in the comment section below. I love you guys so much and I will see you guys in my next video bye guys you

Comments
SupamanAdventures92: Cool video sis!!keep up the good work seriously