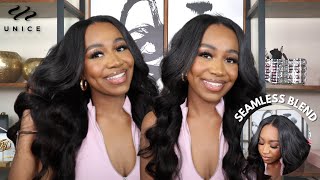
Amazon Unice U-Part Wig Install - Body Wave & Beginner Friendly
I bought this U-Part Bodywave wig off Amazon for $87. It was easy to install and affordable. You can't go wrong with this 16in natural looking wig. Thanks for watching and let me know what you think . #unicehair #upartwig #protectivestyles #unicehairstyles
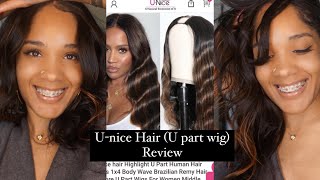
UNICE U-Part Body Wave Wig 16 in - https://amzn.to/3NtFxiZ
Disclosure: Links contain affiliates. When you buy through one of my links I will receive a commission. This is at no cost to you. Thank you for supporting my channel and allowing me to continue to bring you valuable content.
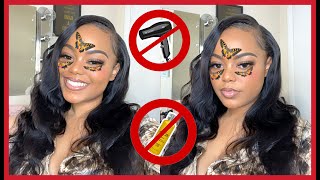
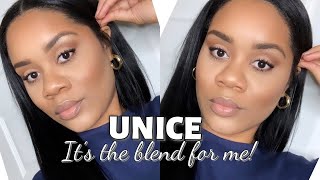
If you want to see me, go from this to this stay tuned, alright, so welcome back to my channel guys, let's just jump right into it today. I have this you, nice body, wave wig. I think that i did get this in the length 16 inches or 14 inches i'll link everything below for you through amazon. This was a very affordable. You part wig and, as you can see here, it is brand new, so i am going to go ahead and cut the lace off so that we can start installing. This is my very first time wearing a u-part wig, so i am extremely new to the game. So please don't y'all judge me we're gon na make some mistakes here, of course, i'm sure and uh, but eventually we'll we'll end up getting it right. So let's just go ahead and cut the rest of this lace off. As you can see there, the clips on the inside it does have some lace at the bottom that we still need to get rid of. So i'm going to go ahead and also cut that off all right. So let's go ahead and start parting. The middle section of our hair - this is going to be the area that i'm going to leave out as i'll do a middle part. So you see me just parting, some of my hair out, so that i can pin and braid the rest of it up. I'M gon na go ahead and take this you know small piece of hair and clip it up make sure it's out of the way before i start braiding, all right so for my braids today, i'm going to do this very simple, as i just want to try This wig and see how it actually looks with me, so i'm going to start by detangling. My hair with my detangling brush make sure that all those tangles are out get the other hair out of the way, and i'm just going to put these into two like pigtail ponytails that are with braids just to get it out the way and be able to Clip it to the back so that the u-part wig lays flat. So you'll just see me here, braiding my hair straight down and we'll do that on both sides and pin it up to the back and that's how we'll wear our hair underneath this wig. So, oh all right! So here's the u-part wig as you can see the clips here, there's one two, three four five and one in the very bottom, which would make six clips all together for you to secure this u-part wig down, i'm gon na start by placing it at the top. First, as i think, that'll probably be the easiest part and then i'll be able to pull it down in the back. But i have one piece down and then i'm going to attempt to go ahead and just finish. Placing those clips into the front area and trying to secure it as best as i could, because, as i mentioned earlier, this is my very first time putting on a u-part wig. So i'm just putting those three clips in first and then i'm gon na go around my head and just kind of strategically put the other clips in to wherever they feel most comfortable, so that the wig is secure. I can tell y'all just from trial and error with this the next time i get ready to wear this out for the full day. I'Ll probably do maybe four to six big cornrows just so those clips can slide in a little bit easier because it wasn't the easiest install process with my hair being braided in those two big braids. So i would definitely suggest to you know, put in some actual cornrows just so you can have that extra security, but, as you can see, i'm just combing this hair out right now, and this is actually some really beautiful hair. I had already pre-curled the hair prior to me coming on camera, so i had some curls in there for about a day or so before. I actually combed them out and i'm just going to go ahead and put my part in the middle so that we can see how this is actually going to lay when it's all said and done. So i'm just going to go ahead and pick up that detangling brush just to kind of help blend my hair into the extensions itself, as you can maybe see the hair kind of leans more towards a number two and my hair is like a 1b. So, there's a little bit more of a brown streak within the u-part wig, but once you actually blend it with a brush or some type of detangling brush to kind of help, your hair, in a weave with the actual wig you'll, be just fine. Look at that. Pretty curl and look at that length, it's the perfect length for just a natural look, so i'm just blending it in but, in my opinion, y'all. I think that's a pretty good match. What do you think? I think that my hair, you can tell is just a tad bit darker, but the body wave hair itself looks really good and pretty natural for a match of relaxed hair. So there's just a few pieces that needs to be curled just to help blend and i'm going to use my tresemme heat protectant definitely want to make sure you're using the heat protectant when you're putting heat on your hair or on your extension hair. It'S just something that you should be in the habit of doing i'm just going to take that curling iron and just go ahead and create a couple of curls there in the front just to help that one side, because that was my side. That was going opposite from my wrap, so i'm just going to help that blend a little bit more on that one side. Only so all right, so we're back y'all and we are ready for the day. What do you think i'm actually in love with it? This was such an effortless look. It took me about five minutes to install it and the hair is really gorgeous for this to be like a eighty dollar wig i'll, be sure to comment and link everything below. But let's chat about this look tell me what you think. Thank you all so much for watching this video. Please make sure that you like comment and subscribe to my channel if you're interested in content like this - and i will see you all later - bye - you
Comments
Yaketta Evans: I love it!