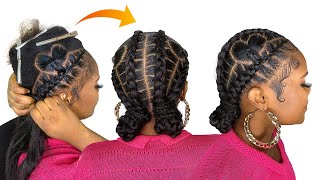
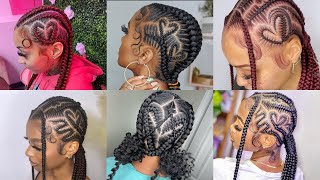
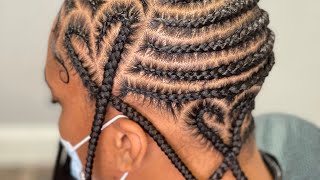
Trending Heart Braids Tutorial | High Ponytail With Weave + Blonde Skunk Stripe
- Posted on 14 February, 2022
- Ponytail Hairstyles
- By Anonymous
I decided to do a last minute hair tutorial for Valentine's day and thought it was the perfect time to try the braided heart trend. I hope y'all enjoy and if you do, please be sure to like, comment, and subscribe! We're almost at 1k!!
Connect with me!
instagram: https://www.instagram.com/1tiffanylee/...
twitter: https://twitter.com/1tiffanylee
Check out my last video here: DOING NATURAL BRAIDS WITH BEADS ON MYSELF
https://www.youtube.com/watch?v=7sT1Xk...
Thank you for watching!
Know if y'all got a valentine or not, i know i do the money, i'm in love with the bag. I don't know about y'all, but yeah. I'M in love with the money is my camera cook it or is it just me? What'S up y'all, it's tiffany lee and i'm back again with another video. Today'S video is going to be another hair tutorial. I feel, like i've been kind of on a roll with these, so i figured why not keep it going. You know valentine's day is right around the corner, so i figured we'd do a little valentine's day style, so i'm just going to be doing a little extended ponytail with a little heart design on side, not sure if i want it on the left or the right Side but we're going to figure that out deeper in the video, so i don't want to do too much. Chit chat - and i always say this because i always end up rambling in my intro. So without further ado, let's just get started. Okay, so, as you can tell, my hair is already straightened um. I straightened it last night just so i could cut some time today so, like i said we're just gon na get started. I never did this style before, just like every other style um. On my channel most of the time, if i do style, my channel is the first time i'm doing it. So i guess just wish me luck. Um. I really wanted to try this heart trend for a while, because i just think it's so cute and, like i said it's valentine's day like i know, the heart trend has been around for a little bit, but it's valentine's day. So i felt like this was just most appropriate to do it, so i'm just going to pull up a picture really quick, just to help me figure out where i need to place it and i'm probably just going to speed up this part uh. So, oh, okay, so my hair is looking a little crazy right now, but i pretty much have the section parted out where the hearts gon na be, i think it's even it kind of looks crazy on camera, but i can't tell it's: just gon na have to Be good enough because i've been working with this off camera for a minute now and yeah, i think, maybe, if i just like round this off a little bit. Okay, i think that's good, so i'm just going to section off the part that the ponytail is going to be in and then i'm going to separate these two in sections so that i can begin braiding in a heart motion. Thank you come on okay. So now i'm gon na get into the actual ponytail part, so i already laid out the edges, but i'm just gon na comb them out just so i can get the ponytail where i want it to be in my mind and begin brushing. My hair back is so at this point i kind of gave up on trying to explain what i was doing while i was doing it because i just felt like i couldn't multitask and focus on what i was doing. I kept messing up, so i decided that at this point i would turn this into a voiceover. So, as i mentioned, i'm just gon na be sectioning off my hair. Just so i can lay it flat and make sure that my ponytail is okay um. So, as you can see, i'm just doing it in sections using got to be and then brushing it and re-flat ironing the pieces that i need to, and i forgot to mention that, in addition to got to be, i'm also going to be using some murray's edge. Wax or beeswax, i think it is, and um edge booster, i'm still smoothing everything out at this point and honestly, i feel like this is the hardest part just trying to make sure that you have a nice flat ponytail that lays flat, because you don't want any Lumps or anything you really just want to take your time with this part. So what i like to do is put my hair in like a loose ponytail, first, just to act as a mold before i set everything in place and then i'll just like brush everything down like after i'm done doing my sections and then i'll put it in The final like tighter ponytail, so this is what everything looks like all slicked down and held together and then i'm just gon na beginning laying my edges down and then we're gon na get into doing the extended ponytail. I was about to begin laying my scarf down just so i could lay my edges down. While i put the tracks in and then i realized that there was the braid hanging out, because i was supposed to put it in my ponytail. So you can see by my reaction. I was pretty sick, but it was an easy fix, because all i had to do was just get another rubber band and hold it in place. But i was still sick, like you really forgot to put that in with the ponytail after you did all that slicking down like imagine, i had to take the whole ponytail down just to put the braid in, but you know. Luckily, all i had to do was just get another rubber band and put it on top, so it wasn't really a big deal, but now i'm just gon na be laying my edges down and just getting everything else out the way. So i can begin braiding my hair and then we're gon na put the tracks in so now that my hair is all braided. I can begin adding in my tracks, so i'm just using the organique uh bundles that you can get at the beauty supply store. They come in 30 inches and i'm using 613 and 1b because my hair is blonde in the back and then i have the black on the front. I just wanted to keep that skunk stripe going uh, just like the video i did a couple months ago on my channel of me doing the other ponytail when i first had dyed my hair blonde in the back. So that's why i'm doing two different colors. I just like the way it looks, so i just wanted to keep that going so now that i finished the blonde, i'm gon na begin doing the black about halfway through and i i know some people like when they do their ponytails. They like to um, wrap it around with the paper and then they glue their tracks in, but i don't really keep my ponytails in for that long. So i just like to use bobby pins, so i just make sure that my braid is nice and tight, and then i place the bobby pins throughout my hair um throughout the tracks, wherever i feel like i need to, and it is pretty secure for the time Being so, i just like to use that method, and i do want to say that this hair is like perfect for ponytails, because it's only ten dollars and, like i said if you're somebody like me, you don't like to keep your ponytails in for that long. It'S perfect because i don't see that point in spending a bunch of money on expensive bundles unless you have like leftover bundles, but it's just not worth it. Spending that much money on bundles just to do a ponytail. So i just like to use the 10 packs from the beauty supply store and it gets the job done because it does stay in good condition. As long as you wrap your hair up and brush it whenever it's needed, because obviously it's going to tangle up a little bit because of synthetic hair, but i've never had it. Look too crazy on me. You know, like it always lasts for the time being. So for these last few steps, i'm just going to be adding some do girl, hair polish just to add some more shine into my hair and i'm just going to be using some got to be to set my hair and i'm going to be taking a piece From the back and wrapping it around just to cover the tracks and the pins, i was kind of struggling a little bit because my arms were getting tired and the hair kept getting caught in the bobby pins, but i eventually got it together. You know, like i said it's, it's synthetic hair, so it's it's not gon na. Be that easy, but it's worth it. I promise like it ended up looking good in the end. So i'm just finishing up my final steps and then you guys are gon na see. The final end result all right. So after three million light years, um is my camera crooked. Or is it just me? Okay, that looks better, so i'm just gon na quick um. I think i already put some of this on my hair already, but i'm just gon na put some more on this hair polish shine mist because you know that got to be it'd be leaving my hair a little ashy, so we're just going to bring it back To life and put some shiny spritz on it, that is it for this look i just i'm obsessed with the blonde in the back. I'M probably never going to change this, and that says a lot because i changed my hair. A lot as y'all can probably tell my channel already but yeah this just i'm in love. I think this is so cute so perfect for valentine's day. You know, like i said we got the little heart going on. I don't know if y'all got a valentine or not. I know i do the money, i'm in love with the bag. I don't know about y'all, but yeah, i'm in love with the money but yeah. I hope you all enjoyed this little tutorial. I always tell y'all i'm not the best at tutorials. I really did try. You know i started talking at the beginning and then i was like i can't focus so i was like we're just gon na record this and then put a voiceover over it. So at least we got it done. You know what i'm saying i didn't give up, but yeah, i hope y'all like it. Let me know what y'all think in the comments down below, even though when i say that y'all don't always be leaving comments, but it's okay. It'S okay, it's cool! It'S cool! Just make sure you like the video please, but for real. Like i said if y'all enjoyed this video, please make sure that you like comment subscribe, make sure you stay blessed and hopefully i'll see you in my next video bye, guys

Comments
Angelaa aa: Love this style
The Voice of New Beginnings Coaching & Consulting: You did a nice job! Such talent
Alasha Conner: Love it