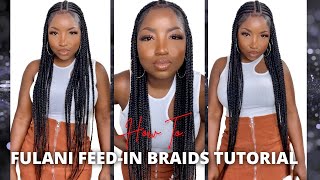
Feed In Braids And Ponytail On Natural Hair!
- Posted on 26 November, 2017
- Ponytail Hairstyles
- By Anonymous
How to create a ponytail with weaving hair on natural hair!
?
Hey Youtube! My name is Maiuple but you all can call me play. I’m a multitalented beauty professional with a passion for the beauty industry and it’s ability to make others look and feel their best. I’ve always been a creative and EXTRA person and I feel like youtube is the perfect place for me to showcase my talents while expressing myself through creativity. On my channel you’ll find videos related to hair, makeup, health, motherhood, DIY’s, physical and mental growth and much more! My dream is to use youtube as a gateway to help others even if it’s just offering a cool hair tip or making you smile. I Hope you subscribe to my channel and embark on this Journey with me! Much Love!!!
꞉ @playslaysbeauty https://www.instagram.com/playslaysbea...
#feedinbraids #howtodofeedinbraids #hairtutorial
So the hair you'll be using is one pack of expression, braiding hair. This is the African collection brand. I just happen to like the friend the most and two packs of some inexpensive weaving hair. The curl is deep wave. I got this from the Beauty Supply for a $ 9.99, a pack okay. So next we're going to section off your hair. So first I parted it from ear to ear underneath side across, and I left the back out and put that into a ponytail and these two part pieces here. I parted it kind of in a slanted direction and let these two out these are going to be. My feet and braids and this and this is going to be drilled into a ponytail along with the braids, okay and then for the hair. I cut my expression here into three parts and I stretch them out like this and I place them on the rack and I pretty section out the pieces that I'm going to be grabbing and I put them on the rack here for easy access. And then you start to break okay, so I'm going to be using a combination of eco, styler and edge control to break my hair as I feed it in and I'm gloss hold on to be using that edge control and they got to be glue to gel These parts down and put them in a ponytail, so those are the products I'm going to be using so right now, I'm just grabbing them and feeding them in to the braid. It'S a mirror right here, that's what I'm looking okay! So I jot this down and put in a ponytail, along with the back when these are put off to the side. The ends of the braids, I'm not gon na need them right now, goofy here everything is smooth and gel down. Okay. So now I'm going to take one of the three pieces that I had I'm going to use this whole piece to do one big braid with its so wanting to split in half okay. I'M going to this is what I'm going to use. I'M going to put this aside for now, so next, I'm going to to make this part easier to braid, I'm going to add some ecostyler on, so it can blend in better with the braiding hair I'm gon na use. This probably will probably divide it into two. Just whatever it doesn't have to be pretty because you'll see what I'm gon na do with it after, but just make sure that you braid it in okay, like I said the braid doesn't have to be perfect, but this is what it looks like. Okay. So in that this is my track hair. So what I'm going to do, or what I'm going to need for this process is some hair glue and some spritz. So the process is very simple, so I'm going to do is just take the end of hair and glue the track hair to the braid and wrap it and continue to glue it and wrap it in a motion going up along the braid. You know to the desired thickness and, however, you want so I'm going to start the process on when I get up in here and then I'm going to stop and show you okay. So this is what it's looking like so far: missus it's gon na be about this long and when I'm done, I can play with the curls and stuff, but, as you can see, I'm just going to continue its a glue and wrap around to I. You know get the desired. Look that I'm going for oh yeah and I move on to start. I started using the pump it up and said that other spreads, I don't know it wasn't working, but just continue to wrap and you can so. As you can see, I have this much left with the first pack. You can add, I mean if you want it longer thicker and make the braid thicker make it longer use more hair. It'S all you know, depending on what look you're going for. So I'm just going so I think I'm just gon na finish, wrapping it on my own and then show you what it looks like when it's done. Okay. So this is the amount of thickness I was going for. I use the whole two packs. Let me show you how long it is, but right there, okay, so what I'm going to do next? Is these two great pieces here I'm going to wrap them around the ponytail? I guess I could and this that I have to look in the mirror and do it at the same time. So I'll show you what I look like when I'm done. Okay, all done so this is the finished. Look. I finished wrapping the braid around and I, like my edges, a little bit and edit some hair jewelry just a couple on this side. Also at it, it's just a little a little bit of mousse to the curls. I didn't trim it or anything, but you always can, but I'm happy happy with it like this, so it'll work, and this is the length in the back so and a good thing about this style is. I can always freshen up the braids. You know if they start getting old, but I don't plan on keeping it for too long anyways. But overall, I'm happy with the look thanks for watching
Comments
Future is Everything!!!: Omg this is so freakin cute this is to be my birthday hair style
Queen Netty: Nice!!
Lay: Yes that is cute
Angela D: Slayed