Easy: How To Hold The Hair And Grip The Root For Box Braids | Karrill Dadiva
- Posted on 01 February, 2023
- Ponytail Hairstyles
- By Anonymous
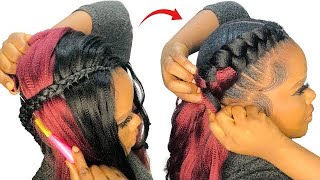
If you're new to box braids, then you may be having a hard time holding onto the hair and gripping the root. In this video, I'm going to show you how to easily hold the hair and grip the root for box braids.
This easy method is going to make it much easier for you to hold onto the hair and secure the box braids. After watching this video, you'll be able to box braid effortlessly and with confidence!
**CONTACT FOR BUSINESS PROMOTIONS: [email protected]
~~~~~~~~~~~~~~~~~~~~~~~~~~~~~~~~~~~~~~~
Please ask any questions in the comment section. Also, leave a comment and let me know what you think.
~~~~~~~~~~~~~~~~~~~~~~~~~~~~~~~~~~~~~~
Thanks for watching. Road to 100K
Remember to Subscribe, Like, and Share. Love ❤️ you guys and appreciate you all so much!!!
I'm Forever thankful
~~~~~~~~~~~~~~~~~~~~~~~~~~~~~~~~~~~~~~
Make sure you watch the video in the highest quality (HD/ 4K) to get the best out of it.
~~~~~~~~~~~~~~~~~~~~~~~~~~~~~~~~~~~~~~
Other ways to support my channel:- https://www.paypal.com/donate/?hosted...
~~~~~~~~~~~~~~~~~~~~~~~~~~~~~~~~~~~~~~
CONTACT INFORMATION FOR PROMOTIONS ⬇️
Email: [email protected]
~~~~~~~~~~~~~~~~~~~~~~~~~~~~~~~~~~~~~~
Follow me on my other socials ~ ~ Instagram, TikTok, Facebook
https://beacons.ai/karrilldadiva
Foreign today I will be doing some box braids in my hair, but for today's video, I'm gon na be demonstrating how I hold the hair to start my braids off the hair I'm gon na be using today. Is this one from easy, braid professional or I think that's where it's from I'm not completely sure? But if it's not it's very similar to easy, braid professional hair. First, I'm going to go ahead and section my hair off from one side to the other, and this is what I'm working with so far so now I'm gon na go ahead and take out my first section in the back. I usually like to you know, add some gel onto the back before I start parting out my first section because I feel like this helps to give me a cleaner straighter part for this first section. I'M gon na be doing three braids for the size I'm going for so here we go guys. First, you want to split the hair with one side bigger than the other. This is how I usually do it, and then you want to go ahead and loop them around each other. Just like this, and as you can see, I'm putting my pointing and middle finger in between the first two pieces of here and then the third piece, I'm gon na bring it behind my middle finger and bring it through the middle of my pointing and middle finger And that's how I hold the braid or hold the hair to start my braids off. For this part, I didn't get too in depth on it, but let me see what I can do for y'all. So when you're starting off the braid, you wan na grab everything using the finger that already have the hair or the hand they already have the synthetic hair in it. And then you want to start plating the hair, with um sections of your hair, going into the pieces of synthetic hair, and that's usually how I grab the root of my hair, so in other words, while you're braiding, the hair, you want to use your finger. I use my pointing finger and I separate the hair or take pieces of my hair out and add it into the synthetic hair and that's how I attach the synthetic here onto my hair and have it looking seamlessly like. It is right now again, as you can see, I grabbed the entire piece of hair at the rule. Juice in the hand, that's holding the synthetic here already and then, as I braid it, I use my pointing finger to separate my hair and add pieces of it into where the synthetic hair is and that's it guys it is that easy. I promise you it may look hard, but it's not as hard as you may think. It'S very easy. You just got to have the understanding. You know what I'm saying and you'll be on your way to braiding your own hair in no time foreign. So let me show you guys again another time how you hold it here to start the braid off. First, you want to split the hair into with one side bigger than the other, and then you want to Loop them around each other. Just like this foreign, like you, see me doing here, that will help to give me more control over the hair. Now you want to place your pointing and middle finger in between the two pieces here, that's hanging and then bring the third piece of hair in between the pointing and middle finger from the back, and that's how you hold the hair to start the braid off, and Here we go guys one more time. You want to put your point in and middle finger in between the two pieces of hair, that's hanging and then the third piece of here you want to bring it to um over the back of your middle finger and put it in between the pointing and middle Finger and that's how you hold it, if you guys have any questions, go ahead and ask them in the comment box I'll try my best to get back to them as soon as possible, and I'm also going to try to get through this video. As quick as I can guys, if you look closely here, you can see exactly what I'm doing, how um you know attaching the synthetic here onto my hair. I just realized that I was actually getting in depth with it. So um yeah. I guess this is uh. How to hold here and how to install it tutorial, not just how to hold the hair. I also add Jam onto the hair as I go along, and this will help to blend my hair into the synthetic hair. So you won't see my hair peeking through the synthetic hair um. You know after I do the braids, and do you see how nice and tight those braids are at the roof? Yes, that's exactly how you want to get it so guys. I'M gon na go ahead and speed through the rest of the video, so we could get to the overall finished look. I know you guys want to see that if there is anything that I didn't cover that has to do with how to hold the hair or how to grip the root of the hair. Let me know in the comment box and I'll try to go over it. Some more in another video also, let me know in the comment box guys what kind of videos you would like to see. I will be bringing some more natural hair videos, like you guys, um requested. When I posted that last natural hairstyle. I will be bringing more of those kind of videos, but let me know if there's anything else to do with braids that you guys would like to see, and I will try to deliver it for you. Oh one more thing guys: if my hair does look black, that's because it is, I dyed it um jet black, and this is something that I do sometimes I think it's been like maybe a year now, since I did it but yeah. I do it sometimes because I, like my hair to look super black. I feel like it looks better when it's jet black, my natural hair color, is about like a 1B 2 number two somewhere around that, but I like it to be jet black. So I usually add dye to it. I did not count how many braids I have in this hairstyle. I know you guys love it when I do that, when I tell you how much I have in the bag, how much is in the front how much Rose? I have going up and stuff like that, but I totally completely forget to do that because I have so much going on anyway um this hairstyle took me about seven to eight hours, I'm not sure exactly, but it's around seven to eight hours. Thank you, foreign foreign ly, done with installing these braids. I'M gon na go ahead and finish the ends because you guys know I don't do it all the way down in the first go and I will be back to show you guys the finished look. This is the finished, look guys, what do y'all think the length of this hair is 26 inches. I haven't done 26 inches in so long, and the color of the hair is um number one which is jet black and that's kind of one of the reason why I decided to dye my hair for this video. This is what the back of it looked like. I do apologize that it's a little bit out of focus, but my camera likes to do that. Sometimes anyway, guys. I hope you enjoy it. I had so much fun doing it. It'S very light and easy to manage. I kind of wish I did it thicker and I usually kind of wish I didn't thicker when I do these braids but yeah I like it. It was easy to style and everything if you guys enjoyed this video. Let me know in the comment box below give it a thumbs up and so on and so forth. Thank you guys. So much for watching and I'll see you in the next one bye foreign


Comments
Talonda Barnett: I recently started practicing your braiding technique my braids are coming out much neater
lilmama291: You explained this perfectly. I tried this and was successful. Practicing is key for sure. Thanks sis❣️
Mmapula Motlhajoe: Always on point❤️ I'd like to see make up and braids videos more often. Great content✨
YMUC: Thank you! Your braids are so awesome. Will be practicing....
Mark Cindy 9900: I can't wait for my hair to grow so that I can do braids again love your videos
Keesh Rose: ❤️ Such a great job!
Rose G: Fabulous as always , job well done, take care see you in the next one.
Naturally Exquisite: I miss coloring my hair jet black…it provides such a vibrant and vivid look to hair!
Erika Hudson: I loveeeeeee your fashion and make up ! It’s always on point !!!
lilmama291: In your opinion, which method lasts longer for natural hair. Box braids or knotless?
Liosah Mutumbami: Can you please do a tutorial for twist using the braids you use when doing a box braid
Connie Brown🌺: I love it karrill
Nicky Shorty: Can you do knotless on natural hair?
Lovejoy Simelane: Hey sis am from Swaziland so please also do butterfly locks very detailed
Erika Hudson: Can you do a video on the wrap n lock hair for faux locs ?
Zineb Ohammou: Thank you so much I love you from morroco ❣️
Mula A: Nice job
Tay Clay: do you use pre stretched hair?
Connie Brown🌺: Good morning Kay