How To Sew Scrunchies - Diy Hair Band Tutorial
- Posted on 27 August, 2018
- Ponytail Hairstyles
- By Anonymous
Make your own DIY scrunchies - sew ponytail holders with this easy method. Blog Post with Links ↓↓
https://mellysews.com/how-to-make-scru...
How to Sew a Headband
https://mellysews.com/2018/08/how-to-s...
How to Sew an Infinity Scarf https://mellysews.com/2015/02/make-inf...
Tube Turner tool (affiliate link, commissions earned) https://amzn.to/2wl0KGi
Wearing in this video - Kirei Cami and Barton Shorts, patterns available in my shop here https://blankslatepatterns.com/product... https://blankslatepatterns.com/product...
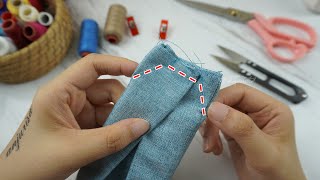
Hey yo Melissa here with you today and today's project is scrunchies. This is a great scrap Buster and the men that I used to make these, which I like to call the magic tube, can also be used to make headbands and infinity scarves. So I've got some links below two blog posts about all three of these projects, and then I will see you after the intro to talk supplies here. Are the supplies you'll need to make a scrunchie you'll need a strip of fabric that measures 18 inches long by 4 inches wide. You need a needle and thread a safety pin and an 8 inch long piece of elastic. This is an optional tool. The tube Turner, which will make it easier, but you don't have to use this so the first thing you want to do - is take your fabric and you're going to fold it in half right sides together and you want to match the long edges and then we're Going to stitch, leave a gap and then stitch the remainder of that edge. So here is what it looks like once: you've sewn that seam for a scrunchie you're going to want about an inch to an inch and a half wide gap. The next step is going to be to turn the tube halfway and I'm going to show you how to do that with a safety pin. So you're gon na weave your safety pin in through the end there, and then you want to take that to the inside of the fabric and use the safety pin to pull fabric into the tube and make sure you do this on the end. That does not have the gap in it. This is how you use a tube Turner to turn your fabric you're, going to start by taking the tube piece of it and you're going to put it inside the fabric that you were going to turn. Then what you want to do is if you have a closed tube, you would put it in from this in and then you'd shove the closed in through, since this is an open tube, you have to start about an inch back just to give your fabric enough. So that it doesn't like unwrinkle halfway through and then you push it through the tube now remember, we only want to turn this half way so once I get it out, the other end of the tube pull that out pull the tube out and I'm done and You can see how much faster that was so there's a link below to get a tube turner if you'd like one once you've turned the tube half way. You want to match up the seam allowances and you can kind of just push one in one direction. One in the other and then we're going to stitch all the way around that tube. Now, on a tiny tube like that, I'm using for this scrunchie here you're going to have to hand stitch it if you're using a woven fabric, if you're using a stretchy fabric, you might be able to put it over your presser foot. So I just use an overhand stitch to stitch. This up can there's what it looks like to machine sew, your tube. You are going to want to put the presser foot inside of the tube and then sew around if you are using a stretchy fabric, make sure you're also using a stretchy stitch. Once your fabric tube is sewn together around the ends, you are going to turn it right-side out through your gap, you're going to use the elastic and the safety pin and you're going to thread that through now before, I start that I also like to mark the Two ends of my elastic so that I can tell which side is which and make sure that I'm not twisting my elastic inside so just use the safety pin to feed it through and make sure you don't lose the end of the elastic inside. Once you get back to the gap, make sure you've got your marks facing up, and then we are going to zig-zag stitch, those together to zigzag your elastic together, you're going to want to overlap the elastic and get it under the presser foot. And then just the exact over those edges, I like to reverse the stitch. Once your elastic is secured inside your scrunchie, you need to finish up this gap that we left for turning. I am going to show you how to do an invisible stitch. This is also referred to as a ladder stitch or you might see it called a slip stitch and basically all those names are different ways to refer to the same stitch that helps you finish a seam invisibly. So we're going to imagine that this is the seam here that I need to finish. Let'S pretend that I had sewed and then I've got a gap left in the scene and what you're going to want to do is take your thread and you want to knot. The end and then come up with your needle from one fold so that you can hide the knot inside there. Then what you're going to do is you are going to go straight across from that thread and you're going to take about a quarter inch stitch with your needle parallel to the fold of the fabric and you'll, see how that makes a stitch straight across then. Come straight across from where you just came up and do the same thing we get several stitches going. You can see why this is called a ladder stitch you just want to do that continue across the whole part of the fabric. That has a gap in it to finish off that gap. Now here is the magic part once you've got that whole ladder done. If you pull the thread, you'll see how it starts to gather up the fabric, but when you pull it flat, you'll notice that the thread has basically disappeared. If I had used a thread that matched my as you should, this would fully disappear inside that scene, and we have the same flat. You can see how that stitching is hardly visible. Finally, what you want to do is wherever your needle laughs came out. Take an extra little stitch there and then wrap or take your needle through that thread a couple times so that you can knot it before you cut it, and that is how you do an invisible stitch.


Comments
featherqueen31: I like this method. The other tutorials always make you sew the two ends together and you can easily see the stitching. This method is much better. Thank you so much!!
Elisa Roberts: Came for the scrunchies, stayed for the ladder stitch tutorial.
Teri Looney: Thanks, Melly! I will make some of these for my grandaughter!
Ari Domonique: Thank you so much for that short invisible stitch tutorial it’s very helpful
Me 23: I want to add these to my hair accessory shop, but the other methods seemed tedious. I LOVE this method
Brianna Fuentes: Love this method and find it much easier and cleaner than sewing the two ends together. Also, thanks for the ladder stitch tutorial at the end!
Oasis Mendez: Yassss! I legit made up my own way, didn’t like it tried other YouTubers ways, then stumbled on your video and BOOM I found the best method ever! Trying this with my new batch! Thank you for the vid Queen!
Synnøve Skaaheim: A very thorough and informative tutorial! Great for all levels of sowing :) Thank you!
Aheahe: Beautiful tutorial absolutely love it. Thank you!
Michaela Curletta: This is the best scrunchie tutorial I’ve seen. Thank you!
Gamer_person4444: Thank you so much!!! All the other youtube tutorials I watched for scrunched didn't turn out right. You make it SO easy and SO fun! P.S. Thanks for the ladder stitch tutorial it helps A LOT! You are so amazing and so impressive!
Hanna: I have tried other methods, but this is by far the best one I have done! I will definitely be making a lot of these. Easy and fast! <3 :)
Davytron: Thank you for this tutorial. It was very clear, thorough, and helpful. :)
Phyllis Cicio: Another great tutorial!! Thanks so much! Easy to follow instructions! I will be making lots of these!
Tina Giaramita: Great tutorial! Thank you for explaining and showing how to do the ladder stitch so well!! I really enjoy your website and watching your videos!
Manuelita Ruiz: That was a great video, thank you so much on your invisible stitch tip loved it
Purple DragonDC: I just found your channel & you’re AMAZING!! Very easy to follow. Thank you so much for posting
Goretty Martinez: I can't sew, but I made three scrunchies last night. Thank you!
Laura D: _Sew_ well done!
Mxlissa: This tutorial really helped me xx I have tried many others but this one was definitely the most helpful thx ❤️❤️
maisecat x: Excellent tutorial, thanks ❤
Giu Ave: Thank you for this! I’m definitely making this for my friend for her birthday.
Kao: Awesome! Ive been making scrunchies and selling them for a while and I could never really find a good way to make the tube into a circle very helpful
Lynn Le: It’s really a smart and easy way to do it. I just made 2 and very happy with it. Thank you so much!
JebNaJer P: This is awesome. Thanks for the tutorial.
Brenda Harris: Thanks for posting this. You made it easy and painless for those of us who normally dont sew anything. Saved alot of money not having to buy these things at over $2
Hermione Granger: Fantastic tutorial! You are born to be a teacher! You make things seem so easy. Thank you<333333333
A heart for animals: This is amazing! Thank you sooo much!
Agent24: Thanks for this video! These seem to be the best instructions, and match what I've seen in scrunchies from the shop. In fact yours is actually better, because the bought ones closed the side opening on the outside with machine stitching. Hard to see as they matched the colour exactly, but just not quite as good as yours.
nst1213: This may look confusing but it works so well! I made one and it’s so good!
Barbara Matthews: Thank you so much for showing an invisible stitch, I for one really appreciate it
Aliza Ahmedani: Thankk you so much! I wore my scrunchies for 2 years and they're all torn up! I had to throw em in the bin . Thank u sooo much! You explained in such a good way! Stay safe bai
Julie: Thank you! Very helpful & much appreciated
Mindy Martinez: Thanks for this! Can’t wait to try
Maggie M: Hi Melly, it was nice to see you, again. Thank you for this tutorial, I thought I knew how, but didn’t turn out correctly. ♀️ I, also, did it differently than you did.
Nathalia Rodriguez: Just what I was looking for! ✨
Toiletroll21 `: This is really good Ive made a few and it was very easy
Sarah Giraldo: ive tried making scrunchies before with different methods, but this is the best one by far!! thank you so much
Shaikh Sarah: Very clear and best explanation ..you made it very simple
Rach P: This is the easiest tutorial! Will try this tomorrow.
Emma Smith: Wow so helpful I can’t wait to get sewing!!!
Bonnie Rae Konjevich: Saved directions... this as a pre-measured strip with excellent fabric turning!
Veia Jeselle: Thank you for this ❤
Gauri Girme: Great Super easy method Thanks for sharing mam
luncing Hatlangh: Melly.... i love your style of making the scrunchie. Can you do (how to reuse old t-shirts) btw love your sews✂
Ashley Garcia: i made some amazing Scrunchies! thanks!
Aria Rain: Great video, thanks! :-)
Lo veo Y no lo creo: The best video I watched .love your technique . Keep posting
*_S n o w y_*: thank you me and my friend are wanting to make a little job and this helped alot for the ideas
Sindhu Pearl: Wow this is so good........ different from other methods........at last the ladder stich is well explained
Nkem Chigbogwu: This is by far my fav method so far and I’ve watched a lot of these videos
Jasmine Leong: Great video. One of the best on YouTube I must say!
Lesley Gilbert: Some great tips - thank you :)
Josie E: For a tube-turner, you could just use a thick straw and a chopstick, couldn't you? I wanna try that out!!
Bree Bailey: Awesome tutorial! Is there any others ways to close the tube other than handsew? The tube won’t go under my machine and I’m not a very goo hand sewer! Any other ways? I prefer this style of scrunchie to all the others! Thanks for a great DIY video!
Mansi Baliyan: Well done dear ❣️..... finally I'm able to make it.....
Bridgette: thank you very much for this video..i just finished making a headband to wear to school it didnt come out great but its good enough to wear
Sandi Newton: I thought this was the illusive youtube tutorial I’ve watched about the twist infinity scarf. It’s not but this is great also!
Mads: Scrunches are trending in my class at school I rlly wanna make some and sell them for $3 and make some money
Anonymous: Love it:)
Shining Sani: Thank you so much you are great ❤
Marvelous LainaBug: I really like the way you make scrunches me and my mom are going to try it
Maegan Delorme: What size and kind of elastic do you use? :)
Meili Zhang: What brand of elastic do you use? I’ve tried different kinds but none have been that stretchy :(
Bear Templeman: Good method, but as someone who can't hand sew, this was sooo hard I prefer to cheat, and run my machine across. The small flat bit is easy to hide in the scrunched ruffles.
katie: Where do you get your fabric? I want to start making my own
Anna Shiegl: Lovely, what width elastic do I need?
Clara Belle: You actually helped me a lot
Alex: Could you use shoelaces instead of elastic?
flower k: THANK YOU OH MY GOD YOU ALWAYS HELP SO MUCH
Heather Gallant: I needed something to do with my mask sewing scraps... can't wait to try it though!
Mariette Forget: Thanks!
Samantha Hoang: Can you make a scrunchie tutorial using a hairband instead of elastic?
Zoie Shae: What type of fabric did you use? (Ex. Cotton, polyester, Satin, etc)
small footprint: Woohoo! Scrunchies are back!
pooja's corner: Beautiful
Heather Jane: Thank you!
Charley Katherinx: I love making these
Faye Thornley: Thanks I am going to make these in quarantine
Miranda Bardick: Great video!
Annika Semple: Does this work for 1/2 inch elastic too?
Greta Gagnon: Nice shirt, thank you for the tutorial!
Joanne Gonzales: Nice thank you so much for sharing nice .i will try .God bless
Koral Scott: That sewing machine tho.
kikcils: Thanks! Great gifts
debbiedebds: How do you make it for thick hair?
Allie B: Bowl cosy tutorial please. Including whether to wash the Pellon Wrap and Zap or not before starting, and if yes, then please show how to wash & dry it. I can’t find any video on this. Also how to sew around the corners neatly. Best type of cotton fabric to use too, and why - as in why that particular fabric out of all the cotton choices. I know it has to all be cotton including batting & thread but which cotton fabric is best suited? Is it quilting cotton, drill or something else? Thank you in advance
Margaret Swann: Thank you for your video.
jessica stier: I want to sew a scrunchy!!!
Amanda Petit: This rocks. I learned alot
Annie Nguyen: whered you get your fabric from?
Lola: When you handstitch the ends together, how do you get them to look neat and not show? My threads are so obvious on mine :/
Susmita Adhikari: Subscribed for the great details .. thanks a ton from Nepal
Joyce: omg...thank you so much !
Bekah May: What machine do you use?
CELINE ADOBEA: thaaank you
Marissa VanDyke: I’m confused on the safety pin part
Joanna Farrell: Where do you get the fabric
Kira B: How long wide and long is the elastic?
Jaiden: I couldn't get the tube Turner pratt exactly right but my scrunchie still looks okay