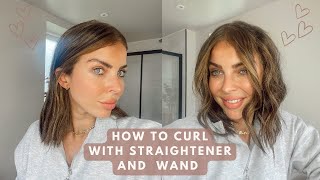
How I Curl My Hair With A Twist Flat Iron
- Posted on 26 July, 2020
- Short Hair
- By Anonymous
HOW I CURL MY HAIR WITH A TWIST FLAT IRON
#twistflatiron #beachywaves #tymeiron
This has been my favorite way of curling my hair ever since I got this 2-in-1 Twist Flat Iron, by Almost Famous. It's very similar to the Tyme iron, but much more affordable!
Almost Famous 2-in-1 Twist Flat Iron with Titanium Plates
https://www.amazon.com/dp/B087JS9LLG/r...
Thank you so much for watching! Please give me a thumbs up if you enjoyed my video and found it helpful!
USPS MAILBOX ADDRESS:
CULTURE SIMMONS
1700 AVIARA PARKWAY - 130871
CARLSBAD, CA 92013
http://www.instagram.com/prettycasualc...
TikTok: prettycasualcoco
http://www.twitter.com/casualcoco
http://www.facebook.com/prettycasual
Snapchat: casualcoco
Hello, everyone and thank you so much for watching my name is culture and in today's video i'm going to show you how i curl my hair with this twist flat iron. This is by a brand called almost famous. This is very similar to the time iron. So there's a little twist in here that makes it really easy to kind of put in waves in your hair or even really nice curls. I like to do sort of more like beachy waves with this, and it's really easy to use really quick. I have seen some people struggle with using this flat iron because there is a twist in it, so i'm going to tell you some tips and tricks on how i make sure that i'm using it the right way, because the first few times i did use it. I was having the same trouble where i would pass it through waiting for it to have some type of a bend in it and nothing happened. So i'm going to show you my tips and tricks and how i curl my hair with this twist flat iron. So right now my hair is basically just washed the night before and nothing else in it. This is what it looks like kind of frizzy and everything. So i like to separate my hair. If i'm in a hurry, i only separate it into two sections today, i'm going to show you how i separate it into three sections, so you can see more of what this tool can do. So i take the majority of my hair on top leave. The bottom part and then twist it up away from my face there we go and then i like to work from the back to the front. So whatever is easiest for you and then i take one inch sections just like this, not too much because then it won't curl very easily and then, if your hair needs to be brushed, i do that beforehand, just a little bit so how i've learned to use This tool is there's a little digital reader right here. You can either increase or decrease the temperature right now i have it at 374.. It goes all the way down to 248 and it goes all the way up to 450.. So i like to kind of be in the middle at 374, sometimes at 356.. If i am working towards the front of my face like right through here, i bring it down to 356, but i'm going to put it up to 374 right now, so that digital reader i like to use it as a guide. I put my thumb there and that's how i know i'm holding it correctly. I know that sounds strange, but that's how i've managed to figure out how to use this tool. So when i'm working on the left side, i bring the tool over my head just like i would, with any type of curling wand or anything, and then i curl all the pieces away from my face. I only twist it one time. Sometimes i like to hold my hair in place, so it doesn't fall through and then pass it through all the way to the end and then help it curl and there it is super curly, the faster you pull it through your hair, the less curly. It will be and the longer and you take to pull it through the curlier. It will be. I like to just curl it all the way through the end on the bottom of my hair and then once i get to the top i like to leave about one or two inches out. So it's a little straighter at the bottom. All right next piece i'll show you what it looks like if you go really quickly through your hair. So this time, i'm just going to twist it one time and go pretty quickly through my hair help it twist, and so here are the two different curls you're going to see this one is a lot more loose and this one is much more curly. Okay, so brush it through thumb right here on the digital reader from the top and away from my face just twist, it once and then pull it through just like that, it's so pretty and here's another tip. If you felt like you spent too much time, curling it on the bottom, so the top part right here is too straight for you. You can easily go back, take a little bit longer to go on the top. Let it go and then you'll see that the curl is there now: okay, moving on to the right side, i'm just going to brush it through first and then section it so again, one inch section and now since i'm on the right side, what i do is Again thumb on the digital reader i go from underneath now and this time the thumb is going to be facing the back and then i twist it once and now the digital reader is at the front and then i push it through this way. So it's going the same direction as if i was going above my head on this side. There'S that curl so again thumb here facing the back, so that i curl it away from my face twist it and now the digital reader is in the front and then pass it through. If you happen to have a section that is a little bit thicker like this, one is obviously a lot thicker than the other ones. I take a little bit more time to pass it through to make sure that it curls just like that. Okay, next section of hair - and there goes my clip - and so i don't have a ton of hair around my face - i like to just take a little bit of one side and then work on that, so here brush it through. Okay, again, i have the thumb on the digital reader, i'm going to take it over my head. It is facing the back and then i bring it to the front. So now the digital reader is in the front and then i push it through. Just the perfect beachy wave so now, since i'm sort of in the front, i'm going to leave a couple inches out and then let it go. So it's a little bit more straight on the ends there we go since this is towards my face. I'M gon na leave a couple of inches out at the bottom like that now taking that top section of that half there we go okay, so that one is a little sad. I'M gon na have to redo that one much better. So the reason why i'm holding my hair at the bottom is sometimes it can spread out inside the tool and it helps keep it together. When i do that. Okay, this section section is pretty thick as well, so i'm going to slip that in half and do this section again. If you grab a little bit larger section, then normal go a little bit slower and i'm going to leave a couple inches out at the bottom and then sometimes, if you feel like the bottom, is too curly for you um. I just take a little bit of heat at the last bend and straighten it out a little bit i'll fix that um towards the end. We are almost done, okay, so once we get to the top you can see. I spent a little bit too much time right here on the end, so i'm going to go through that part again go a little slower from the top and then pass through and then, when i get to the bottom, i like to pull really hard straight down. See how i turned it from upside down to here and then it's going to help, keep it straight on the bottom. So let me show you that again hold it from the top once you get to the bottom, bring it around and then pull it straight down. So it's not super curly at the bottom, so you got a little bit of a bend at the top and then it's straighter at the bottom. And then, if you want to add a little bit more bend just hold it and curl that one part just like that. Okay, try to show you that again, it's the same thing when somebody just uses a regular flat iron, they'll, curl it and then pull it straight at the bottom. So the bottom part becomes a little bit more straight, but it keeps the curl on the top turn. It around and straighten down, so that's the kind of curl you will get so this one. I think i'm going to have a little bit more curl at the top. So i'm going to add that just to the top section and then stop that way, you can see now i've added a curl at the top there. We go okay, last long piece and then i'm going to work on to my bangs, push it through and then leave out the last part, and this is again where i'm going to pull it straight down. So it's not going to be super curly like that. Okay, so now i have these last two sections where my bangs have grown out, so it tells me i actually need to get a trim. So here on my bangs, i just like to add a little bit of a bend again same thing, thumb here and then facing away from my face and then pulling it down. You can see what i did. I did a little bit of a bend and then pulled it straight down because i don't like my bangs to be super curly, but i like to have it be just a little bit of a bend now the right side same thing here, away from my face And i go straight down, i do that, instead of going all the way back, i like to kind of form it to frame my face - maybe too much curl right there, so i'm just going to take the ends and straighten them out a little bit there. We go run my fingers through my hair. You can also just brush your hair, i like to use my fingers and then this time i like to correct anything that i've done so here in these sections. I feel like it's a little too straight, so i'm just going to take this hop sections here in one inch sections and then start curling it a little bit more so i'll spend more time passing it through my hair, making sure, there's curl and then pulling it Straight down at the bottom, so there's a little bit more curl a little bit more body and take another section here that seems to be flat. Peekaboo. Are you filming yeah? Do you have any fabric glue? Yes, i'll. Tell you in a second see how it adds just a nice bend at the top right there, so it looks a little bit more full and less flat, i'm going to do the same over here in the back. So it looks all the same, spend more time on the top and then leave it out there. We go okay, so, as you can see, there's a little bit more curl than i'd like i'm just gon na pull that straight down, so it's less curly all right! So this front piece right here is a little straight, i'm going to just curl that part and then let it go okay. So i like the left side, the right side here needs a little bit more help it's a little flat on the top. So i'm going to brush this part out and then do the same thing i did by adding some more body to the top. Just like that. Now, there's a lot more going on i'll do about three or four pieces until i feel, like the top part, has more body instead of being flat and then that's it can't forget about the back. I feel like my bangs are off of a little bit. What'S going on there, we go okay, so now i'm going to do this part again, okay, so that is it a little funky with the bangs, but all good. If you want to brush the ends, so they look a little bit more polished, you can, you can go in with your favorite texturizing spray dry, shampoo, flexible, hairspray, whatever it is that you use also, if you want to add some oil to the bottom of your Hair, if it looks a little bit dry, you can do that. I love this tool. It'S so easy to use. It already gives you that laid back look. Sometimes when i use a curling wand. My hair looks better the second day because i've slept on it, and this wand, with the twist in the flat iron, helps to give you that look the first time you use it. So that's why i love it so again, this company is called almost famous. If you were reluctant to buy it before now, you know how i use it, and hopefully i helped you if you wanted to purchase it, for yourself gave you some tips and tricks. Let me know if you guys have any questions at all and i will see you guys on my next one bye. You
Comments
Trunk Treasures: Your hair is amazing it grew so fast. Thanks for the curling tips
Audrey Hempburn: I bought this and I love it! I learned how to use it.
gentleblasphemy: You are a lifesaver I literally cry when I’m trying to use this straightener to curl my hair
MerGypsy: Thank you for this video! I have this iron and I've been struggling to figure it out for MONTHS.
Joy Jasin: How do i control the heat setting on this flat iron? It rises up and down by itself. Do i just press or hold start button and choose a temp ?
Victoria Goodwin: I just got this straightener and it's so confusing. Even watching this. It's trying to wrap the hair so it will curl that confuses me
Rk Sharma: Nice video
jennifer tirado: mine has been locked for days do you know how to unlock it ?