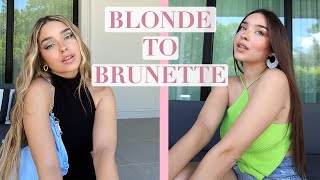
Blonde Hair Into Brown Hair Utilizing Filling Technique | Kenra Color
- Posted on 15 September, 2020
- Trending
- By Anonymous
How to transfer a level 10 blonde hair to level 6 brunette hair in two easy steps utilizing a filling technique by Mirella Manelli.
00:00 Introduction
00:31 Sectioning
00:50 Fill formula
1:08 Fill formula application
2:36 2nd formula and highlight application
5:49 3rd formula & application
7:34 Styling using Kenra Platinum Signature Style Formation Mousse 14 & Veil Styling Crème 1
8:36 Final result & recap
If you enjoyed this video, make sure to give it a thumbs up and tell us in the comments below what you'd like to learn next!
SUBSCRIBE NOW: http://bit.ly/KenraProfessionalSubscri...
VISIT OUR WEBSITE: https://www.kenraprofessional.com
WANT TO WATCH MORE?
How To Transition Highlight Client Into Balayage Client Using a Foilayage Technique: https://youtu.be/rdVo6MqAv0I
About Kenra Professional
We are a purely professional brand dedicated to understanding and serving today’s stylists. Our passion is developing best-in-class innovations, delivering superior and reliable results. Kenra Professional strives to elevate the stylists’ artistry and craft.
CONNECT with US
FACEBOOK: https://www.facebook.com/KenraProfessi...
INSTAGRAM: https://www.instagram.com/kenraprofess...
TWITTER: https://twitter.com/Kenra_Haircare
TIKTOK: https://www.tiktok.com/@kenraprofessio...
Blonde Hair Into Brown Hair Utilizing Filling Technique | Kenra Color
#blondetobrown #hairhighlights #haircolor #haircolorhowto
Hey everyone, it's Mirella Manelli and today, I'm gon na show you how to take blonde hair and transition it into brown hair in two easy steps: utilizing a filling technique.. This is a technique. That'S gon na take any summer blonde and transition it into a really fun fall color using all Kenra Color, so stay tuned and check it. Out. (, chill music ), So first things. First, we're gon na go ahead and section her into four quadrants so that we have nice clean working space to go with. And then we're gon na get ready to do her fill formula which we need to do, especially if we're gon na go two levels or More darker. So we're planning on taking this a level 10 blonde hair and taking her into a really dimensional level. Six brunette shade. For this project, I'm using all Demi-Permanenet hair color. And since we're gon na be coloring about three to four levels. Darker, I need to fill the hair first., So I'm going in with equal parts of 7NB and 8G one to two mixing ratio with nine volume developer.. The reason why I chose 8G and 7NB is because I need that gold underlying pigment that's lost at a level 10.. So, since our end goal is to take her to about a level six, I know I need to add in just a little bit of warmth into her hair like gold and the natural brown is just gon na. Give me all three of my primary colors at a level seven. Now the reason for the level choice is because I always wanna go about a level lighter than my target level.. So since we're going for that level, six I'm going to fill her with a level. Seven seven and a half. So once the fill formula has been decided, I'm then gon na apply it throughout her entire head from roots to ends. And we're applying this to dry, hair and just processing for about 20 minutes room temperature. A little tip when applying your Fill formula is to make sure you are thoroughly saturating the hair and really working in that formula throughout. So that way you don't get any splotchy effect. An added tip is you can always use Porosity, Equalizing Spray to help with porosity issues before applying your fill formula.? Once she was done processing I then shampooed the hair out and then 100 % dried the hair and got ready for my second formula.. Since we're going for a more natural formula, I decided to go in with 6N still in Demi-Permanent, because again, I'm considering the hair is a level 10. So it's probably a little compromised.. So since we're only depositing Demi-Permanent is gon na be the best choice.. For my secondary color, I'm using Clear at a one to two mixing ratio with nine volume developer. - And this is just going to help - add some dimension by diluting that 6N formula into the fill formula which I personally think looks really pretty on its own.. I'M really focused on putting dimension more towards the face., So I'm putting in some diagonal back highlights right by the side of the ear under the parietal ridge.. I'M then taking my 6N Demi formula and applying it on the first inch to two inches of that new growth and then blending it right into my clear formula.. So my clear formula has no color in it whatsoever. So basically, what this is gon na do is take that 6N formula, which is a lot more saturated and has pigment, and then I'm gon na blend that into no color whatsoever.. So therefore, it's gon na dilute it from that 6N and then just gradually it'll fade right into what's already existing there, which is my fill formula because we're using clear. So kind of a nice creative way to use it.. Now, if you had some further correction to do, then definitely use your secondary formula with pigment in it, but I just absolutely loved how this fill formula turned out and I wanted to preserve some of it.. This entire front section of highlights was split into four sections.. So right down the center and then right on the parental ridge.. So once I got the side section complete, I then moved towards the very top focusing on the hairline first and then moving on back. Still on a diagonal pattern, but it is zippered with the under section and it's gon na be zippered with the opposite side as Well., So for the very very front, I am taking two back to back baby lights, which I personally like, because it makes it a little bit more of a extra bolder dimensional piece, but I'm still tapping in that 6N right at the root and not burning it Down as much as I did on the interior., So once I get those back to back sections done, then I start taking a small slice to add a subsection in between further adding in that dimension. And I'm just taking a regular weave here, and this is where I'M starting to bring that 6N just a little further down still about an inch or two, so nothing super crazy.. But again, if you wanted to add in a little bit more depth or that lived in grown out looking highlight or more rooted, you certainly can bring that 6N down just a little further.. Once I was done applying my highlights on the top and the sides, I then mixed up a little bit more 6N in Demi-Permanent at a one to two mixing ratio with nine volume developer and then applied it in between the foils from roots to ends.. Now keep in mind if you do this technique, you do not need to worry about your foils bleeding whatsoever, because you applied that same exact formula onto the roots in those foils. So really make sure you work in this product. I cannot stress that enough. There's nothing! Worse than doing a full color application and then washing it out and finding out that you have a lot of splotchy pieces. A lot of times. This happens because we're not applying enough product and we're not working that product into the hair.. Now, in order to keep you a little organized, I personally like applying to the roots first and then gradually bringing those foils right on up and using some clips to help, keep it nice and clean.. This also helps me have a nice clean working space, so I can go in and really work in that product into that mids and ends., And then once the roots are applied. I can then work my way right on back up and nicely place the foils back into place, so your client's comfortable - and you know that that color is applied correctly and thoroughly.. So once you get this final color on you're, just gon na process for another 20 minutes and then we're gon na get ready to do her final style., (, chill music ) For her final style. I went in with Formation Mousse from the Signature Style, Kenra, Platinum Collection and then worked a generous amount through her mids and ends and then did a nice volumous blowout with a big round brush, really focusing on getting lots of volume and shape into the roots. And then those mids and ends. For a little added, curl and texture plus it does show off the highlights a little nicer. I went in with a one and one quarter, inch Marcel iron, which is my favorite., And I focused on putting the curls more towards the hairline and the front of the style. Again for that little bit of added texture.. I then finished her up with Veil Styling Creme from the Signature Style Collection., And this was just to go in and add a slight definition but more to eliminate some of the frizz. And, as you can see, it just defines those highlights nice and seamlessly and weight Free. And here's the final result on how to transition blonde hair into a brunette shade using all Kenra color.. So, just to recap, we went in with her fill formula with Demi-Permanent 8G equal parts to 7NB one to two mixing ratio with nine volume developer and then processed her for 20 minutes.. Then we shampooed and 100 % dried her hair and prepared her for her final color.. So we went in with Demi-Permanent 6N at a one to two mixing ratio with nine volume developer. And then for those highlights. We just used a clear formula in Demi-Permanent one to two mixing ratio with nine volume developer just to help blend in the line of demarcation from that 6N and still maintain that really beautiful fill formula that we got. And for her final style. We went in with Kenra, Platinum, Signature, Style, Collection, formation, mousse onto wet hair and then did a nice blowout with a round brush. And then on dry hair when she was 100 % styled. We went in with Veil Styling Creme just to maintain some of the frizz and a little bit of soft definition.. Now I really hoped you enjoyed this hair tutorial. If you did give this video a thumbs up subscribe check out more of my other hair tutorials on my channel., And I hope to see you guys next time.
Comments
Florian Meinhardt: Great color transformation. Filling is sometimes a little tricky, but you showed us how to do it propery. I love this mushroom-like color, it's in trend right now and looks amazing, only a great colorist can do.It was a good idea to preserve some of the filling color as highlights and shine gloss it with clear. I'm sure a real client would ask for repeating it after 6 weeks.
Lacyla: Love the highlight idea. They always love a little brightness around the face, even when going darker
Lori M.: Just excellent! I see so many times hair is ( not filled), so it was great to see this done and explained so clearly with stunning results.
T M: Hi Mirella! This turned out beautiful! Im curious why at the end when you were putting on the color outside the foils you put it all over the roots first and then ran it through the ends instead of just applying it all over the hair outside the foils. Is there a reason for this?
Kaitlin McCafferty: I love all Mirella's videos!
Cindy Sayavong: Well blended. Need it for the Fall. Much appreciated!
The Crafty Hairstylist: Love all your techniques
VM: Great work! Thank you . Love your work.!
elena mill: Very pretty! Thank you!
Angela: Beautiful natural love it! Actually one of the best end result color ive seen on utube
Shopitybop: So pretty! How would you achieve this end result if you started with a client who had level 1 or 2 virgin/never dyed hair with some grays?
Michael Max Gierl: Killed it! Looks amazing!
Angela Hagood: Love it!
The Sparrows That Cheep Too Much: Lovely result!
_NIAHT: Absolutely love this
Regirl75: Gorgeous!
Stacey G: Great job!
Blago.Concept Professional Reviews: I do hair like this :) Its pretty!
Clouds 🌧 🌸: I love it!!!
Estera Nine: Looks absolutely amazing BUT I don’t really understand why formula 6 is applied in packets since the whole head is covered in that 6 after. Wouldn’t be quicker to do just packets with clear and cover rest in 6?
rhonda moffit: BEAUTIFUL!!!
ainospc: Me. Encanta! Super bonito trabajo
Starmane: Whoa this is gorgeous! Mushroom brown realnessssss!
AC: Awesome colour
sheepgomeep: I was just wondering why you used 30 vol developer for the filler colour? I thought this was just for when you want to go lighter?
KBStrong: Good Job I need that.
Daniela Gomez: Have a client that wants to go back brown. What color would i apply on her roots she's a natural level 3and 4 without pulling to warm
Afsheen Raza: Wow excellent
Bhavesh Valand: Thanks
Nunya Biz: you think you could get away with not filling if doing level 8 root and 9 ends from a 10 starting point?
Lisa Rios: GORGEOUS.
Bülent Uzun:
Kim G:
Renee 24.7: Niiiice!!
so beji: Thanks i love you ❤❤❤❤
Ron Kelsen: Hey Mirella!!!!