Cool Blonde Highlights On Dark Hair - Foilyage Hair Technique On Dark Brown Hair #Hairtutorial
- Posted on 15 August, 2022
- Trending
- By Anonymous
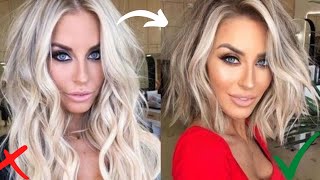
In this hair tutorial, I'm sharing how I achieve cool blonde highlights on dark hair using a foilyage hair technique. This video also shows how I cover gray hair while the highlights are processing and why a foilyage hair technique is important in achieving a cool blonde on dark hair.
Foil highlights are a heat conductor and it is perfect for achieving the perfect lift to blonde on dark hair.
Checkout my other foilyage hair technique tutorials on my channel:
https://youtube.com/playlist?list=PLWT...
Formula using @KenraProfessional
Blue Powder Lightener 20 vol
Studio Stylist Express 5N 20vol
Final Gloss Toner with Demi 8NUA into Beige Rapid Toner
The perfect money piece hair tutorial: https://youtube.com/playlist?list=PLWT...
Foil Highlights Hair Placements Tutorial:
For more education visit my website
Join me in Beyond the Chair Mastermind
https://mirella-manelli.mykajabi.com/s...
Follow me on Instagram
https://www.instagram.com/mirellamanel...
Follow my Facebook Page:
https://www.facebook.com/MirellaManell...
Join me on TIKTOK
https://www.tiktok.com/@mirellamanelli...?
Learn with me!
https://mirellamanelli.com/online-hair...
Listen to my podcast!
https://mirellamanelli.com/hairbnb/
Book an appointment or shop at my salon
Shop all my favorite foils and color tools
https://framar.com/?rfsn=5729303.eb090...
Hair painting board by Cooboard:
https://cooboardtools.com?aff=21
Use coupon code “Mirella” to save 10% off your purchase
You know you want that extra big ass color brush
https://zerotimesystem-com.3dcartstore...
Malibu CPR, DDL and color correction tools
https://malibuc.com/shop/rebelfemme
Use code MIRELLA to save 10% off your Hair Extension purchase: https://donnabellahair.com/discount/Mi...
Buy me a taco and get a shoutout!
https://www.paypal.com/biz/fund?id=57J...
What'S up and welcome back to my youtube channel, my name is marela bonnelli. I am so excited because i'm going to show you my go-to foliage technique so basically doing a balayage on brunette hair and i'm also going to show you my go-to technique for doing some hairline highlights. So this is perfect for anyone that wears their hair up a lot and you need to brighten up that hairline. But then you also maybe want to keep the foils at a minimum in the interior. I'M also going to follow up with some great coverage and a color melt. It looks so beautiful and gorgeous for any brunette hair, but before we get started, make sure you hit that subscribe button and turn on all notifications. So you don't miss a video. Now, let's go ahead and get started, so this is my client and you can see. She'S got pretty dark, hair and she's looking to add in some more highlights on the underside, because she does wear her hair up quite a bit and you can see she's got lots of thick curly. Texture she's also got some gray to cover up and overall we want to soften up some of these orange pieces and just create a much more softer blend to get this project started, i'm using counter professional blue powder lightener at a one to two mixing ratio with 20 volume developer now because my client wears her hair up. Quite often, she wanted to make sure that those highlights were going to be visible when she wore her hair in a ponytail. So this is my go-to technique and i start out by outlining the entire nape area or the hairline. So i put one foil on each side and then i marry those sections together right in the center and then once i have those foils in i'm then going to put another highlight right behind these foils and i do leave a little bit of hair in between. For my brunettes, however, when i'm doing blondes, i typically do a back to back with very little hair in between. So this is just my go-to technique. On how i like to put in these hairline highlights i like to use the head as kind of my table. This just makes me have the proper amount of tension and allows me to get really close to that hairline and to the root area. Once i get all of these six foils in now, i can focus on the interior. Now this is a really old video and i wasn't planning on posting it, because this was the very very first time i ever used this ku board. So i was a little awkward when using it and filming of course, so basically, what i'm saying is, i personally would prep my board with the foil first, instead of putting the board in and then the foil, so that would just be a little added tip. Uh. Just from my experience, but as you can see as far as the sectioning here, everything else would remain the same, so lots of big sections kind of going on all of my sections are about an inch and a half wide and they are all in a diamond Pattern so diagonal box and then a horizontal in the center just to kind of marry it all together. Now, if you've watched any of my other videos, you've seen that i really do love this coo board. But, like i mentioned this was the very first time i ever used it. So i was just kind of working through the kinks, but it's a really great tool to create those teasy lights without the tees, and that's why i love it so much little added tip anytime. You are using a board or doing any type of foliage technique, especially on a brunette is make sure to properly saturate, so you can get both sides of the hair. So i do this by making sure to brush my color brush on each direction going against the green and with the green and just really working it in the benefit of this board is the fact that it does have these little teeth, so it does help with Creating rooted effects as well as making sure that you do have that saturation for these dark brunettes. So, overall, if you're looking for a tool to help, you do foliage this is it now for the front area. I did put some highlights right onto her hairline that are very similar to my money piece technique, and i will show you a little bit of what that looks like, however, for the interior for the front, i really focused on doing horizontal placement, and that's because i Wanted overall brightness right here on this area, i am using the from our dream: weaver comb, to help create these baby lights. If you will, they are kind of a little whiter than a baby light, but, like i mentioned, i wanted to get an overall brightness, as you can see, she had previously highlighted hair. So i weaved out the dark pieces and just pushed that hair right on up into the foil and finished applying my lightener, so basically for this entire interior, i'm keeping all of the foils horizontal. So it's not your traditional mohawk placement and then i finished her off with a money piece right in the front hairline. So if you want to check out my other hair tutorials on the perfect money, piece or foil placement be sure to check out those links in the description you can see, my client does have a four week, regrowth of gray hair. So we are going to tackle that with studio styles express it is a 10 minute coloring system. However, i need to let these foils process so in about 30 minutes, i'm going to mix up 5n equal parts with its dedicated developer and then i'm going to apply it and it will be done literally in 10 minutes now. There are two different ways you can tackle doing a double process like this with gray coverage and highlights so traditionally we used to put the color on the roots and let that process and then 100 dry, the hair and then add in the highlights, or you can Put color in between and kind of, just guess when the lightener was going to be done and hope that you had enough time of a 30 to 40 minute processing time with traditional permanent hair color. So this coloring system allows me to apply this really quickly right when the foils are almost done. Processing because 10 minute processing time for permanent hair color is pretty amazing. So i took it back to the shampoo bowl 100 shampooed it and did a light condition on the ends and then towel dried. It really really well - and this is where i took her back to my chair now i like to do all of my color melts and any targeted toning right at my station. It just gives me a lot more control. Now you can see. I left her money piece out, so i'm going to put that in last. So for her formula it was a color melt with kenra demi permanent of 8 anyway and blending that right into beige rapid toner. So the eight anyway is gon na process anywhere from five to twenty five minutes, but the beige rapid toner is gon na process in about five minutes. So i make sure to get on the eight anyway. First, comb it through just wait about 10 minutes and then apply the beige rapid, toner and, like i mentioned the money piece placement is the very last, because i want to make sure that it is the brightest out of the entire head. So once i get on all of my demi-permanent, i'm only going to process for five minutes, because the beige, rapid toner does a beautiful job and shampoo condition gave her a little shaping. And here is the final result. We got a gorgeous foilage teasy light. Without the tease hair blend it looks really beautiful. She has gray coverage and we got some lightened pieces going from dark into light here. Are those hairline highlights really soft and really pretty and she absolutely loved her hair and then here is a glimpse of the money piece while keeping her face covered because she didn't want to show her face throughout the entire process. But you can see it's slightly brighter right in the front, so i really hope you enjoyed this hair tutorial and if you did please give this video a thumbs up, make sure to subscribe, be sure to follow me on my other social channels like instagram, facebook and Tick tock all under mirella minnelli and if you love listening to podcast, be sure to check out hairbnb. It'S a podcast for hairstylists, just like you to simplify color styling and their beauty base and just launching beyond the chair mastermind, to help elevate. Your business through a group community coaching session with me once a month, it's where i help elevate your business through the creative art of social media, marketing, helping you through brand partnerships and overall, just helping you in this digital creative space. So if you're, a hairstyle that wants to grow in the influencer marketing space be sure to check out beyond the chair, mastermind link in the description. If you want to learn more about how you can get free education, sent right to your inbox, be sure to head on over to marillamanelli.com and sign up for my newsletter and finally be sure to smash that like button and subscribe turn on notifications share this video With a friend - and i will see you in the next video


Comments
MARISSA SANTUCCI: love your videos !!❤️ so helpful and clearly explained!
robert björnesjö: Just perfect as allways and omg your curly hair is just so beautiful here
Hannah Kate: Amazing! Thank you queen
Lesley Morley: Wat a beautiful blend .. lovley colours they blend beautifully Loving ur curls
N. Tulin Tacettin: Thank you for this. ❤
Ashley Brown: Can you give me a few suggestions on what colors are considered cool blondes? I'm fixing to purchase tape on extensions and want to add highlights. My hair is dark brown and I have cool toned fair skin. I love the colors you used on your client here would they be considered caramels and blonde shades?
Marla Jones: You are amazing! Thank you!
Olivia: I just bought my own coo board! I love it ! You don’t tease prior to using the board tho?
Nouri Parvahan: Loved it
Laurie Almeida: Wooow!! Love iiiit!!
Moazzama Karim: Superb ❤️❤️❤️
Alysssa Jernigan: Why put the color between the foils if you were just gonna do another shadow root on top? Just curious
KellyJelly9976: ❤❤❤❤❤