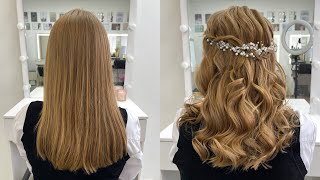
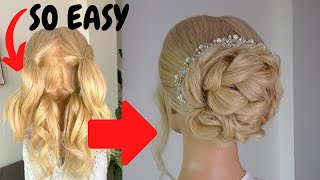
Mother Of The Bride Hair Tutorial
Hair Tutorial for a Mother of the Bride!
Looking for more updo techniques and skills? I've got a free guide for you! Right here: https://www.theupdocollective.com/5-es...
Hi guys happy monday, i hope you're all doing well today. I just wanted to come in and do a little tutorial today on a look that i did this weekend on a mother of the bride. So i'm going to do kind of a classic look. So a lot of times you know we're working on bridesmaids and we are doing a lot of textured we're doing a lot of loose messy buns. Well, this is more of a style, that's geared toward a mom, so someone who is wanting a more classic look. Maybe somebody over 60 um, so let's get started so proctor hair we're good. We got some dry shampoo in here. We have texture spray, we have hairspray throughout, so i can just go ahead and get started. So the mom that i worked on this weekend. She had bangs and she specifically said: can you make sure these bangs are out of my face and off my forehead? I don't want them, so i had to make sure i got rid of those, so i'm going to pretend that she kind of has bangs. So we're just going to put this out in the front and say those are her bangs and then the next thing that i'm going to do is i don't want to do my bangs first. I want to do a little bit of lift at the crown so she's going to have a more smooth look, so i'm not doing any suctioning first, because i'm going to work from the top down when i work from the bottom up, i do a lot of Sectioning, but for this one, because i'm working from the top down, i'm just going to kind of get it in my mind. So in my mind my section is bangs volume right at the crown and then i'm sweeping the rest up and into some more refined curls. A lot of times, mature, updo, so people over 55, 60 years old - they don't want to have something low because they feel like it pulls their face down. They want to have something that lifts them up. So i do. A lot of mother of the bride looks by pulling up the hair, so it sweeps upward like that. Not only does it look elegant, but it really helps them feel more refined and polished. So i'm thinking about the hair in two big sections, the volume right here and then the middle part, i'm gon na sweep up into the updo, so we're gon na start with the volume all i'm gon na do is do a little bit of back combing because Um, like the mom that i had this weekend, she wanted to have a little height, so we're gon na start by just creating a little backcombing in the crown. Now i'm taking about a one and a half inch section, i'm going to hold the hair straight up and i'm going to back comb all around. So i'm not just back combing right in the center and back combing on each side a little bit and then i'm going to do one more layer of one inch of backcombing and i'm just holding the hair loosely and that combing from about half of the shaft Down to create a little bit of light volume right at the top, so i'll flip this back. So you can see, i have some good height here right, height off the front and i'm going to pin this rather high because i want to have a higher more pulled up updo. So i am taking just basically the section from temple to temple and i'm just going to pull this back and pin it now, unlike so many of the other looks that we're doing where you want to create texture. I don't want a lot of texture in this. I want it to be more on the smooth side, so i'm going to smooth through with my comb and make sure i don't see any of the backcombing. That'S like rule number, one with backcombing and i'm just going to bulk it up a little bit by pulling up with my tail comb and then i'm going to go ahead and pin it. So i'm just going to put two pins in here to make sure it's secured and then, if i like it and it's the right amount of volume, then i can go ahead and give it a hairspray. So this is the beginning, and this is going to be your foundation every up do i do. I always have in my mind what is the foundation of the updo? This is my foundation here, so i'm going to be pulling all this hair up to this spot, and this is where i'm going to be doing the majority of my pinning now that i have that done. She doesn't want any hair in her face if you recall, so i'm going to go over to the bangs. Now often, i save the bangs for last, but because she doesn't want any of this on her face, i'm going to pull this back with the rest of the updo so that i'm not left with any weird pins or ends at the very end. If i save that for last - and i have everything done and polished - and then i try to pin this in, i might see little spikes. So that's why i want to get this in now, so that i can use other hair down here to cover this hair. These ends, if i should need it, so what i did for the mom this weekend is she had kind of short bangs, and so i went through and i just backcombed a little bit on following the hairline, so i'm kind of following the part and that helped Them really stay put and help them kind of clump together in one section so doing a little back. Comb internally on the bangs will help that stay and i'm going to start to comb it back and then i'm going to hair spray it before i pin it. So sometimes i use a little bit of hairspray before i pin, because i want to get the shape of the hair going. So i'm going to hairspray, because i want to see how the shape is falling. So i'm just pulling it like this away from her face. Using my fingers to kind of give myself a visual and with the mom that i had this weekend, it was pretty short, so i truly only could pin twist like that, and this is where it ended. So, just for that sake i'm going to go ahead and pin this in right here, so you can take a peek at what that would look like. So i'm taking my pin and i'm just grabbing the ends with the end of the pin and pushing it towards her face. So i'm not doing a flat pin because then you're really going to see that i want to do a pin, that's going into the hair and it's going into some of that backcombing and then it's going to stay put that way. So now i have my bangs up and i have my volume and now i'm going to start working on pulling up the rest of this into the updo. So for this one i'm going to curl as i go, you could also curl before you get started. So this is one of those times when you have some um correct, like personal preference, you can decide what feels better for you. I want my. I want this to be a little faster, the wedding day when i did the mom. I had more time so i curled first and just made sure i had all the curls, beautiful and polished, but because i'm working on this today with you and i wanted to be efficient and quick. So you get more the idea i'm going to curl as i go, so that's a tip for you. If you're really crunched for time, don't bother curling all of it first curl as you go, and that way you won't have to curl too much, and you won't spend too much time curling here, that won't necessarily be put into the updo. So the two uh curls that i just did i rolled in this one in the middle i'm going just straight under and then the ones on the outside. Here i'm going to curl in toward the middle something to note with this style. I am going to be doing big classic tucked in curls, i'm not going to have texture, i'm not going to have a lot of little curls going on, i'm not having one big, smooth, bun, i'm having pinned in kind of like barrel curls, and so i really Just need to get a bend in the end of this hair. I don't need to really get like a tight curl, that's going to last online by itself, because i'm pinning this in. So that's something to think about as you're working on your updos as you think about what type of updo am i doing, and what type of curl is going to work best for this updo. So when you take a look at a picture that a bride brings, you that's one of the first things that you should be thinking about is what kind of curl is this? What kind of volume does this person have? What kind of texture is in here? So you can start to make a game plan for how you want the curls to be, and then you won't waste too much time, curling stuff, that maybe you don't even need to curl in the first place. Okay, so for this updo i'm going to start with the very center i'm going to take the piece. I just curled this middle piece here and i'm going to roll it up, so i'm turning it and then i'm rolling it and i'm going to pin it right into the pins that i made here when i created the volume. Now i start with the center and then i go back and forth working on each side. So there's my center curl. Now i'm going to go over to this side and what i'm doing here is i'm taking the entire curl of my hand and then i'm using my fingers to just roll it up and i'm rolling the curl into this one in the middle and i'm going to Pin it here - and this is how i'm going to go through the whole thing, to start to create a more sleek mother of the ride. Look so there i have my two curls. Now i'm going to come back to this side and i'm going to do the same thing. I'M going to take this one, i'm going to roll it up and roll it into the updo. Now, if you want to make these curls bigger, you could comb through it and do a little back, combing underneath, but i'm just going to keep them right at the size that they are when i curl them. So this is my i'm starting to build up to here. Okay, so i don't want to have a neat row of curls here, so i'm going to use this outside curl to come up and over and create some balance, because i don't like how three rows look right here. So i'm just combing through with my fingers and then rolling it under and i'm just going to pull it up here on top of this curl and pin it on the inside. So i'm opening my pin up just a little bit and then i am pinning right down into that base that i made and then i can spread this out just a touch. So i have a base right here if you're just joining me that i created with this volume and now i'm using that as my foundation. Okay, so for this side, i'm not going to do this one first, i'm going to do the outside first, because i want to cover this pin so the way that i'm going to do that drop my phone okay, i'm down all right! So the way i'm going to do this is i'm going to back home and touch on the inside just like that, and then i'm sweeping this up and over this pin. So it covers that. So if you have short little things on the mom of the bride and your little spike sticking out, this piece is going to come up and over and it's going to hide that for you. So what i'm going to do is sweep this up. I'M going to pin this in and then i'll take care of the end after i get this secured so there it is it's nice and secure, i'm hiding that pin right there and it's swept up and off her face. Now. I can take this curl and just twist the end and pin the curl in okay, so i'm not wasting any hair, i'm using all of it to create the updo all right and now that i did this side, i want to come over and balance it by Doing the other side, so what i'll do is this hair here is coming off of her face, so i want to do the same thing that i just did on that side by sweeping it up and bringing it in i'm actually going to come over here. So you can see okay, so i'm going to take all this hair right here and i'm going to back comb on the inside just a little bit, and that gives the hair a little more grip right here and then i'm sweeping it up. So i'm using my comb to sweep it upward, making sure it's all smooth and there's not any weird kinks in here and then i'm going to twist it like this way and that way it looks really soft and natural and pinning that in so you kind of Want to step back here and make sure that you are making sure everything looks really balanced, seeing that this got pulled down a little bit with one of my pins. So i want to pull it up to make sure it's balanced and then just making sure it's swept up the face and there's no flyaways. So i'll show you how that looks on this side now. So i brought that up and now i just have this end. So i'm just going to turn this in and pin it right here. So what i'm doing is as i'm working going back and forth, i'm just checking for balance and making sure i'm hiding my pins along the way see. I need to smooth that end out a little bit and then i can use it for a curl, so this curl is great because i'm going to go over here and i'm covering the bobby pins that i have showing right here. So you don't want to see any pins and just going right down into my base like that. So now i can take a step back now that i have this beginning right here and check her out from the front and make sure it's all balanced and smooth. I make sure the volume is still what i want before i move on. So if it's how you like it so far, then you can move on so i realized i have this one more curl here. So i'm going to go ahead and i'm going to bring this one up as well. So what i like to do, when i'm bringing the hair up and over is i'll just hold it softly in my hands and calm the curl, and then i can have more control over the curl when i turn it to twist it, and that will help to Make sure you have really smooth beautiful curls and you don't have any ones that are frizzy or have kinks in them or just don't. Look that polished when you're, creating an updo like this. That is on the sleeker side and isn't one that has a lot of texture. That'S so popular right now. You need to work really carefully with each curl to comb through it, and i know that feels counterintuitive right now, because we're in the age of taking a curl and pulling pulling pulling texture spraying it and making it all broken up and crazy, which is great. But i'm telling you not very much many moms want that. Okay, so this is my polished curl. So far i like this, so i'm going to spray it now i'll tell you when i was doing the wedding i made sure before i kept going. I i i showed the mom in the mirror, how the front looked so that i could confidently work on the back, so i gave her a mirror. I had her look at the front before i kept going, i said, are you liking? It so far. Is everything working out good, she said yeah, so then i can do the ball, keep going and be creative in the back. When you don't have confidence in the front, you can spend all the time in the world doing something beautiful in the back, but if they don't like it from the front it doesn't matter, it's not going to be cute. So don't waste your time doing a beautiful back that you have to take out if you haven't checked on the front, that's another tip all right! So now i'm going to go ahead and curl the bottom all in big barrel curls. So i'm really just getting a little bit of bend, i'm taking a huge section um if the hair is really really thick, you're not going to be able to take this much of a section, but this hair isn't terribly thick. So i know that i'm going to be able to roll each of these curls up in one sweep and that's why i'm curling them in this way. I might break up one or two in the middle just for shape, but i i know that i don't want the updo back here to have like 20 curls, so i don't need to do 20. Big barrel rolls. I maybe want oh five or so so that's why i'm just taking about five sections in the back, because i know i want about five curls in here to kind of bring it all together, um, if you really are having a trouble with uh like control of How much hair to pull in it? Just that's something that i think just takes practice the more updos that you do, the more hair you realize you need for the creativity of the thing that you want to do so when i first started out doing updos. Sometimes i'd be like okay, i want to do this thing i get started and then i get towards the end and my design was done, but i had a ton of hair left or the ladder where i knew what i wanted to do and i would get Going and then realize i didn't have enough hair for it. So that's something that just comes with time and practice um, but if the hair is really really thick, i always recommend kind of trying to hide some of it away so making out, like maybe a bun in the center to get rid of some of that hair. Before you get going, if you don't want to have too much hair, okay, i'm going to start in the center. I'Ve got about three curls right here, so i'm going to do two just to keep the balance i'm combing through and i'm going to roll this curl up towards the middle and pin that in and i'm pinning it up at the base. Opening my pin and you can always go back through and double it up, so if it's really thick hair then go through with the second pin and pin it again, that is always an option. Okay, i did that one now, i'm going to do the same thing with this, i'm just combing it slightly and as with the other ones. If you want to have a really big curl back here back home a little bit, i don't want it to be huge. So i'm just going to comb through and then i'm rolling it up and then pinning it in. So you can kind of decide how you want the back, the back bottom down here to look. If you feel like they want it up really tight, then what i would do if you wanted a tight sweep up here, as i would pin it in first and then curl under rather than pinning it up and curling it inward does that make sense. So as an example, if i wanted to have it tight on the back of the neck here, i would pin this in first and then curl down like that, rather than curling it and rolling it up, but i'm going to make this one kind of sweep upward. Like that instead combing it just to make sure it's nice and smooth and then rolling it in and pinning it toward the inside, so i'm making sure that this is smooth because that's the part that's going to be seen a lot on the inside or on the Outside there and then i'm pinning it on the inside and then coming over to the back and doing the other side. So i have two more pieces here and let me bop around this way. So again, if you miss that, if you want to have more of sleek up the very back of the neck and curls coming down, then what you want to do is: pin this in first and then curl down okay, but i'm having mine sweep up. And so that's why i'm combing through and i'm rolling mine upward, and so it's going to be looser on the neck, so nothing's. What is it right or wrong? It'S just a matter of preference and how you want the final look to be okay and then one more section right here. So if you have someone who has super short hair and the back isn't going to do this very well, then i would recommend just getting your curls in and then pinning up the hair on the back of the neck and just pinning the ends right into the Curls, rather than trying to make a loop with them, because then you really run the risk of them falling out throughout the night, because they're too short to stay in okay. So now that i have that, in what i'm gon na do is just make sure that it's even so, i'm kind of walking around and i'll pull a little bit where it needs to be. I see that this isn't quite as smooth as i want, so i'm gon na just spread it out a little bit with my fingers and that's what's really great about doing these smooth kind of barrel roll curls is you can just smooth them out with you? Can pull them out, fan them out with your fingers, because you comb them and they're nice and smooth, so i'm pulling up any flyaways using my comb and then just hairspray to finish making sure it's really balanced on each side and, like i said when i got Started moms often like to have hair pulled up off their face, so they look younger and that's what i did here. So let me show you so just to recap what we did was we did the volume first. I did a little backcombing and created the base right here and then i did the bangs, so we were talking about if your person has really short things, this is a way to get them off the face. Now, to be honest, i don't love how like this right. I didn't ride. Sorry, not bright mama, the bride. I didn't totally love that look of it pulled off because they were short and it didn't really. It didn't. Have a lot of flow didn't look as elegant, as i think it could have if she would have had them down swooping across her face, but that's not what she wanted. She wanted to have them off her face, no matter what it looked like. So that's why i did the pin here and then we did just the smooth barrel curls in the back by doing big, curls and rolling them in, and then i swept up the side to cover the pin that i have in right. There swept up this side. All in one swoop, so you can see this all goes in, pinned and then barrel curled and then i swept up the back. So this is a pretty simple updo, but really more classic and elegant and beautiful for moms and they feel more like themselves. They feel like they stand apart from the wedding party and that they don't look too trendy or like they're trying to be young, because that's often what moms have a hard time with. So i hope that was helpful. If you have any questions, please post them in the comments and i will be happy to answer them and then just a quick note. I am doing a beta launch of a new course for updates for beginners. So if you are new at updos and you like my teaching style - and you want to get the basic fundamentals and go through an eight-week course - that is starting october 5th - and it's going to be eight weeks in a row and i'm going to be putting out New content every month for you and every week for you and then you're gon na have four one-on-one coaching calls with me as well. So, if that's something that you're interested in, you can also send me a private message or email me at opticollective, gmail.com and i'll get you going with that all right. Thank you guys for joining me and please post any questions. Let me know if you have any other ideas, all that good stuff i'll see you next time. Okay, thanks guys, bye,
Comments
Hair Styles By J: I love your channel!!! Such a talented hairstylist!!
Stella Gonzalez: Really nice! Thank you!
EVA HUBBARD: Would love to see this with some long bangs in the front, framing face
ST MARK: It's Beautiful.
sumathy sivanesan: thanks a lot.
Ginger Trotter: Wish you lived in Las Vegas. Could really use someone like you here.
M z: Just do it we can see what you doing