Top Ponytail And Minimum Baby Hairs| Thick And Long Straight Lace Front Wig| Julia Hair
- Posted on 04 March, 2020
- 360 Lace Wig
- By Anonymous
●▬▬▬▬▬▬▬▬▬♛Julia Hair♛ ▬▬▬▬▬▬▬▬▬ ●
I am wearing a straight wig in 24 inches http://bit.ly/2FU0l2s
https://www.juliahair.com/ ➤ Top-Selling wig:http://bit.ly/2TzMtmr
20% OFF for All hair bundles with closure&frontal: http://bit.ly/3881oYK
hair detail: 13*4 lace frontal straight wig 150% density 24 inch
Use Special Code All orders get Extra 5% OFF" y3tb"
Order over $159 ,get Extra 3% off ,code “WD3”
Julia hair official website http://bit.ly/2RiPXGX
20% Off For Making Into Wig http://bit.ly/2tW721B
Transparent lace closure& frontal http://bit.ly/2sribaf
18% For Hot Selling Wigs, No Code
Hot selling Transparent lace wigs http://bit.ly/2ToS1ju
New arrive 13*4 13*6 lace frontal fake scalp wigs http://bit.ly/2tVL1Ql
New arrival wig & hair http://bit.ly/2RlgkMz
Subscribe #JuliaHair monthly giveaway on YouTube: https://goo.gl/6z9tvz
Follow IG @juliahair_no1: https://www.instagram.com/juliahair_no...
AliexpressJuliaHairstore
➡
Welcome to IAmBeautifulHustler Channel
Be sure to SUBSCRIBE & TURN ON YOUR ALERTS
CONNECT WITH ME✨
Personal IG: Iambeautifulhustler
Business Instagram:_Beautifulhustler & @thebeautifulhustlerbrand
Twitter:_Beautifulhustl
YouTube: IAmBeautifulHustlerTV
✨SLAY WITH BEAUTIFULHUSTLER✨
TO PURCHASE MY PRODUCTS :
WWW.iBhSlays.com✨
Lace Melt Adhesive,
Melts Belts,
GLAMWAX
and more ❤️
Have YOU Purchased your LACE MELT ADHESIVE YET?
To Purchase : www.ibhslays.com
✨✨✨✨✨✨✨✨✨✨✨✨
Spanish Mami Proof✨
Puerto Rican Mami Proof✨
Out the scalp proof
Swimming proof
Sex pulling proof
Waterproof✨
Sweat resistant
Adhesive : Lace Melt Adhesive
@thebeautifulhustlerbrand
YouTube :IambeautifulhustlerTV ❤️
To purchase: www.ibhslays.com
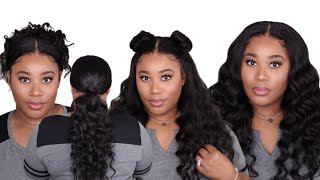
Hey beauties, it wasn't like to own a beautiful TV. Today we will be doing a top ponytail style and today's figures provided by Julia's hair that I've just sent over this 24 inch 13 by 4, straight lace, front, wig and guys this bit was extremely extremely full. You will see towards the end of this tutorial when I showed the finishing look. How full this wig is. This week actually looks like a frontal with three to four bundles, so it's super super full submission. You guys check out the description details down below, so you can get the exact density in information on where to purchase this week. Now today, as I've mentioned, I will be doing a top ponytail style but I'll. Nevertheless, you can see the unboxing on the bottom left of this tutorial, but today I jump straight into doing the ball cap method. Now I got this method from one of my youtubers that did a review on my legs flew and actually liked this technique. She actually purchased my goo and did his technique for her ball count method and I actually wanted to try it out and I loved it so um. What I did was placed a cap on I'm to her head and I used one layer up that beautiful hustle. A small blue, and just one like layer of spray of that bedhead hard head spray and I just blow-dried. It was completely clear and this actually made my ball cap method, so much more so much more better because one you knew you using less product. So, instead of spraying a person's head a few times or using you know, different layers of different products to get the ball kept us take the first time just using one layer of that glue and one on one a round of that spray. It got this cap molded where it was not lifting whatsoever. So this is a easy, quick, lube, all cup method that you guys can try when your clients - and just let me know how it goes now for this Connie here she does have like Lone Star burns, and most people don't want to really cut that sideburns off. So I just match the cap to go with the same exact shape of her hair on my all, the way down to the sideburns Bishop. What is up to them? Are they okay will cut me? They can cut it, but if they don't want to, they shouldn't have to use just learn how to work. You know around around it. So, as I mentioned, I just went ahead and did her cab and now I'm just gon na go in with that Ruby, kisses Foundation, 11:13 use in the darker shade and just begin to shade on top of that cap. So I could blend nice and seamless, and I really really like I mentioned like this. Myth is so much more better than just doing it. How I used to do it cuz it just speeds up the process as well as far as the installation process. For this step, so after I finish applying the foundation, I will get into you know applying the wig of course, and this week I did have to bleached it nice and I did do some plucking. It was not hard to pluck whatsoever, but you know, depending on what type of tweezers you use to be careful to, you know be careful when plucking, because you can't whip the lace easily. So just you know take your time I plug into whatever you need to do now. As far as her hairline in the week itself, this week did not match her hairline, so you will see me go on in this tutorial later, one after gluing and cutting off a lot of that extra lace towards the center. That way, whole week will not be too far down as far as in the middle section, because you do have that high-low hairline. So it's important that you do apply the glue to match the person's hair mom. That way, you can cut the extra lace off and the same as their natural hairline, but now I'm just taking that foundation, I'm applying a same foundation that I used on the cap onto the lace on top of the lace and underneath the lace as well. Then I started a while back doing the foundation on top of the lace as well just to make sure it really blends into that person's skin as natural as possible and just taking some holding spray and spread it. On top of that, underneath that lace, where that foundation is so, it does not transfer over up to the clients head which can prevent your lace from sticking or lasting. As long as you would like you to, and then I'm just gon na go and work. My beautiful hustlers legs mother, he stuff and just begin to apply my layers, wait for the turn clear and they begin to pull my lace down and get him all day. So, after adding all of the layers and two onto your clients head - and it turns clear, as you see here - you can go ahead and uh you get to hold the lace down into the flue and just have them assist you I'm wholly side down. As you glue but make sure also when you are placing the cap you do place, I mean not the lace, but when you place that lace onto the head make sure you do not stick it out regularly. On top of the cap, you want to have that lace past the cap when you land it down that way, you would not see the cap underneath there or D the print of where the cap shows that's a common mistake. Some new sellers make as well. You do not want to place it on top of the cap directly like where the hair, where the cap stars, you want to place that lace a little bit past that cap line and that way everything blends them perfectly, and you do not see that cap underneath, But once you do that just go ahead and begin to use your call me your blow dryer and the heat setting and melt that lace and today I'll be using a technique. I learned from slave out Jordan and by putting my melt belt on top of the lace it's before. I cut the extra lace off instead of doing it after the lace, but I still end up trying to lace down once again. But I just went ahead and put it on top, like I said, for about five minutes and now I'm back to cut off the extra lace and I will be using the eyebrow razor and, as I begin to raise off this extra lace, you will see how Natural and how well blended and melted on this lace isn't to the skin before I even tack down those extra corners super Mel, just super natural looking and blends so perfectly and really melted in so once I get into you know finish: laying this lace cut off The extra and taking everything down we will get into the star take down every little trailer pieces that still looks at everything. So just before you get in on Elizabeth again in style and look how natural that is. Looking as I'm cutting down the rest of the lace, they should still be so naturally, installment melted, absolutely love my product, of course, and I'm just gon na go ahead and take down that other side as well, and as I mentioned after we do all of this. We will get into the styling portion as far as baby hairs. I didn't do too. Many only did I'm just like at the heart areas in the sideburn I didn't want to go baby create a baby pray. I didn't want to go baby hair crazy with this installation, but if you do want to add more baby hairs to this install when you're doing on your own clients feel free to I'm just spray it across the hairline. Before I tie you down, that's just to make everything just super super like push back to, because I like I mentioned, I didn't want to do too many baby hair, so I didn't want the hairline to be as like unique as possible. So I didn't comb everything back and then tie it down, and it's gon na give it like that natural push back on the head on as well from the last band and that spray laying everything down and off-camera. While I was waiting, I did go ahead and press all of this hair out I'll, just use my flat ironing and some flat ironing spray and pressed out the whole hairline. So I'm just gon na calm their hairline out once again to make it nice and soft, and I'm just gon na take alcohol as well and just wipe off any residue. That'S on the skin that dripped down on the forehead so does not have like that white. It was to do outside of the hairline, so I did go ahead and clean that area off as well and as I mentioned before today style we will do the top ponytail look, so I will begin to part off my section for what the ponytail will be In the hair that would just fall down behind the ear, so I'm just gon na start and part. You know a little small section depending on how much hair you one up is up to you. You don't have to do this. You don't have to put up the same amount I put up, you could put up all at the top or you can put up even a smaller section at the top. It'S just all going on your clients, preference, but I didn't wanted to do like like a deep side parts on both sides and then half the hair pulled up at the top and right now, I'm just pulling down that little section right there and I will do This on both sides, because this would be the only baby hair that I do for this install just a little swoop right here and then, of course, the sideburn and everything else will be either down behind the ear or pulled up in a ponytail. So do try to make the parts as symmetrical as possible, so it does not look uneven, but once you get all of that out the way make sure you part off a section in the back as well to cover up where the tracks start along. There'S the lacewing and I'm just gon na put everything that I'm holding right now into a quick messy ponytail. That way, I can begin to use my glam wax stick and apply it on those areas that I will hop come out before, I'm actually putting the top up in a ponytail. So just a quick little heads up, I did change the packaging for the glam wax. My brand colors are actually black a pink and gold, so this was pretty much like my old labels and my old. You know my old. I forgot what you call it, but it just had a French fries, my old logo, there. He goes my old logo, so it is the same product for this new shipment. It will have a different labeling, but it's a different packaging, but it is the same product. I just updated my packaging, so everything matches so it will be updated on my site as well, so don't be confused as the same product. It'S just gon na have a new packaging look, but I'm just gon na take that glam wax and a hot comb and just press everything out and guys when I take this week was so full like. I was just so amazed on how full this weed was. Like a lot of people, you know thought it was like frontal and bundles and everything, but it's really just how cool this week is like they really did a great job making this last week here, like I, have no complaint, they have a super soft before hairline Is the work way everything so that was so dope, but now that I have all of that pressed out what I'm going to do is just take a little bit of wax and apply it all on my area for the pony tail part just do a little Hot coming and then I'm going to secure everything with the big new rubber band, I'm you can use the small black rubber bands you can use whatever you prefer, giving use like just all stretchy, scrunchies or whatever like that. But it's just really what you like to use, what works best for you and you know. Sometimes I use this from all black rubber bands, but I really like the bigger ones because they stretch more. You can really grab it. How you want and go around the ponytail area as many times as you need, so I will use the big mood on rubber band for this part, but once you do your wrap around the ponytail you're, not gon na see the rubber band regardless or whatever. You are using, so it really does not matter so yeah once I do this, I will do the wrap around and you know just to cure the little you know so that way to have been don't show just do that wrap around part smooth everything out, and I will get into the finishing touches as far as what a baby hair - and you know just filling out the cars let's pray for today I will be using the moose bed head, I'm the most holding spray in the web thing I like to take the wax. Stick and rub it on top of the hair, it kind of makes it lay down already so once I lay it down I'll just take a little mousse and put it on top of it, and then I'll go on with the holding spray. Once I get it to the desire suit that I like it to be, I just give it a nice firm hold. So yes wax stick moves and then we hold these words. What I'm doing for the baby hair um. This is gon na, be like my new technique. I like this way so much better y'all know I always try new stuff trying to see know what works best and giving new ideas to tribal things, because every stylist is different and could do you know things better with certain products, so yeah I'm going to just Do the same technique for all the four of the baby hairs that I am doing so just continue to watch so now that everything is complete, I'm just gon na go ahead and black sprinkles, so the pars and B will be finish, and that is pretty much Like the whole finishing touches on this look, so I hope you guys enjoyed this tutorial. Let me know what you think about this look down in the comments, don't mind me. I know I look a mess, but this ain't about me right now, but thank you guys for tuning in to I'm be trusted. Tv, so would be 200 subscribers. If people just stop hating subscribe to stay, watch the videos anyways, we will soon be to a honey cake. So I thank you guys, but it continues to pour thank you for buying all of my products, I'm officially restocking and I'm gon na upload everything on the site so stay tuned, and thank you guys, just a constant support.

Comments
Princess Toyia: Heyyyy Shae!!! Honey you will be at 100k in no time, and you definitely deserve that and so much more
Dorthea Williams: Great job... nothing else really need to be said
Prestige Nashiboo: Love it
JustLing👑: Got my alarm set for that restock and install is laid per usual
Julia Hair: u are so creative, and patient, the hair looks so beautiful, dear thanks so much,u have great talent
Shell Shell Beyond Beauty: Just purchased my glue and the remover girl when I tell you I'm over excited. I can't wait. Been trying to get your products for a hot minute now. Your amazing beautiful work
Red Tucker: Looks so natural..
Abigail's World: Can you do a sew in closure
Brittany Pearson: What time will the restock open?
deseraymiles87:
Shandell kute: ♥️♥️♥️
Carmen San Diego: I just ❤❤❤❤❤❤❤❤❤your videos..
Asia Williams: Nice
HeyLe: Can you link your hot comb please
Skylersthelimit: She always falling asleep lol.... beautiful hustler got them good hands
Its Rena: Install is laid, What product do you use to slick baby hairs now???
•LayLay• Foriegn: What kind of makeup are u using ???
Julia Hair: same hair in the video https://www.juliahair.com/julia-150-180-density-straight-human-hair-lace-front-wig-with-pre-plucked-hairline-13x4-4x4-lace-front.html
BRIONA J WEEKS: