How To Add Honey Blonde Highlights + Lowlights To Your Hair For Beginners
- Posted on 19 July, 2019
- Bob Wig
- By Anonymous
Watch me go from black to blonde in this coloring tutorial. This process is totally BEGINNER FRIENDLY, it just requires a little patience. I hope it's a breeze recreating this look!
__________________________________________
Business advice:
https://www.youtube.com/channel/UCmP6a...
Follow me on Instagram:
https://www.instagram.com/jasxaigner/
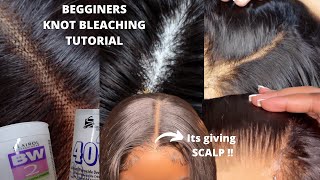
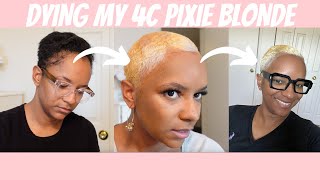
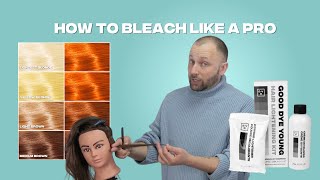
What is up you guys, I'm jazz. I ain't welcome to my channel in today's video I'm going to be showing you how I achieved this super cute, hair color. I have bleached my hair colored and put highlights any little lights and all that good stuff. So I'm going to be showing you guys step-by-step how to do this, so you can look it's good okay! This is so freakin cute. I love how this color came out like I am really proud of this color job. Okay, this week was black. This video is sponsored by cranberry hair. They sent me this closure wig, so this was a black wig yarn and it looks so bad. So if you have never clicked highlights in your hair or you don't know whether you can I got you, I got you covered because I'm literally going to be showing you the easiest way to do this style. Okay, make sure you guys give this video a thumbs up and hit that subscribe button. If you haven't already says we have fun on this channel, okay, so let's get into the video alrighty my love. So this is how the wig looks after I bleached my nice and pretty much coal washed it. Let it air dry, you know. So this is the guts of the wig. This is a factory unit, so it's not look pretty standard here. I'M saying I want to start with my dark and lovely in the color honey blonde and I'm just gon na follow the instructions. Hopefully you guys can read so you can follow them too. I'M just mixing this together and then you're gon na give that a really really good mix. Alright. So now I'm just wanting to be applying this hair color all over the wig. You guys. This is really easy. This part is super duper easy. It'S pretty standard apply comb through make sure you get it all in all throughout the wig, distribute it real, real, good, okay, smaller sections this week density wasn't high, so it was a really I'm not going to say a 10 week. It was literally like the perfect amount of hair on this week for the summertime, not too thick and not too thin just right. Okay, so you want to make sure you're using small sections to make sure you cover every single thing. Please note that, even though this box dies says honey, blonde says your hair will not be blonde after you are finished, coloring it. Okay, it's gon na give you like a brown shade, I'm actually going to use another two box guys after I rinse this color out. So you guys will see that later in the video, but I'm just repeating the same steps applying the color combing it through just making sure I get it all over the hair. Okay, that's pretty much it. So this is the easy part all right. So I am pretty much done. I am just going in and using up the rest of this hair color. Just to make sure I got everything covered okay, so I'm going to place this wig in a plastic bag and let it sit for an hour and a half okay. So once the hour and a half is up, I rinsed it out, watched it real good with some neutralizing shampoo and let it air dry. I did not condition it because we're not done yet so now, I'm going to go back in with two more box dyes. This time this is the light golden blonde by dark and lovely as well. You want to mix that together, but this pack comes with a lift booster, which is pretty much bleach, so you're gon na go ahead and add that to the mix and then shake that up really good, y'all and I'll start applying it directly to the wig. We are literally literally repeating the exact same thing that we did previously with the other box dye all right. This is so easy, y'all, so easy, beginner friendly. You got it. Okay, it does not take rocket science. Alright, I will warn you guys, though it took me three days to do this entire process like from beginning to end. So, even though this is a 20-minute video, so this is not gon na. Take you 20 minutes. Okay, you've been warned. Also, you guys all the hair and links to this wig will be in the description box. Again. This video is sponsored by cranberry hair. They send me this hair, so yeah y'all make sure you go check them out and show them some love, I'm extremely proud of how this hair turns out. I'M not even gon na hold you all right. Now I'm pretty much finished, I'm just going back in again to make sure I use up the rest of this hair dye, I'm going to let this sit on the wig for 45 minutes. You guys can already see that it's changing already, because this has bleach in it. Well, you know they call it the lip booster. I don't want to let this process for as long as I let the first hair dye sit. Okay, so once I washed it out with some neutralizing shampoo, this is how it turns out. This is the perfect Brown okay. This is exactly how I wanted it. I have not conditioned the hair. This is just strictly wash and air dry. Okay. So now we want to go ahead and get our bleach ready, so we can start highlighting I'm going to be using two of my favorite products. Of course this is the iron cream bleach and I'm going to go in also with the iodine 30 volume developer. Alright, I did not mix this, I mean I'm sorry. I did not measure this y'all just got it. I bought it. Okay, you can eyeball it to where you can measure it. It'S useless alright! So I'm going to start by sectioning my hair off into three sections. Of course you are going to need some aluminum for you. I highly suggest cutting out your sheets before you get started just so you can move faster. This will make your life a lot easier. Alright, so this is how my bleach consistency is looking. Yours should look something like this over in here. It'S up to you. Alright, you guys. Now we are going to start highlighting what we're doing right now is called weaving. So all you're going to do is take your red tail comb and weave the hair from the top of your section to the bottom of your section. This can be as big or as small as you want. Okay now you have highlights, and you have blow lights. The top piece of this section is the highlights, and the bottom piece is the low lights. Alright for the bottom half of this wig, I will be doing highlights when we get to the top I'm going to do little eyes, alright. So the first thing you want to do is go ahead and tease your hair. This is going to prevent any lines of demarcation. Okay, that is not what you want stirs. You want a very clean and smooth transition from the top to the bottom of your highlight. Now we're going to take a sheet of aluminum for you and put it directly, underneath your highlight section and now you're going to do now is apply the bleach directly onto the hair. Make sure you guys are applying enough bleach, because you want to make sure that you get every single strand. Okay and all you doing is just painting it on this pretty much it take it up to where your hair is teased at so again make sure you do not have any lines of demarcation and make sure you guys are putting enough product to get it throughout. The entire section of hair once you've added enough product we're just going to go ahead and close this for you up by crinkling the sides with your comb and you just pretty much close it on up and if you guys are wondering I didn't think I showed The end on this clip, but I do not put any bleach on the very very ends of the hair. I pretty much just leave that open because I want again. This is a highlight: okay, so just a really smooth transition. So I'm going to be pulling out. Another section of hair I'm going to go ahead and weave this section as well and repeat the exact same steps again you guys. These are my highlights in the back once I get to the top, I'm going to be doing little lights, but you want to make sure that you absolutely tease your hair to avoid any lines of demarcation. We'Re going to go back in with our sheet of aluminum and a by that product. This is the same exact step over and over and over again, this entire process took me an hour to do so. Make sure you guys take your time. This is not a quick thing to do. It takes time and patience. Also you guys, when I do highlights and or lowlights I try to keep track of how many sections I'm going to actually do not sections how many likes weaves I'm going to do like how many highlights I want actually, so I did a total of twelve. So I have three sections, so I pretty much did four highlights and lowlights in each section. So again, in the back of the wig, I'm doing four highlights and in the front of the wig you're going to see me do four on each side of the front of the wig. I hope that makes sense you guys so all-in-all. I have a total of twelve for use all right, my love's, so we are finally in the front of the unit. Now, I'm going to start doing low lights, okay, so this is the exact same process, I'm just weaving out the hair, I'm going to pull it apart and comb it through, but instead of working with the top section of the hair, I'm going to be working with The bottom, so I'm just going to do the same thing: tease it out and apply the product onto this section. Again these are low lights. The reason I chose to do low lights in the front was to make sure it was a really seamless blend and that everything just came out super bomb so same exact process y'all, but instead of the top piece of this section, we're working with the bottom now. So once I'm actually done with this side of the front, I'm just want to go ahead and repeat the exact same steps on the other side. Okay, so once I'm actually finished with everything, this is how it came out. This is how my four years are. Looking now, I'm going to go ahead and start taking them out. Okay, so before you guys X, this hair was processing for a total of an hour in the back okay. So I use 30 volume developer for the back for use and when I got to the front, I had to use 40 because the back was already processing and I couldn't possibly leave it on for too long without over processing the hair. So this is how the wig is looking y'all real crazy, but I'm about to go ahead and wash her out with some neutralizing shampoo, so we can actually go ahead and start applying the hair color to it. Okay, so for hair color, I'm once we using my 7 W and my 8g, I use the entire bottle of H G and this is a 1 to 2 ratio. So I'm going to pretty much be putting double amounts of developer with this hair, color y'all and yes, it looks green, but it's not going to be green y'all. This is a light golden blonde color. This is going to go towards the back of the wig and towards the very front okay, so I will be applying this color, while my hair is wet just to make life easier on myself and again, we're gon na put this in the back, and then this Is going to be pre stuff explanatory, I'm going to be applying this hair color with my applicator brush combing it through to make sure it gets all over the hair and repeating this step throughout the entire wig. Alright, okay, so I'd mixed the 7w off-camera. But that is the caramel color, so I will be putting this color towards the middle of the wig, just to kind of give it some dimension and give it some variety inside the wigs, with the highlight in the low light. So I didn't want one color highlights. I wanted to H the 8g. We just want to give me that light golden blonde and then the 7w is one to give me that really pretty caramel. So I pretty much use only half of the bottle of 7w because again this is only going in the middle of the wig. I place the 8g at the very top all right, so for my last little sections at the top, I will be going back in with the 8g again. This is the lights golden blonde color. So I'm just repeating the exact same steps you guys have seen me. Do I got a little lazy and just kind of poured it all over? I was really over coloring this week at this point, so I got lazy, y'all, alright, y'all. We are finally finished so once I got done applying all the color, I let it sit on this week for an hour and now I'm going to go ahead and wash it out. I didn't use any shampoo y'all. I just conditioned it with the actual conditioner that came with the box dye, which I will say it's one of my favorite conditioners in life by the way. So I let this baby air dry and now I am going to go ahead and straighten her out for you guys on camera. As always, I am using my beyond the zone. Heat protectant y'all should know that's my absolute favorite ever and I will be using this to protect the hair from any heat damage or failure. I promise I get out the way y'all in this clip. I was just all in the way like so smooth over, but anyway do you guys see this color like it looks so freaking bomb like what I'll show you guys. The fluttering that I'm using is a titanium plate flat iron by baby bliss, really one of the best veterans out there. I am not going to lie it's a little on the expensive side, but it's definitely worth a like. Look at this. Look at this silk. Look at this color look at this hair. Like yes, cranberry y'all came through for the kid I'm not gon na hold you, but I'm just pretty much fluttering in and Al's getting a real scrape real straight. You know I'm saying, and she really really flat, earned really good like look at this color like look how this color paint out y'all like it's taking me one pass. I have not had some flour on this hair over and over this bleach did not. It looks amazing, but are you seeing this now, I'm just gon na go in with my carrot: hair wax stick to get rid of any flyaways and just go ahead and brush that into the hair. Look at this y'all look so freaking good y'all. Now I'm just going to go ahead and hit that top with my curling iron, because just because it's a whistles, just cuz, it's a wig doesn't mean that everybody needs to know. Okay, so you just want to do this until you're completely satisfied with how flat the top is, and after I'm finished with that, I'm just going to go ahead and pluck a little of the part just to give it a really natural, realistic look. So this is how the final look came out. Chopped. Do y'all see this wig. Okay, look at it! Look at me and look at it. Look at me and look at it. I am loving these colors and a good part about this wig. Is this perfect for literally every season summer spring fall winter? I'M gon na be rocking this wig every single season? Okay, I'm so freakin happy about how this week came out. How the colors came out this week to this color. So well I'm very surprised, but I absolutely love it if you guys are interested in purchasing a recreation of this unit, I will have the link to my website in the description box down below you will not get this week, so it won't be this week this Week is mine; okay, it will be a wig custom made just for you. The hair for your wig will be from me to ensure quality purposes. So, yes, we can all play together. Honey! Okay, if you guys have any other recommendations or on hair colors, you like for me to do a tutorial on leave them down in the description box below. I hope you guys enjoyed this video and I will see you in my next upload.

Comments
Jasx Aigner: Other hair color suggestions?!
NiCole Sky: I usually don’t even watch these type of videos bc I know that if I do it, it won’t turn out right. BUT the fact that you used box dyes as the base for this perfect blonde color for us brown girls got me inspired. Sis, you Kilt That!
patrice murray: Wow this was so simple! But the color looks like it took extra skill of you didn't watch the video. I'm saving this one. Thanks for the mini class. Love you!
The Billionaire Che: I love this I tease the hair when doing highlights too! You always got the s
June’s Finest: This was one of THEE BEST damn tutorials I’ve ever watched. GIRL YES. I am subscribing to your channel boo.
Evelin Merchant: Love this! And your channel ❤️. I’ll try this for my fall hair.
High Priority Cali: Okurrrr I used these method for years my mom did this In the day
Slioness007: Girl! This is literally highlights for dummies!!! Thank you so much for this video. A lot of youtubers get hair for free and be having the ppl who pay for it ducking over their bundles at home. You’re a real one for this one.
Lynette Smith: Gorgeous hair and amazing colours. Suits your skin tone perfectly. I'd love to see you do some colours on a 613.
VirtuousBeauty Salon: I watched your other video on alie express vendors and that it's difficult for you to support many of there vendors because of quality of the hair. Is this a vendor you would recommend. I didn't see a follow up video on this hair
Stephanie S: Gurl!!! This vid was right on time
Shinta Brown: This come out beautiful I love the color
Robyn Kennedy: this was so detailed I think I'm a cosmetologist atp lmaoo
Love Bug: I like the color of first dye because it's the color of my hair when I have been in the sun a lot. Thanks for teaching me a new technique regarding highlighting hair. Also, when will the bundles go back on sale. Life happened and that money had to be spent elsewhere. I've recouped my losses and put that money aside so I am ready
MzDivaShy: Would love to see it curled. Looks really good.
Daily Dani: Sis!!! I hadn’t have the money when you posted about your old video but I’m ready to buy now may you please temporarily open that option online please!!
Nestascia mona: Love it!!! Giving me Beyoncé vybz. Can’t wait for you to do a meet and greet
Carol Williams: Jasx...I absolutely love, love this color...this is the exact color i want to do on a short wig...anyways ...you are a color whiz...keep up the goodworj.. Love you , your work and the vids!!!!
~Daphne Amy's World~!: I had a wig from freetress simular to this 2013 for Valentine's day wig and I had complents on it they didn't know it was a wig I fixed the body wave with perm rods even my had a similar color one day Love this on you compliments your skin tone well❤️
Taynay Cameron: Ok this is bomb!!! These are the colors I work with. Good job sis!! Yasss!!
Tracie Cook: LOVE THIS... R U SELLING THIS WIG?
Tiyunna Chambers: Omgggg I loveeee it I’m so scared to try but this is bomb
Silky Saks: The wig turned out amazing
Kamille Kelly: I’m sooooo glad ur back to being u yes sis happy looks good on u
Lady Cee: Pretty wig. Glad to see your feeling better, if you look back at your video describing how you was drugged I left you message. Again take care of yourself and stay safe. Blessings!!!
Mayowa Adewoyin: Pls can you write the list of all color used. Thank you
Lakeshia Jackson: I know I’m late but I love this
TheHareLife: Love it
Lia Walker: I’m loving very beautiful
Alleriar Rowles: Love this hair
Ms. Sunshine 2u: I love that color,you did an awesome job.
Chrissy Daily: So bomb! Loved it in your live last night
Gabriël Hecbert: Just wanna say hi! I am a subbie to your channel. The wig came out beautiful!
Lizette Baldeo: It looks GORGEOUS!!!!
Devona. G: Loveeeee It That Color Too
Krystal Russell: You sound like you from Detroit
Angela W: Thank you I live for this color hair.
All Things Alisha.E: This is EVERYTHING!!!!
K. Gray-Jackson: New subbie! Glad I found your channel. This customization of this unit is bomb. I love the color its so pretty. Thanks for the detailed tutorial...you made it look extremely easy.
Moni H: Yesss the honey suits so good on ur skin
Alathia Flores: Perfect Girl. Lovely for Summer and Fall
HAIR CARTEL: this hair is period!!!!
Elizabeth Akol: From Australia ❤️
Return Of The Wise Woman: I absolutely LOVE IT sis!!! Great video!
Brianna Simoné: This is so pretty
kkimberly2004: Loved it, beautiful! I think the part looks a bit too light though, easy fix, but A+!
Valerie Davis: Flawless
DezJanea Jones: I love it!!
Alexis Sade': Wow this is Crazy I JUST Made the same hair color as this Today ( I’m tired ) and then you upload a video
Alexis Henry: Suh! Another great video!!❤
Yairelina20 L: love it!!!
Toni Patrice: So pretty thank you so much for sharing
Cheyenne Dunnell: I would’ve used a 5n or 6ag on the roots to blend the lines of demarcation so it’ll be a seamless blend but the color came out pretty
Boujie Kayy: I’m late, but I’m here sis
Her Royal Hair Extensions:
Kawaii Franki: What flat iron do you use! Bc I need it in my life lol. Mine sucks!
Elizabeth Akol: Notification gang
Kessely Kamara: Great weaving technique
All Things WhitNicole: What number developer was used with the Wella?
LadyMili B: So pretty.. nice job sis
Meggans POETICAL Breeze: Whoever thumbs down this a## color job should've just bypassed this video PERIODTTT‼️ The color is definitely complimenting your skin tone...
Juicy Hair Affair: I did a color similar to this in one of my recent uploads! Love the dimensions. Blonde is the perfect color for the summer time!! Keep up the great content girl!
Rene Poah: What’s the colors you used to due it ?
AlexisOn TheBeat: I never heard about the hair teasing but your hair looks good
Ms Hunni: Gorgeous
LivingMyAlterEgo: You did that!!! I HATE coloring but I love this color
Queen Beauty23: Thx 4 sharing
Kierra Malone: The color is gorgeous. Your makeup looks good.
London Tayy: You did that SIS !
Zel Lewis:
belleza total: es tan facil hacer ese color en 2 procesos. desperdicio producto y tiempo ... ..
Keisha Calixte: The link did not work
Carissa C: Slayyyy Aigneeeerrrr
Tete Johnson: you did an awsome job! Will try this.
Kersha Beaver: Yes
Cee Ocean:
Xyzcat098: Beyonce vibes
Eboni M Israel: Another slay !... BTW as a hair stylist can you please give me advice on weather or not I can blow dry my wet virgin hair
The Belkis Rochez: WHat flat iron is this ?
Skylersthelimit: Ps. It’s not baby-byliss it’s Ba-Byliss♀️♀️♀️
minime: i have virgin black hair and want to go to a dark caramely, honey, buttery blonde. after bleaching, my hair became quite light but it’s pretty yellow and brassy. do i tone it then dye it a dark golden blonde? or do i skip the toner and dye it a dark neutral/ash blonde to balance it out? i was thinking of mixing a neutral blonde with the dark gold. would i still have to tone?
Datasia: What flat iron did you use
Auntie Pony: Cute