How To Slay A 613 Bob W/ Brown Roots | Customize And Cut | Arabella Hair Company
- Posted on 31 August, 2020
- Bob Wig
- By Anonymous
Hey y’all ! Welcome back to my channel !
EMAIL ME ! | [email protected]|
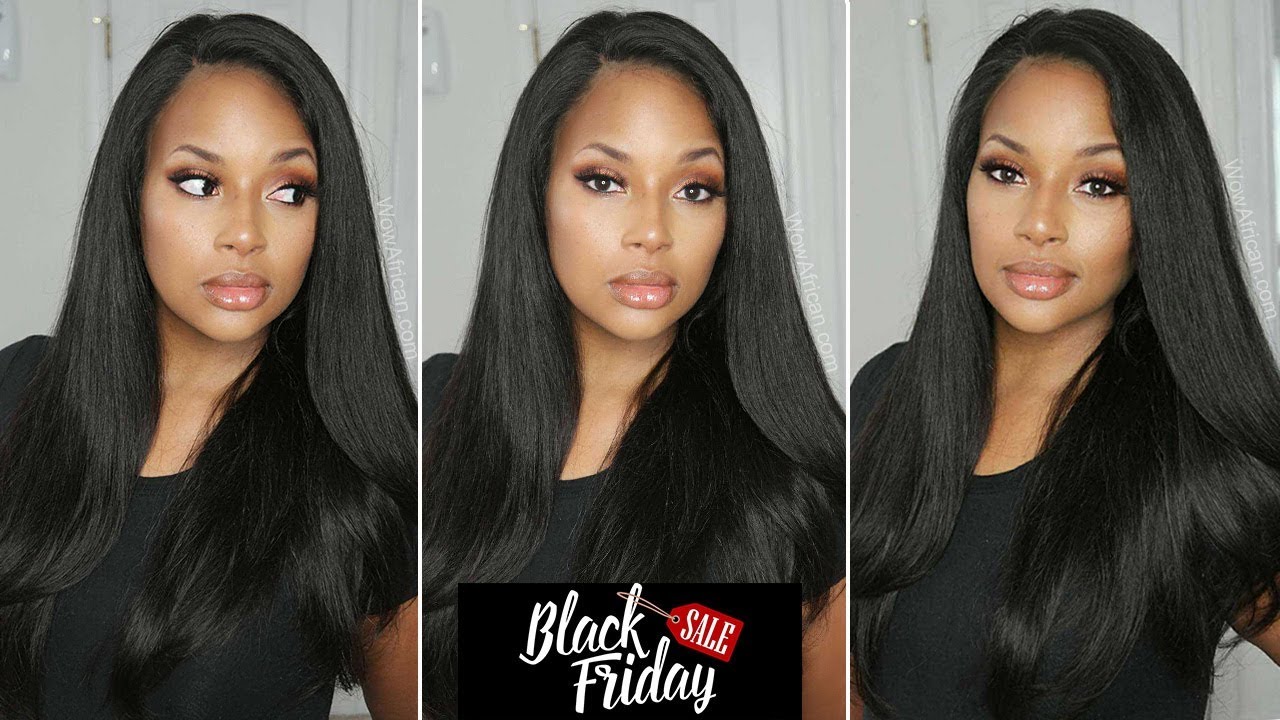
Hey y’all ! Welcome back to my channel ! Today I will be showing y’all how I prepped and cut this 613 bob wig provided by Arabella Hair Company . I am in loveeeee with this bob and if you love the customization of this hair , stay tuned for PART TWO to this video , where I install it !
╲ ☆━━━━━━━☆ Arabella Hair ☆━━━━━━━☆ ╱
Hair Info: #613wig Straight 13x4 Inch Lace Frontal Wig 12”
Hair in the video: https://bit.ly/3boEPBS
☛ Use Coupon: AYTB5
#Arabella Hair website: https://www.arabellahair.com/
Arabella Combo Sale: https://bit.ly/3lSeHEH
#360Wig on Arabella: https://bit.ly/2EQZ1AI
Buy 1 bob get 2 Highlight clip inset: https://bit.ly/3hTuKzF
Contact us:
Arabella hair E-mail: [email protected]
Arabella Hair WhatsApp: +8617746999290
Follow our YouTube: Arabella Hair
Direct link ➤https://bit.ly/2Wd0e8X
Instagram @arabella_hair_official
Direct link ➤https://bit.ly/3hyhT5r
Arabella Promoter Group:https://www.facebook.com/groups/881943...
Products Used:
Purple Shampoo (To Tone)
Matrix 6WN (Level 6 Warm Neutral)
The length of this wig is 12”.
I highly suggest using a good pair of shears and tapers . Bad tools with butcher your cut .
Don’t forget to LIKE , COMMENT , SUBSCRIBE and SUGGEST more videos !
Social Media :
@CraDeja
@HairByCraDeja
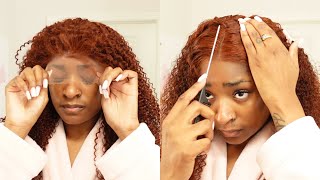
Hey y'all welcome back to my channel. My name is craig j. If you've never been here before today, i'm going to be showing you guys how i got this 613 brown roots. You know asymmetrical, blunt cut ball, that's something mouthful, but you know we're going to keep it moving. So i want to thank arabella hair for sponsoring this video. You guys can see that, of course, this hair is 6. 13 got some nice little goodies. That came along with the hair, you know a cap and all that stuff, but you know we're gon na pretty much jump straight into this video. So, as you guys can see um i've already you know, sprayed down my cap, we got to be glued. You know went ahead and boiled my water, and now you can see that i'm pouring the water in a um in a big bowl, where i am going to add some purple shampoo, because i'm going to tone with 6 13 hair and then i'm going to dip. The hair all up in it now i will tell you guys that this hair is um. It is 13 it's from ira bella and i believe it came in 12 inches. I always order 12 inches when it comes down all nice and pretty so um before we're going to dye the roots you're going to go ahead and spray the roots with the got to be sprayed to make sure that they're nice good and hard so that the Color will not penetrate through the hair. I am using a color um, a color, really, the color. Six, i believe, is six w in warm neutral, sits warm neutral by matrix. This is from a professional line. Um, you guys can use any color that you like. Hopefully, you have access to these products, but this is what i'm using. I really really like it, and i was very particular about how i wanted my roots. I didn't want no weird ugly undertones or anything like that, so i decided to use a permanent color, not a semi-permanent color, not a door or anything like that, but i decided to use a permanent color so that i can get the exact root that i want. So um i'm just going to go ahead and apply this product to my um to my root area and, as you guys can see, i'm going at an angle. You want to go in at an angle because angles create um angles, really diagonal lines create. You know a blended look, so that's why i'm going in diagonally. I am speeding this video up pretty pretty pretty good because it is pretty long, but i mean i'll just be showing you guys how i got the cut and you know whatever, whatever um it's really late. So i'm really tired, but you know i said i got ta go ahead and get this video out for you guys so yeah. I just want to be really careful when it comes down to applying this to your hair because it can seep through the roots. Honestly, i prefer that it seeps through the roots, but one thing i hate about 613 hair is how it had those blonde like white knots. Oh it literally irritates my soul, like i hate wearing 613 hair because of the uh white knot. Sometimes so i think i found a way to combat that, but whenever i try that method i'll definitely make a video for you all, but yeah keep going in doing your rules be light with it. You don't want to smear it. You don't want to make it too wild too crazy, get it onto the other pieces. So you know just take your time and be really really careful when it comes down to this process. You, i don't know if you guys can see in the corner, but the roots are starting to change a little bit. So i'm going to show you guys and after how it looks so the roots came out this pretty pretty brown color, as you can see right here, um this little bit wet and then this wasn't dry um. So in this video here, i'm basically trying to see how i wanted to wear this bob wig um. As you can see, i kind of had it as a side - part kind of bang type of look. But you know we ended up not going for that, but it's okay. So this is how pretty the root came out, really: chocolately, really nice and pretty. I went ahead and plucked the hairline. I plucked it a little bit too much, so you guys want to be careful with 613 here because it already bleached to the highest level that it can be so be really really careful when it comes down to it, and i press the hair all out right Here so in this part right here, i'm basically just going to go ahead and carve out how i wanted to wear my bang. Like i got like i said i was not. I can't talk tonight like what i did not decide. Really i didn't. I did not wear the bang pretty much. I did. I decided not to wear the bang, because i mean i don't know. I just feel like it didn't look as good as on me. You guys will see me installing this wig on part two. So this video is simply going to be me, you know customizing the wig and make sure that it's good and ready to go so right. Now, i'm just trying to see where i want to cut my guidelines for my wig. I decided to go ahead and create my guidelines, while i was on my head and then take it off of my head and go ahead and cut it on the wig stand, because i wanted to make sure that my hair fell exactly where i wanted it to Fall at now, i do recommend that you guys use some really really good shears and use some really really good clippers, because the ones that i initially used were pretty crappy and i had to take my mannequins to school so that i can clean it up with My good utensils and implements i had to pretty much keep going over my guidelines to make sure that it's the exact length that i wanted it to be. So i got my guideline on the right side of my head. I'M going to go in and do the left side. Y'All was not going to catch me lacking in this video y'all. I get tired of looking crusty while i'm trying to install my wig so bear with me because yeah you did not want to look crusty in this video. Pretty much got my guidelines, so i just transfer it to my weight cap here and i'm going to go ahead and continue using the guidelines that i've created to get the perfect length and bump that i wanted y'all. This bob was so freaking hard to cut like it was so freaking hard. As you can see, i had to use sheers and i had to use clippers. I don't believe those are tapers one or the other. I had to use those and then i had to go in and use um a sharpie marker so that i can try to like you know, get my traveling guideline to continue to flow, but that didn't happen so yeah i just had to kind of like improve. My improvise and keep going with the flow, so do so. As you can see, this is the bob and it is final look and yeah, so you guys continue to watch part two for the next part of the video. I love you guys, and i see you in my next one: go ahead and part over go ahead and head over to part two


Comments
Cra'Deja C: Hey love ! Thanks for watching Give this video a thumbs up and help others see this video by pushing it throw YouTube’s crazy algorithm ! SUBSCRIBE to my channel and follow my Instagram pages ! What would you like for me to try next ? Stay tuned for PART TWO (the install )
nini lashaé: I have no idea why this video doesn’t have as many likes. You explained everything well and with detail. I’m up looking for new and different styles to try for my own YouTube. THANK YOU this was well need!
K & Kingdom: Marvelous
kickitwithkyla: I saw you on jalen’s live and lo and behold I had watched your videos before lol , keep it up love the channel
Zaniya Mc: Yes girl been waiting on an upload!!
Halimatul Inuwa: Its cute i love the bang
Shyah Joe: Do u like the hair overall ?