Loose Deep 4X4 Closure Wig Installation Ft. Ishowbeauty
- Posted on 12 July, 2021
- Closure Wig
- By Anonymous
My 8% off discount code: "IshowFI8"
Ishowbeauty hair official store: https://bit.ly/3yoLs1o
I'm wearing 24in loose deep closure wig: https://bit.ly/3yqxGeC
All wig types from Ishowbeauty.com: https://bit.ly/3AvrbsQ
13x4 lace frontal wig: https://bit.ly/3ypRfUK
Cheap 4x4 lace closure wig: https://bit.ly/2Uq5CcU
Highly compliment highlights hair: https://bit.ly/3hcL2pb
New transparent lace wig: https://bit.ly/3hcL4gN
[ Daily human hair units ]
3 human hair bundles with 4x4 closure: https://bit.ly/2Ump2iS
3 human hair bundles with 13x4 frontal: https://bit.ly/36hZh5G
**** Contact #Ishowhair *****
Email: [email protected]
Whatsapp: +86 182 3684 8017
Follow #Ishowbeauty on social media:
YouTube (@ishowhair): http://bit.ly/2PTT7Bb
Instagram (@officialishowhair): https://bit.ly/3AmRyRX
Facebook (@ishowbeauty): https://bit.ly/3xkLfMF
Tiktok (@ishowhair): https://bit.ly/2TrFluF
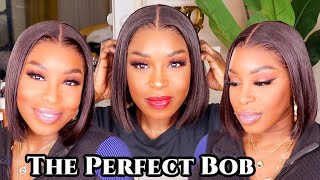
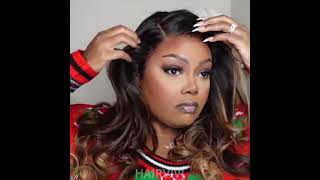
Hey guys welcome back to my channel, as you can tell by the title in today's video, i will be installing and styling this hair, which is just from eyeshadow beauty, hair company. This hair is a loose deep wig, which is a four by four closure, as you can see, it goes from here to here on me and i got this hair in 24 inches. If i didn't mention in the video, but this is what it looks like on me with the loose curls and everything - and i really like it - it's like different to what i've done before. If you like, this video, give it a thumbs up, don't forget to comment and subscribe and let's just get into the video, so i did do a wig cut because i'm always used to doing a wake up now. So you don't really need anyone if you're doing a closure wig - and here is the wig right here. I have bleached and put the knots. I just did a light plug, so i wouldn't ruin the hair. This is what it looks like i'm just going to take this nars shadow foundation in the shade dark three. This will be linked in the description box below i'm going to pour a bit of this on the back of my hand, and i'm just going to be putting that on the wig cap. If you see little wipe it's on the side, it's because i cut the wood cup off on this side, because i didn't really need it. There, just gon na do the same thing onto the wig as well. Here with laces in the bottom of the lace. There are these two clips i usually just clip them together. So it looks like this now i'm going to put the wig on with today's install i'm just going to do a quick and easy method which is just using got to be glued, because this wig is a transparent lace wig. So, that's why i had to make sure i did tint the lace just to the same foundation, shade color, that i would actually wear on myself. I'M just going to wipe the white bits down as well. It'S just literally excess glue from when i glued down the wig cap to cut the lace, i'm just gon na use one of these razors. I find these ones so much better than the other races that i use, but first i need to cut in the middle. So i'm just gon na do half and half now, i'm just gon na. Do i think this side first and with one of these all you're just gon na be doing, is cussing down. Now i'm just going to glue down this side and i'm going to use, got to be glued and just going to be sliding it underneath the way i'll just take that much from this place a bit. So i can get me now, i'm just using a different side of my comb to just press it down and i'm gon na dry it at the same time with my hair dryer. Now that is dried. I'M just gon na do the same thing to the other side. Now that is done, i'm just gon na get some baby hair out. So it's usually just this whole line here and then i just pick how much hair i want. That'S what i do, i'm doing. The same thing to this side as well: okay, i think that's gon na be fine, so here were the two bits that i'll be using for baby hair, i'm just gon na spray a little bit. I'Ve got to be spray in between that. Just so there's like an extra hold and then i'm going to dry the middle bit. I'M just going to take this elastic band and just tie that through the middle, i might not even be able to put it on properly because my ears still hurt. Now. That'S done, i'm just going to leave it like this for around 10 minutes and then we're going to get on to doing baby. So now i'm just going to take the band off and i'm going to do baby hair. I'M going to use this pair of scissors to cut in a diagonal line. I need to cut a little bit more off, i'm going to take my little straightener and just curl these baby hairs and voila. Now i'm just taking this mousse, i'm not really sure what it is. It'S i bought it yesterday because i just saw it and it's pink and, as you guys know, i really really like pink so yeah. It'S just called the curl company foaming use, i'm just gon na use my edge brush to sweep the baby hair, i'm just going to do the same thing to the other side. That was good for the first try. Now, i'm just gon na take this silk wrap. I need to put the hair up first, just laying the baby hairs with this. I'M gon na leave this on for a couple of minutes, and while that is left on, i'm gon na prep, the hair for styling. As i said in the beginning of this video, this hair is a loose wave wig, so i'm just going to do some like loose curls on it. I just need to brush everything out now. I'M just going to take this off. I'M going to use this at the elix flat iron bar to do the curls. Let'S get started with the curling. This is going to take maybe at least 30 minutes only because i'm not doing curls just hold it for like a few seconds and then drop it and look at that curl when you brush it out. It'S just going to be looser than this, which is so good. That'S once i'm done, i will be back when i'm about to do the top okay. So now i'm at the top of the hair. Okay. So now i'm gon na do my makeup and let this hair dry not dry cool down a bit, because this side is still hot, like the ones that i did like, and these are kind of warm like i can feel from their heart. So i'm gon na do my makeup and then i'll be right back, hey guys, so i am back. I'M just gon na move this a bit okay right there! Okay! So now we are going to be brushing the curls out hold up. Let'S get hot we're going to be brushing out the hair styling it to my desired look and then that's going to be the end of the video. I do have this pink hot comb. I don't know if i've showed it in a youtube video just yet, but i have any instagram tutorial: i'm gon na brush each one out individually with this comb like this. As you can see, it just brings that really loose curl and you can see. We'Ve got the curls like bone now i need to get this beauty works, paddle, brush and just brush it down just so you can get the length back like we've got the volume now i'm bringing back the length. This is what the hair is looking like. I need to get some wax stick, so we can cover up the little closure section, so it doesn't look like an actual closure, so i'm just doing this and then going over the top as well. This wax stick is from kiera care as well just started using it again going through the hot comb and making it go to the desired place that i want it just to be able to cover up the side. I'M doing the same thing here too. I'Ve put this hot comb on the highest level by the way, guys now, i'm just taking the hot comb through everywhere else. Just so it stays flat. Okay, now we're done this. Is it i'll show you a 360 of all the hair together, i'm a standoff. So here's 360 be here just gon na go like this like this and then all the way to the front. So that was the hair. That'S what the back looks like, and this is the end of the video hope you guys enjoyed it. Don'T forget to like comment and subscribe and i'll see you guys in my next video bye
Comments
Faith: Love this look hun, love to see more hair installs
Monique Alicia: Love it
ItzKeisha: I need to get the beauty works wand omg
Mistina Kinsly: You look amazing