Deep Side Part On 4X4 Closure Ft. Svt Hair
- Posted on 06 October, 2021
- Closure Wig
- By Anonymous
══════════════════♛ SVT Hair ♛═════════════════
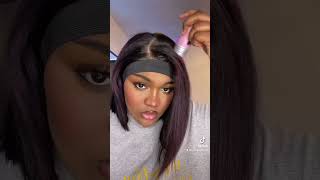
Hair Details: 4*4 Lace Closure Straight Wig 26 Inches 180%
Hair link:https://bit.ly/3lfP3LD
4*4 Loose Deep Lace Closure Wig: https://bit.ly/3nJGD0B
4*4 Lace Closure Water Wave Wig: https://bit.ly/3uOgPSK
Recommend:
Short Bob Wig: https://bit.ly/2VOwuUQ
Headband Wig: https://bit.ly/3zj2lLe
Lace Front Wig: https://bit.ly/3hIPI69
New Product:
4*4 HD Body Wave Wig: https://bit.ly/3Ao5ZEG
5*5 HD Deep Wave Wig: https://bit.ly/3hLmHXz
HD Lace Closure Wig:https://bit.ly/2XlKgPf
JOIN SVT HIAR NOW:https://www.svthair.com/
SVT Hair on Aliexpress: https://bit.ly/3lyuKI9
IG:https://www.instagram.com/svthairmall/...
FB:ttps://www.facebook.com/SVTHair/
Tel/WhatsApp:+86 176 0374 5128
Email:[email protected]
Instagram: @LucciVee
Twitter: @LucciVee
TikTok: Lucci2xs
Email: [email protected]
Latest Music Video: https://youtu.be/GrxQZ2yxpI8
Apple Music: https://music.apple.com/us/artist/lucc...
Stream my album!
26 inches, or whatever welcome back to my channel yeah luchi gang, i'm back again with another wig review, and this time i am going to be reviewing svt hair. The link will be in my description on how you can get everything. Of course, this is a very beginner friendly tutorial right here, very easy, peasy one, two three z, but before i get into the video make sure you like comment subscribe hit that notification bell go straight. My album guard your girl, too, available on all platforms. You guys how i'm looking um yup ate it up yeah, you want to see how i got this look right here, including the streaks and everything, because it did not come that way. Stay tuned to this video right here: okay, we're going to go ahead and hop in the unbagging of the svt hair. Sbc show your perfect look but yeah we're going to go ahead and get into the unbagging and, let's see what we have here. Oh, we've got a little message: um i'll read that later have some lashes. Of course we have some wig caps, two wheel caps, um, and then we have the wig. This is a 4x4 26 inch closure natural color. It is in the texture straight. It is 180 density and, like i said this is 26 inches, so he is long. I have not reviewed a really long wig on my channel yeah. I think the longest idea was like 22. Maybe did i do a 24 inch. I think i did do a 24 inch deep wave, but you know when you do the deep wave. You don't really get into the length like that. But this is a brown swiss lace units um. It does have the combs in it. It does have the adjustable straps in the back like i said it is 180 density. Oh, this is a really dark black. I don't really see many highlights in it where i'm going, how i feel like i need to dye this jet black. I feel like this looks good already, so i'm going to do a little plugging because i don't think this hairline is pretty plugged because they look a little. They look a little thick to me. So let's go ahead and start plucking okay, so i thought i wasn't going to bleach the knots, but i am going to go ahead and bleach. The knots you already know same routine as usual. Get it very very thick to wear is barely falling off of your brush and then you're gon na cover every part of the lace, but you are not applying any pressure at all you're, literally just setting the bleach. On top of the lace like i promise y'all like i'm, not applying any pressure whatsoever and you're gon na do this ever so gently nah y'all before that be very gentle, so it's not just seeping through um, your lace and dyeing. You know everything blonde because unless you just want some blonde hair, you know what i'm saying, but that's not what i'm going for. I feel like i do all my just straight hair installs the same i haven't really showed you guys me doing anything too extra with the styling. So i think, with this wig i'ma try something different um, i'm thinking, i'm gon na add like two little streaks or something in the front. I don't know if i'm gon na do blonde or, if i'm a add some color. I do have some purple dash in here. I was going to use it for something else, but i'm bored with just doing the straight black looks for these wig reviews, so thinking i'm a socket to y'all with a list on something else but yeah. So, as you see, i'm just covering the full perimeter of the lace even going past the hairline just a bit because you want you, don't want the um, the part where your baby hears it to still have the knots and be looking crazy because i don't even Know if i'm gon na do baby hairs for this look, but just just in case, i want some baby ass tonight. Imma bleach these nuts across here baby, just in case just stinky, so yeah. When i just looked up too and noticed on camera, my lips was looking a little bit crusty, but i'm in the house so mind your business. Okay, thank you but yeah. So you just want to repeat this step until every single part of the lace is covered. Okay, so now that i have the full circumference of the lace covered, i am going to let this sit for about 10 to 15 minutes. Um. Keep in mind, though, i am using only a 20 volume developer, so there is no like correct right or wrong time for how long you leave this on there. It really depends if you use a stronger developer. Of course, you will be checking it quicker. I also noticed that different laces tend to turn different speeds. So since i'm using 20 volume, you know i don't have to be as cautious because it's going to turn slower. So i'm going to just leave this on until i feel like you know, the knots are turning to how i like it and then i will be rinsing it with some purple shampoo to take out any of the brassiness, and then i will let you guys see How it's looking okay, so the knots bleached perfectly! Actually there was no over toning, so i actually did not have to go in with the um with the purple shampoo. I'M thinking i'm gon na actually definitely do a middle part for this, because it's only a four by four closure um and i am going to go in and do some minimal plugging you guys already know same routine as always part off the front of the hair. In front of the lace front of the closure, whatever you want to call it and then put from back here and you're just plucking, so you feel, like you, have plucked enough for your liking of how you want your wig to look, because you know not everybody. We need to lay or look the same. You may have your preference on what you like and what you don't like on the wig, like the arrogance, hey method, the alonso method, the jonathan wright method, whatever popular hairstyle method. That does not necessarily mean it's the right method and i'm saying it's whatever you like, and you know i'm saying. However, you want it to look, and so i just pluck until it's the desired look that i want. You can see the difference already from. Let me turn to the side: you see how that look humpy and then it's getting that flat. Yeah! That'S what i'll be wanting! It'S a look, nice and flat. I don't want the humpy on me, but it's a closure. So it will not take me that long to get the plug that i need. I actually think i'm done with that side already, because it's getting thin rather fast, yeah, there's not a specific amount of time that i take plucking, it's not a number of plugs. I do i literally just do it until i feel like i have done enough, and so where it looks. How i wanted to look at, i feel like, looks good and natural and, like what y'all know what i always say, scalpiana i like to use these kind of tweezers that are very um sturdy, the thinner ones and the ones with like a more narrow head than This they seem to be a little more flimsy or something, and it takes me longer to pull out the amount of hair that i need like. I would be plucking for so much longer with those flimsy ones than this one that just get right in the and pluck how we need to plug now. Okay, it's looking like this is about good for me now y'all know, i always say don't pluck from the front right, but i do do this flip. It back like. I feel, like i've plugged what i'm a plug from another second row or whatever you call it. I do push it back and i go in like this now y'all, i'm still not plugging from the front. I'M just going in. You see i'm still behind. Oh wait! I'M trying to pull it off the thing on here, trying to show y'all, but i'm still going behind the hairline and i'm just going in and just doing some random plugs just to get it like a real natural, hairline being okay, and now i am going to Let this dry just a little bit and i'm gon na come on and i'm gon na do my streaks in it. Okay, so um! I went ahead and just parted off the section that i want to bleach, and then i put a plastic bag over the rest of the hair um to make sure i don't get bleach on it made me some more bleach. Of course, this consistency is not as thick as when it's time to bleach the knots. This is way more runny, of course, um. I did part it off camera because, like i told you guys in another video, i'm not good at partying, so i did not want y'all to see me struggling like that and be making fun of the girl. So what i'm doing right now, i'm just stirring up the bleach a little bit more. I have some foil on deck because i do like to wrap the hair in foil um because it will heat up and start turning faster and get lighter as well. So you should wear gloves when you do this y'all, but guess what i'm not wearing gloves, because i never wear gloves, don't be like me, wear gloves, so i'm putting the hair, i'm making sure i'm getting all the hair that i want to be colored for me. If all the baby hairs are not in there, i'm good, because i don't care if the baby hairs. It'S not colored! So now that i have this like this, i'm going to go ahead and start placing the color you guys, i'm pretty sure it's the easier way to do this, but guess what this is, how i'm doing it, because since i'm not doing such a um large portion Of hair y'all, i use these colored wigs while they on my head, like if i'm bleaching it to a whole nother color and not doing a watercolor method. I usually like to do it while it's on my head, but i'm trying something different. So i'm trying this with y'all, because it's my first time doing it like this, so hopefully i don't mess it up, hopefully, usually when i mess up, though doing something with my hair, when i try something new, it usually comes out better than what i even planned. So i'm not really worried about messing up. You know trial and error, trial and error. So i'm just going to do this all the way, all the way up to the part that i want bleached and i think i'm gon na just do it all the way up, because i won't because i want a lot of it bleached. It sounds like i got a lot of leftovers right now. This aluminum before rattling, like this all right. Girls are all the leftovers, so fire. Okay, at this point, i'm gon na start combing through a little bit because if you're a person that bleaches you know that bleach will not always go through to that other side of the hair, and i don't want to have to flip it over. So i'm just going through a little bit. I know that he's saying you shouldn't call me: why is the bleach on there, but guess what i'm doing it? This is what works for me. Okay, you don't got ta, do what i do with him. So yeah, i'm just doing it the luchy way, all the way to the roots all the way to the ends. That'S that's the roots. I was really you doing how y'all trying to try to play it off like this yeah i haven't said the wrong thing yeah. I did okay but yeah, so you're just going to paint this like picasso, not really like picasso just painted painting, so it's bleached how you want it to be! Oh and the plastic bag didn't feel. Now i got to be extra careful, but that's okay, a careful mommy, so yeah repeat this until all the hair you want to be covered now that i have every piece covered that i want to have the bleach i'm going to seal it in so it could Be getting nice and hot and cooking up because y'all know he is gon na make bleach turn up. It will make it start turning very fast too, so you have to watch it but yeah, so i'm getting it nice and tight inside the foil and i'm going to let this sit for about 20 minutes. Well, i probably could do 30 since it's 20 volume and then i'll come back and check it and then i'll rinse it when it's the color that i want it to be. Okay y'all. So i left the bleach on for like a total of like 45 minutes, and this is how light it got as you can see, it did not take the bleach well at all. It even looks lighter on camera than it does like in person right now, like it's really like a more dark brown than that, so all i did was cut the lace put a little foundation on the lace. Of course. This is it on my head um. I'M about to attempt for the first time to do absolutely no um, no glue, no spray completely glued this unit. I'M thinking i'm gon na do a little like bone straight middle part, kind of bag. Thinking that's going to be y'all know i always tell y'all, i'm not good at pardoning, so manage your business um. I think i do want to do a look with no baby ears, just because i feel like i always do extreme baby hairs, and i know some people are not into the baby here, so i could show you some other looks. You know what i'm saying. So i'm thinking i do kind of like how it's just highlighted in the front. I guess so. I'M thinking bone straight middle part, no baby hairs, which i think okay. So i was not feeling that middle part at all. So what i did was shift the whole entire closure to this side of my head and we're going to turn this into a deep side. Part got my flat irons here. This is straight hair, so it should just straighten with one more stroke. Okay, it's straightened pretty! Well, so i'm just going to fly iron this and then i'm going to probably do um a little look where i do like a little swoop behind the ear. I'M thinking, that's the look, i'm going for i'm thinking, that's! What'S gon na okay! One thing i will say about it, though it does straighten pretty fast. This is not even the highest setting um that these could go on and it's just boom one more stroke, and it's straight so i do like that because y'all i hate getting some super thick straight hair that takes forever to get straight like baby, who got who Got the time to be doing that all day, this straight hair is supposed to be straight already. Maybe oh and y'all, please be careful when you do the hot comb stuff y'all, because i did burn my ear while i was filming, but i just didn't want to scream and embarrass myself on camera but y'all. I did burn myself while i was showing y'all the last little stuff. I did burn my leg and it was hurting. I was like oh my gosh. Now i got to try to play this off, but i didn't just hurt myself. I did add some foundation to my part too, to make it more. What'S the word prominent, whatever the case may be, so this is one of those real, quick and easy kind of styles. There was no glue used and y'all know um. Usually when i do this style, i use a frontal. This is my first time. Oh see, y'all wait get inside okay, one thing about her: she does get nice and silky straight okay. Now that part, i really do like don't play with that girl. She is not one of them. Okay, i do not have a slick stick, so what i do sometimes is take some hairspray put it on top of them fly aways and then i just smooth it down and see they already going away. Sometimes i do that with the um hot cone, but since i already unplugged my hot comb, there we go and it works fly aways. The next step would be to do the now y'all. You could do this as deep as you want to. I don't like my eyebrow rings to be covered, so so you know i'm gon na make it a little bit deeper than that, though, like i really do not like when my when one of my eyebrow rings are covered, oh no, it just throws the whole aesthetic Of the eyebrow rings, the double eyebrow rings off to me, and i just don't like it. Okay, now sometimes i will just leave it like this and have one side, swooped and one side down, and that actually really does work for this. Look since i got the one with streak, but i also like to do this sometimes and like i said i usually do this with a front tool, but i only trying to see if it could do what it do with closure um and they gave what needs To be freaking gay, but, like i got ta front someone i'm wrong, i'm really wrong. I'M really wrong! Okay y'all! So i'm gon na put some clothes on and i'll come back with the final look. Okay, you guys! This is the final look. Let me step back because it is wrong, 26 inches or whatever, but i think i look cute you guys. I like the look that it is giving um number one. The hair is super soft super straight minimal, shedding number two. If you are looking to color this hair bleach into a lighter color, i would not suggest that this wig is for that, because i left the bleach on for about 45 minutes and yeah. It didn't really change much at all, though i do like this little streak effect that it gave um very easy install. This is glueless. I did not use any type of hairspray any type of glue anything. It got straight bone straight in a matter of seconds. So this is a very beginner friendly, quick, easy, throw the wig on one flat eye through it and be about the dough. I really do like this, because sometimes you guys, i do not feel like doing a full, install i'll be going to just pop something on. Do my makeup and go so this is the perfect wig for that. I do feel like i'm looking real cute, so i would rate this wig a 8 out of 10 only because i tried to do the bleaching and it really didn't give what needs to be gave on the bleaching side of it. But it is very soft, very straight um very manageable. It was very, very easy to style, so i do like that. The lace melted very easily. It wasn't too thick or anything like that. So all in all yeah i like this yeah. The link will be in the description below on how you can get this wig, so you can get this. Look like your don't forget you guys to go stream. My album, gradual 2 available on all streaming platforms like comment subscribe at that notification bell. All of that tell a friend come subscribe to your world cause, i'm funny. I'M entertaining tell them come watch me


Comments
Fine Ass Cinco: U always slay every wig ! U look so pretty
Audrie Adore: You made it look bomb
Papi Suave: The long videos are everything!
Alexisiana Monae: This is giving me very much Video Girl status. Love it!!!
Choke and Die: You are fr so beautiful and your soul seems genuine! I just love your videos
Alisya Gray: Bomb af i love all yo wigs reviews
Press Me Please: You’re pretty !! you and Suki favor
Ja’Rod: Sis please get into story times
India Johnson: What lip is that girl bomb