Very Detailed | Glue-Less Lace Closure Wig Tutorial For Beginners | Jasx Aigner
- Posted on 27 November, 2018
- Closure Wig
- By Anonymous
HOW TO FOLD DOUBLE WEFTS FLAT! NO BULKINESS! NO LUMPS!
YOU WILL NEED THE FOLLOWING SUPPLIES:
Wig Block
Link: http://a.co/d/iaeeohw
Mesh Dome Cap
Link: http://a.co/d/dkYqp8M
Butterfly Clips
Link: http://a.co/d/0aNq4U1
C-Shaped Sewing Needles
Link: http://a.co/d/iip26w7
Scissors
Link: http://a.co/d/8vPorWR
T-Pins
Link: http://a.co/d/iip26w7
Elastic Band
https://www.walmart.com/ip/Dritz-1in-N...
Measuring Tape
Link: http://a.co/d/adr306g
Lace Closure & Bundles Of Your Choice
As always, please don't forget to give this video a THUMBS UP, Like, Comment and S U B S C R I B E!
Love you guys!! XoXo
SUBSCRIBE TO SUPPORT MY OTHER CHANNELS -
VLOG channel:
https://www.youtube.com/channel/UCjTaN...
Business advice:
https://www.youtube.com/channel/UCmP6a...
Follow me on Instagram:
https://www.instagram.com/jasxaigner/
SEND ME STUFF:
Jasx Aigner
2101 CityWest Blvd. #100
Houston, Texas 77042
Business inquiries ONLY!
#laceclosurewig #howtomakeaclosurewig #howtomakeawig #wigtutorial #closurewigtutorial #lacefrontwig #howtomakealacefrontalwig #howtomakealaceclosurelooknatural
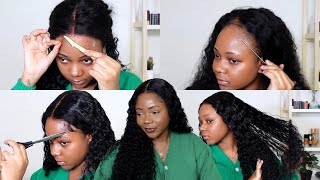
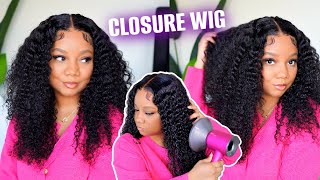
Hello: everyone, I'm Jess, onion, welcome back to my channel today, I'm gon na be showing you guys how I created this glueless lace, closure unit. Okay, I'm in love with this. It'S super sleek and black. It'S really not black. I didn't die at all, but I want to show you guys literally from beginning to end. This is a completely clueless unit. There'S no glue! No chill no got to be none of that. None of that. None of that. So let's just get right into this video. You guys don't forget to hit that subscribe button. Okay, alright, let's get started so you're gon na meet. Of course, your wig block this is the cap I'll be using this as a mesh don't cap. This is what it looks like outside of the package. By the way, all these supplies will be left in the description box. I'M just gon na show you guys how to looks on top of the mesh cap. I'M sorry the wig block some butterfly clips. This is my favorite race. They have biggest thing is, of course, you're gon na need your needle me. You won't get far without that and some scissors you got you can use whatever scissors you prefer, but this is my favorite, some team pins to keep everything in place and elastic bang. This is the last event that I recommend is from Walmart your measuring tape. If you already know your major means, you're good, to go of course, you're gon na need it like closure and your hair I'll be using three bundles of body wave. I do not know the lens because was given to me by someone else. I didn't eggs didn't accept, alright, you guys so at the front of the cab. I usually use the V just another way to put the closure. You'Re gon na put the closure in the middle of that, and you want to bring your closure down in front of the cap now directly on top alright. So we just want to secure that in place and then I'm gon na also put a few in the back and on the sides. I'M also going to be kind of sticking this cap in place just because, when you're making the wig, you don't want it to slide. It will do that if you do not stick it in place, I'm putting one on each side and one in the back. So for the closure, you guys first things. First, even this is important in order to ensure that your closure is super flat. What I like to do is start in the middle of the back as you can see, and then I like to go and sew one side completely down, and then I go ahead and sew the other side. So you're gon na see me literally start at the middle and then work my way on one side, but you don't want to like start from one side. Go all the way to the other side. You don't want to do that. You want to start in the mid Pooh, okay, as you can see, so I'm just wan na fast forth this part, and just so you guys, we don't fall asleep here. Alright, so, as you can see, this side is snug tight, so down and then on the other side I haven't even touched yet so that's what you want. This is how you're gon na make sure your lace doesn't have any humps lumps or spaces, or it just lays really really flat. That'S what we want. Okay! So now I'm gon na go back to the middle of the closure and I'm just showing you guys the side. I guess alright, so I'm gon na go back to the middle of the bag and then sew down the other side. I'M literally just repeating what I did on the other side, all right, so you're all done sewing the closure down. I think you guys are wondering about the underneath the closure I wan na cut that later. It'S gon na worry about that. I'M gon na go ahead and start laying my first bundle, I'm just trying to show you guys where I'll be placing the bundles the tracks. I'M sorry and you don't want to place them directly on top of the elastic band mmm, you want to place them on the mesh cap, if that makes sense so and when, if you will so you're gon na see me sew on top of it, but I'm Not going through the elastic band, I'm just going right underneath the first layer of what a fabric of material. I can't really explain you guys just keep watching and then so. The first two bundles will be doubled and then my last bundle I'm gon na go back to single tracks. If you guys are wondering how I'm going to flip these tracks, I will not be cutting any track. I have a video on my channel. That'S gon na show you guys how to flip your hair and not have any humps or anything in your wig or your sewing or whatever. Okay, all right. So, as I get towards the top you're gon na start, seeing me go in a u-shape. You want your track to start to mimic the shape of the closure just so when you get to the top. Everything is super close and flat and there's no track showing or anything like that. So you do want to start to change the shape of the way you're, laying the tracks and it's gon na happen gradually. So your first couple tracks and your first two bundles - will be straight across and slowly but surely you're gon na start to be in the track so that it starts to form a u-shape. All right, you guys, so I'm completely done the wig, I'm not to go ahead and measure my head for the elastic man. I feel so bad because I left this measurement out of my measuring video, but this is what you need to. This is how you will measure your hair for a lace closure, so I measured it 17 inches, but I'm gon na take off 4 inches, so I'm gon na actually put 13 inches off the elastic band because if you will suggest pretty much cuts, how big is It wouldn't be tight enough to have it secure, so you want it to be kind of snug, not too tight or your head will hurt, but I found that 3 to 4 inches off the elastic band is like the perfect measurement, and all I'm doing now is Just cutting the lace off of the closure and then I'm gon na go ahead and show you guys how I actually sewed down the elastic band. No one ever show you guys this part. I mean when I use when I first started out, and everyone will always skip this part, but this is very very important, so you want the elastic bands to be facing towards the cap. If that I hope that makes sense you guys can see like the band is running direction of the cap, not the direction of the closure. I wish I could. I don't know how to explain it other than that, but you want to pretty much sew it on exactly like this. I already went ahead and did the other side, but I wanted to show you guys how I slowed it down, and that is pretty much it guys. It should look just like this, and this is how you're gon na literally throw it on your head, and this is the final look. I went ahead and flattened it, of course, but I didn't literally do nothing else other than that, it's not so dang close. Damn Joe down under that all the things holding this baby down is the elastic band, so I hope you guys enjoyed this video. Please give it a thumbs up comment. If you learned something and don't forget to hit that subscribe button, I will see you guys in my next video. Thank you so much for watching


Comments
Shazelle Hurt: You are the only person that has showed how to make a wig with detail after detail. I needed this. I will definitely be watching more.
MsDiaAmour: Bout to make mine this Thursday! I made a closure wig last year and I always wondered how I could make it glue less, but you’re right most people don’t show how they sew on the elastic band, so thanks for making this video... my wig bout to be laid- it ain’t running nowhere
Always True: Thanks for showing exactly how and where you sew the elastic band.
Carol Mahler: This is by far the best tutorial on how to make a glue less wig. Thank you.
Cassandra Campbell: Thank you!
Brown Skin Beauty: Is your name Jaz or Jacks? I've been recommending your channel but I think I've been butchering your name ♀️
Amberly Kay: Do your ears hurt when you make your own wig? Why my ears hurt and I measured it right ... something is not adding up
J Michelle Howard: GOD bless you sister! New sub here wow I love this
Shai Randle: Where do you recommend getting a Swiss frontal? A lot of these companies are scams or poor quality now days
Lauragift Hair: This really explanatory thanks alot
kjhgf ewe: WOW,I like your videos,thank you for sharing this video, I got the same one from newigstyle..com yesterday, delivery by EMS,wonderful quality !!!
Teisha Ennals: My favorite youtuber lol you are so detailed and informative and I thank You!
imjet_:
Shy Shy: Did you purposely put the cap on that way? It looks like the back of the wig block was used as the front. I’m just curious, I thought of doing that before because I don’t have that bulb thing in the back in my head
The Billionaire Che: Is there a difference between the mesh dome cap and the solid one? Or is it just preference? I was playing around with the solid one on my sewing machine and it did seem like it bunched up a lot, but I wasn’t sure if the cap was the reason or my beginner sewing skills was the issue .
Helen B: Love the video!! For the part when you sewed on the closure did you also only sew through the first layer of the band or all the way through?
Goodhairgal: Did U have to bleach ya knots?
Jamese Harris: Omg I adore you & this definitely helped me with perfect my own wig making skills thanks girl!
Danielle Rolle: Do you have an issue with the edge of the lace curling up? I hate that
Brandon Parker: Let me say this ......I’ve just not to long ago started making wigs and have been trying to figure out how to get them glueless. Taking a risk I did exactly what you did and still till this day I’ve always been nervous about getting a text after sending a wig out that it wasn’t tight enough or maybe the band was pointless. You just reassured me that I’m doing it right couldn’t be any more thankful for this video !!
xdstnyx: Nice tutorial, very helpful and I subscribed! Every video I see when cutting the lace they always say go zig zag do you see a diff when just going straight like you did?
mikia gumms: Did you put on another cap after ?
Niecey Cee: I'm glad I found you girl because I'm about to make a glue-less wig this week. I'm glad you showed it step from step I will be watching this video to guide me....
ThePrincez1997: I tried an elastic band & had to take it out because it was hurting my head. Is there a certain technique I should use?