How To Make Wig Without Closure | Natural Looking Curly Crochet Wig Using Xpression Braiding Hair
- Posted on 31 March, 2021
- Closure Wig
- By Anonymous
Hey Beauties! Thanks for watching this video.. Hope you find it helpful...Pls like and share And subscribe if you haven't already
Products Used:
WIG CAP -- https://aliexpress.ru/item/4000009086...
SWISS LACE NET -- https://aliexpress.ru/item/3283908082...
CROCHET PIN --- https://aliexpress.ru/item/4000123775...
Silhouette Invisible Hair Spray
Olive Oil Nourishing sheen Spray
LA Girl concealer
MORE VIDEOS:
HOW TO: FULL WIG WITHOUT LACE CLOSURE | No frontal, No Glue, No Closure
HOW TO : DIY BRAIDED WIG WITHOUT LACE CLOSURE | All Back Braided Wig
https://youtu.be/fcXNpFVajrc
HOW TO MAKE A WIG WITHOUT A FRONTAL #5 | New Method AND Very Detailed
https://youtu.be/ExGFpJYv77s
HOW TO MAKE A WIG WITHOUT A FRONTAL ft Adorable Quattro Yaki Wave| Hot Glue Method https://youtu.be/Y_Wd1S8e7pg
HOW TO MAKE A WIG WITHOUT A FRONTAL| Reusing My Old Weave| Hot Glue Method
https://youtu.be/yk2r4dKZ2IY
HOW TO MAKE A WIG WITHOUT A FRONTAL (VERY DETAILED) ft Mama by Alice| Hot Glue Method https://youtu.be/-ePnJYlmwrw
FOLLOW ME:
INSTAGRAM --------
@nicolepatrick_k
FACEBOOK PAGE
--------Nicole Patrick
TWITTER ---------------
@nickybrown_7
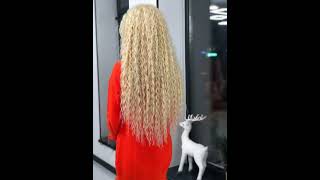
Guys welcome back to my channel if you are new here, i'm nico, patrick and you are welcome in today's video, i'm gon na - be showing you guys how i made this full week without a lace, closure and using extension, braiding hair. So after watching this video, if you love it, please give it a thumbs up and share. Thank you so much for your support and let's get started i'll, be using this mesh wig cap, i'm going to go ahead and place that on the head of the monkey, the link to this wake up is going to be in my description box. Please go there and check it out, you're going to be needing lace; nails like that, so i'm going to go ahead and sew down this tiny pieces of lace net on the wig cap. That is where i'm going to create my closure. After sewing it down, i'm going to take my scissors to cut off the excess wig cap on the needle lace net for the hair i'm gon na be using this expression rich braid. This is color one like the blackest of the black. Then i'm gon na go ahead and start using my crochet pin to install the hair. Finally for the closure, this is my favorite part, so before i start creating the closure. First, i'm going to use my eyeliner to mark where i want the part to be like that, so that i'm going to start using my crochet paint to install tiny pieces of hair, like that, you only need from three to five strands of hair. Be done installing the hair, if you want straight hair, you can leave the hair like this. All you need to do is to use your straightener to straighten out the hair, but if you want curly hair, i'm going to show you how to coat the hair. So now to cut the hair you're going to be needing your hair coiler, you can use your fleshy rod like this type or you can use any other thing that you love to use to koi your hair so yeah. I love to use this flexi roll because it's more faster for me and it's very good if you're a beginner, it's very easy to work with to put the hair in hot water for some minutes after that, i'm going to take it out and remove the flexi Rod, lastly, i'm going to go ahead and use my leg concealer to define the parts very very well, and this is the final look. I hope you enjoy watching this video. If you love this hair, please give this video a thumbs up and thank you so much. I will see you all in my next video bye. You

Comments
Kat-34: Wow never thought of doing crochet in a wig cap nor ever seen this being done before. Good job.
Sheila: This wig is so beautiful and it looks so natural
Tanzy The Glow Up Guru: Awesome job!!! Looks like human hair! Just beyoutiful ! YOU DID THAT!
Charity Sarpong: I've got it,nice nice nice
Mwalimu Moja: Pretty.
chiy mega: Wow very beautiful ❤️ Please is it closure net or tailoring net you use
Charity Sarpong: Weldone
Charity Sarpong: Love u Soo much