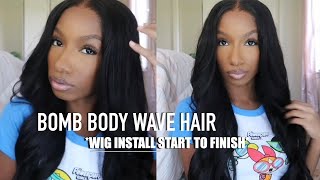
Very Detailed Lace Wig Install | The Ultimate Melt Step By Step
- Posted on 07 June, 2022
- Closure Wig
- By Anonymous
My beauty dolls, this has been a long requested video to show how I install a closure wig.
I hope you enjoy this learning curve of me doing my hair and wigs myself .
Shop the same wig @allgracehair on Instagram.
~100% human hair.
~BEGINNER FRIENDLY WIG.
~ READY TO HO WIG.
~SUPER REALISTIC LOOK.
~SKIN MELT INVISIBLE LOOK.
Hair length: 12 inch
Hair texture: silky
Hairline: Ultimate melted hairline.
PRODUCTS / TOOLS:
Got 2 b glue
Hair straightener
Cotton pad
Rubbing Alcohol
Comb
Hot comb
Foundation
Gorilla glue
Ghost bond
SOCIALS:
Instagram: babsygracy
Email: [email protected]
MUSIC:
No Copyright Background Music
Star baba Jay
TyneeBee
HitSongs Instrumentals & Make sense producer
Hi guys welcome back to my channel. If this is the first time my name is gracie grace i do videos on beauty. I do lifestyle video, i do how to do stuff or things and if an old subscriber are welcome. Okay, as you can tell from the title of today's video i'll, be showing you how to install a closure guys, so i decided this is the bomb week. It'S just a closure, as i told you, nothing serious, nothing, special. It'S a bulb 12 inch i'll, be showing you how i installed this and mine too. I don't have a mirror in front of me, so i'm looking at that, i'm looking at the pathfinder screen. Okay, guys um first thing i do. Is i clean my forehead in case of any oil so as to make the glue stick down to the lace uh? This is also a very important step. Don'T mind me i'll. I know i'm looking at myself because i'm trying to make this in store without a mirror, also don't mind me. So, as i said, the first thing i do is i clean my forehead to take off any oil so as to make my wig or my glue. Stick glued to my lace: if you get a drink, you get what i'm saying: okay, so um i'll leave a product in the description box below and don't worry uh. If you missed anything, so i take a cutting pad and a rubbing alcohol to do that. Okay, just gently rub your forehead the side as well, even though we're not going for a frontal just a closure all right, but you have to be generous with this step, just enabling your frontal or your closure stick perfectly to your scalp or your forehead and condition Up, okay, so we're done with this, you can see you see the oil all right, guys this one's bad now so after cleaning my forehead, what i do is um. I try to put a foundation at the back of my hand, like so the shade of my face right and i take a beauty blender to blend it out. Like so, and i applied this at my closure, so it looks like my scalp and natural. This is essential, even though my closure and my frontal is bleached. I still do this extra step so as to get that scab. Look. You can see because it's totally different right, so i do this all over the closure. Okay, nothing crazy, nothing special just so it takes out that brassy look and make it look like scalp. Instead, okay, if you're not satisfied, you can go on again to get a foundation and just apply that and yeah just wipe off the foundation. Leftover foundation for your hand. Okay, so i put this wig on in the position. I wanted to lay guys, as you can see, can you see the scarf? It'S already transformed to the color and the skin of my forehead. You can't see any demarcation, nothing is applied. Yet it's just this, so that's why i said you have to do this step and take the serious so as to get that look that this is not a week. Okay, all right now i have to blow dry my wig. As i said, we still have that shiny, look and a kind of wet look. The blow dry helps it eradicate that look. So i do this, it's optional. If you don't want to do it. Okay, i'm done drying my hair. You can see the effects of what it just is: smooth, dried and uh. First look to it. So the next thing i do is i try to glue down my wig with this post bond. Okay. So since i'm gon na be taking off this week in in few days maximum soon or one day, i will put a little if you're going for a look that will stay for more than a week. You can apply this glue in more than two or three layers, so what you do is you put the first layer, you use the blow dry on cold or medium heat, and you let it dry. When it's dry, it's transparent, it's not going to be white anymore. Then you put the second third and fourth layer if you want so as to get that strong hold, but since i'm going for a one day, look i'm just going to put one layer, wait for it to dry and i'll apply. My got to be glue. Okay, just the spray, because i'm going to be taking this off tomorrow, okay, all right, so i shift back my week like so guys. I know guys so short story. Don'T apply this directly at first, because you can just splash put this at the back of your hand. First, then, you can tap it at your forehead before you get all glued up on your forehead, your hair, your eyes, okay, just a short, take home mode. Okay, then you go to your forehead. Okay, when that's clear i just frame, i got to be like so, and i allow i just allowed this to air dry on its own. So when it's a little bit tacky, not so dry and not so wet, then i push down my wig to my forehead. I allow this to dry for two to five minutes. Okay, so guys i push this down so where i will normally want this to lay and use a comb to push it down like. So you can tell the difference right so try avoiding using your hands to push this down because our hands contain oil and and when oil mix with this it won't look. And when there's and when there's oil on the lace it will glue down. Guys don't find it don't worry if the lace doesn't come out right now, melted, because we're gon na go read our elastic band, let's tie that down and it will be melted in no second, but as you can see, it's already melted from what i did tell Me, where the lace is i'll, try to make this side look so natural and mind you don't block on one spot as not to get anything bad, okay and now i'll just go in with my elastic band! So try my lace to tie my lace. So it's gon na get all melted, okay, now onto styling, now onto styling and flat ironing first, what you do is, first, what you do is you go on with the hot comb so flatten this and the front, and then you use your straightener to straighten the Ball: okay, you just watch what i do so you use this hair wax, of course, to make any fly over, and when i take off my elastic band, i do that at the front as well and you go in with your iron to press it down. So it gives that relaxed, fresh, look, guys be careful where this hot comb, it's so hot, don't burn yourself myself here, we're not done yet, but it's just coming together and i love it already. I love it. I love it. I love it. I love it. I love it already. Okay, so moment of truth, i take off this elastic band voila. Where is the lace guys? Where is the list? Where is the lace? Okay? Now i found my baby hair. I do this with uh my gorilla glue and also my cancel coily mousse. If i wanted to stay that long, i go with the gorilla, but today i'll be using both so guys. This is the finished. Look. You can see my bob looking oh cute, and it was a quick store uh. It didn't take me so much. I think it took me like two to five minutes to install this. You can see how cute it came out and it turned out yeah guys. So try this at home, and you see it's a very cute and quick installation all right guys i'll see you guys. My next video bye


Comments
Олег Баранов: Hai anna iam Nagendar Anna na age 42 Marioncotillardd.Uno qualification m.l.t medical lab techniciang ,Srpt lo jobs unte cheppagalaru anna.with govt Jobs