How To Make A 6X6 Lace Closure Wig On A Sewing Machine | Barbara Atewe
- Posted on 09 March, 2021
- Closure Wig
- By Anonymous
BE SURE TO LIKE, COMMENT, SHARE & SUBSCRIBE!!!
Wassup y'all! In today's video, I’m showing y’all how to make a 6x6 lace closure wig on a sewing machine! This tutorial is super easy, DETAILED & beginner-friendly! You can even use this tutorial to make your wig with larger closures like a 7x7 closure or even an 8x8 closure. So I hope y'all find this video helpful to make your lace wigs using the sewing machine method! Enjoy!
#6x6laceclosure #sewingmachine #sewingmachinemethod
⇣ P R O D U C T S U S E D ⇣
Sewing Machine [SINGER Promise 2 (1512)] ⇢ https://bit.ly/3iR906S
Nylon Thread ⇢ https://amzn.to/32fQnnN
Heavy Duty 110/18 Needle ⇢ https://bit.ly/3dzkfC3
Your Bundles & Closure (find out how you can purchase some from me down below!)
T-Pins ⇢ https://amzn.to/2JEcNsl
Dome Mesh Cap (that is one size up from your usual size) ⇢ https://amzn.to/3556nLj
Canvas Block Head in your size ⇢ https://amzn.to/32h7Xb2
Silver/white Permanent Marker ⇢ https://amzn.to/36cDEDx
_____________________________________________
FOR ANY BUSINESS INQUIRIES (NO PERSONAL EMAILS PLEASE): [email protected]
CONNECT WITH ME!! ⇣
Subscribe http://bit.ly/subscribebarbara
Instagram ⇢ @BarbaraAtewe
Twitter ⇢ @BarbaraAtewe
Snapchat ⇢ @BarbaraAtewe
_____________________________________________
MY HAIR JOURNEY:
MY RELAXER TOUCH-UP TUTORIAL ⇢ http://bit.ly/2DWE82Y
MY BIG CHOP ⇢ http://bit.ly/2RvGuh8
I LEFT A RELAXER IN MY HAIR FOR 3 HOURS ⇢ http://bit.ly/355kPAi
I RELAXED MY HAIR TWICE IN ONE WEEK ⇢ http://bit.ly/2LASASu
MY LACE WIG SERIES ⇢ http://bit.ly/33uaWME
MY FLAWLESS LACE WIG INSTALL ROUTINE ⇢ https://bit.ly/3r0A1ue
HOW TO MAKE A CLOSURE WIG ON A SEWING MACHINE ⇢
HOW TO MAKE A FRONTAL WIG ON A SEWING MACHINE ⇢ https://bit.ly/3mjSiyX
_____________________________________________
HAIR INFO:
Editorial Looks Hair Company
TEXTURE & LENGTH⇢
IG⇢ @editoriallookshairco
Email⇢ [email protected]
ORDER YOUR CUSTOM WIGS & EXTENSIONS @editoriallookshairco on Instagram!
_____________________________________________
Location⇢ Austin, TX (Toronto, Canada)
Camera⇢ Canon m100
Lenses: Canon EF-M 55-200mm Lens & Canon EF-M 15-45mm Lens
Age & Ethnicity⇢ 25 & Nigerian
barbara atewe,how to make a 6x6 lace closure wig on a sewing machine,sewing machine method,how to make a closure wig on a sewing machine,6x6 closure,7x7 closure,8x8 closure,closure wig sewing machine,sewing machine,how to make a wig on a sewing machine,sewing machine wig,how to make a wig,how to make a wig under 30 minutes,lace closure wig,make a wig in minutes,wig making,wig tutorial,wig making tutorial,Closure wig tutorial,closure wig,how to
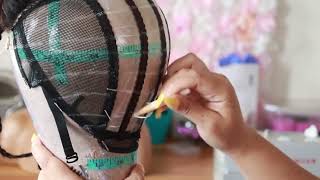
What'S up y'all, my name is barbara atway welcome back to my channel, so for today's video we are making a 6x6 lace closure wig on a sewing machine. So i really hope you guys find this video helpful and enjoy it. Please, like comment share and subscribe and let's get started all right, so we are taking my bundles. I have four of them because that is what i am i'm making a wake for my friend for her birthday, super belated, but you know i'll, be making wigs and whatever so i was like. Okay, let me just make her wait for her birthday, easy, peasy, lemon squeezy, all right, but um, we're gon na be staggering. The bundles and um the things you'll be needing is a 6x6 closure with three or four bundles. A sewing machine heavy-duty thread, one 10 by 18 needle a mesh dome cap, a silver marker, your t-pins, your canvas block head and patience; okay girl, because listen you're going to need it to make this wig, no matter how many times you've made one before on a Sewing machine: it still requires a lot of patience. Okay, so our bundles are staggered under the presser foot and then we're just dragging it along under the presser foot, with the zigzag, um stitch pattern and the tension is between three and four um. I noticed with my um previous wigs i've made on my sewing machine. I use like just the regular needle that came with it girl. Don'T don't do it to yourself, don't do it to yourself the needle breaks very easily, so the 110 by 18 is the perfect bet for you. It'S heavy duty and it can withstand going through the weft of the bundle and also going through the weft and the cap of the wig, while you're making it okay, so we're dragging it through under the presser foot. Continuing and you're gon na keep doing it until you finish with all of your bundles and when you're done. This is what she looks like you see, i'll, see the zigzag pattern and while it's going through the is going through both of the wefts, so it's overlapping. Each other, so it won't separate while like over time, you know what i mean. So now we are at my canvas blockhead. I am pinning down my closure. It'S a 6x6 closure because you know 4x4. Isn'T really the wave like that anymore, even like a five by five? You know six by six, seven by seven, even eight by eight. It'S really the wave now so um we're pinning the closure down on the canvas block head, making sure that she is completely flush to the wig cap because listen if you have ripples in your um closure on your wig, it's going to show when you try to Lay it on your head, okay, so you want to make sure that the wig cap, the closure i mean - is completely flush to the um wig cap and then you know you're, just gon na have to keep readjusting until you get it perfectly because girl, you don't Want no any mishaps, you don't want any mishaps whatsoever, okay, all right and then now we are taking our silver marker and we are outlining where the closure lays on the wig cap um. You want to make sure that your marker is bright enough to see. So you can use, you can use silver, you can even use gold or you can use a white chalk marker. It'S up to you just make sure that it shows up on the wig cap enough for you to be able to see it. While you're sewing your um weight, your wefts down and your closure down onto your wig cap and then uh we're also going to begin with drawing the lines on the canvas block head. So i can remove my closure now. I'M not sewing it down until after all, my bundles are sewn down onto the wig cap, just because it's easier for me to work around it. You know what i mean so we're going to take a gold marker now and then we're just going to draw lines at least like a middle finger apart. I know like the the amount of how dense i want the wig to be um, so we're going to make sure that we're drawing lines even even lines throughout the entire wig cap. Sorry and then we're gon na connect the lines throughout the wig. So you can draw you, can sew through the elastic band. You just have to make sure that you're not sewing along the elasticity. You know what i mean like i've said this before in two of my other um tutorials. You can sew across it. Don'T sew along it because sewing along is going to constrict it and interfere with the elasticity and not having it being able to conform to the shape of your head. Okay, so you'll see how the lines are just going straight across and not uh along the elastic band of the wig. That'S what you wan na do, okay, so we're gon na continue going all the way up and we're just gon na keep going and going and going and going and going okay, so um! Since this is a 6x6, i didn't want to put all four bundles in, even though i'd be doing it for myself. You know, but only that's, because i need to make sure that my wig is not see-through, but since this is not a long wig and all of my wigs i use like if i do like a large closure or even a frontal, i want to make sure That i have four bundles because i don't really wear short wigs, so um the longer the bundle, the thinner, the um, the thinner. It is, as you all know, so you want to make sure that you keep you have even spaces between them and also making sure that the density is to the point of either, if you're, making like a wig order. So i guess in this sense, we'll consider a wig order, even though it's going to my friend for her birthday, i know what density she likes her wigs to be so. She doesn't like it too full she doesn't like a tooth. She likes it perfectly. You know like a cute, 180 or 150, you know what i mean, so we have um all the rolls going across and then the only row that's going like um connecting, i guess, is right behind the um closure so that it lays flat and then i'm going To do another line right outside of where i outline the closure, so i know where the last track will go um behind the closure, so it's like completely flat. So now we are going to sew our bundles onto the wig cap. Okay, so you see the lines are showing up very clearly on the wig cap under the sewing machine light. So we slide. We slid the cap under the presser foot and then we're going to align our bundle onto the um wig cap and then slide it under the presser foot. Uh press the presser foot down is that is that the proper term - i don't know but um, making sure that it's aligned and we're gon na hold on to the thread with the hair because listen you have to hold on to the thread, or else it's going To go right back under the presser foot and then it's going to start tangling and you're going to get mad, which is why i repeat myself when i said that you need patience to make a wig. Okay, because you know sometimes i'd be trying to rush. And i'm like girl. What'S the point, you know ain't no point so we're going to sew it through and then we're going to reverse through the elastic band and because we're sewing across the elastic band. It'S not interfering with the elasticity, as mentioned before. Okay, so we're going to keep going, you want to go slowly and pay attention just so that um the presser foot since it like curves up it kind of like hooks the hair through it, while it's going through. So you want to make sure that you're holding the hair down as it's going under the presser foot, so it doesn't get caught up under the needle in the sewing machine and all that. Okay and when you're done with each row. You want to cut the thread at the end, and this is how it looks with the first row sewn down. As you guys see, she is completely on the line where we marked earlier on the canvas block head and i'm going to be cutting my wefts. I don't have to worry about shedding because again we reinforced it before um sewing it onto the we reinforced the bundles before sewing it onto the wig cap. You know what i mean so um yeah we're just going to continue. Um lining up the tracks on the wig cap and sewing it down making sure that we're holding on to the thread as we're holding on to the hair as well. So it doesn't pull under the presser foot. Okay, i'm keeping these in real time. Just so. You all can see how fast i'm going or how slow, depending on you know what level of expertise you're in or whatever making sure that it is um steady under the presser foot and letting it rip. Okay - and here i have created a little diagram that i've included in my two previous tutorials about how you can sew through the elastic band, but not you can sew across the elastic band, i mean, but not along it. You know parallel versus perpendicular. You don't want to sew parallel to the elastic band. You want to slip. You wan na sew perpendicularly, if that's a word, uh uh, so all right and then now that we have reached the last row um. I want to make sure that i am making sure that it's staying within the line of where i marked outside of the closure, because i don't want it to interfere with where the closure will be sewn down. Simply because i want the wig to lay as flat as possible. Okay, we want a flat lay of a wig okay, so we're just going to continue um doing the same thing that we were doing with all the previous rows and then just making sure that we're reversing um either end of the um end of the track. Yeah end of the track, all right so um we're going to cut the thread and then i'm going to show you all the inside of how the wig looks. And then we are going to um align where the closure will lay. And then we are going to sew the closure on okay, as you can see, she is perfectly even y'all see that she is even there's even amount of space like it's matching on either side. Like you don't see like the stitches of the wig cap. It'S it's not uneven on either side, okay cool! So now we are going to sew the closure on and um. This is the most tedious bit because, to be honest with you, the hair keeps getting caught under the presser foot, and i mean i could have just braided the hair on the closure away from the presser foot but girl i was like. I feel i don't feel like doing that. So that's that's stupidity on my part, okay, but we're gon na cut under where the um the closure will lay simply because it's easier to maneuver under the presser foot without that mesh there. You know what i mean so we're going to take her under the presser foot and making sure that you are holding the hair away from the press. But you guys will see how many times i had to stop just to make sure that the hair wasn't being caught and you'll see my fingers going near the presser foot to make sure that the hair is away. So i hold it like that and then we pull it through and then we go, we just have to keep going until we get all the way around you cannot. I mean you could go to like the middle of where the closure is the back yeah at the back um and then flip it over and do it on the other side. That'S what i did here, because i was losing my patience. I was losing my patience very much. Is that proper? That'S not proper grammar verbal, that's not proper grammar. I was out losing my patience very quickly. There we go words um, so you want to make sure that you're holding it and pulling it taut. Well, not too taut because you don't want it to stretch, because if it over stretches it won't fit on the head properly, so um again we're just going to keep pulling the hair away from the presser foot. This will be so much easier if you just braid the hair on the closure away. Don'T do what i do. I mean do what i do so. Y'All can like be able to sew the wig on on a sewing machine. But don't do this part like i did. Okay, make sure you braid the hair away so that it's an easier process for you, uh, okay, and when you are done. This is how she looks y'all see that zigzag it's really reinforced without throughout the entire wig. So it's making sure that the closure won't slip, because a regular stitch will not hold your um closure down for a very long time. Okay, so you want to make sure that you're cutting all the loose threads away and then this is how she's looking she's a very thick girl, okay and then this is how she looks all red. She looks sickening tell me she doesn't look sickening, so i really hope you guys enjoyed this video. Please, like comment share and subscribe, and i will see you guys next time. Alright, bye, you

Comments
Barbara Atewe: I hope y'all enjoyed this video! the tutorial on how I got the fire red hair color will be out next week!