Red Brown Auburn Wig Install | Ft. Nadula Hair
- Posted on 26 July, 2022
- Color Lace Wig
- By Anonymous
HAIR DEETS:
●▬▬▬▬▬▬▬▬▬ ◆ #NadulaHair ◆▬▬▬▬▬▬▬▬●
❤All the hair can be paid in 4 installments
★ $20 OFF for $199 Code: Nadula20
★ $10 OFF for $99 Code: YTBGIFT
——————————————————————
☛Hair Direct link in the video: https://st.nadula.com/b78uo
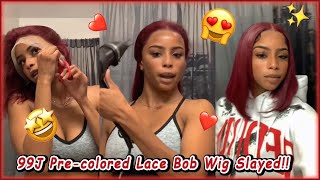
Hair Info: 13*4 Lace #33 Red Brown Auburn Body Wave Wig 24inch
https://www.nadula.com/ ➤ Top Sale wigs: https://st.nadula.com/b78uq
New Protective Style V-Part Wig: https://bit.ly/3p5yOkS
Invisible 13*4/13*6/5*5 HD Lace Wigs: https://st.nadula.com/b78ur
New arrival Fashionable Wigs: https://st.nadula.com/b78us
Top-selling bundles with closure& frontal: https://st.nadula.com/b78ut
Perfect install tutorial of Beyonce Same Wig: https://st.nadula.com/aijs0
Nadula Customer Service Email: [email protected]
Aliexpress Nadula Hair Website: https://bit.ly/33oOx83
Aliexpress Nadula Hot Sale Wig: http://bit.ly/3068Mlt
Amazon Nadula Hair: https://amzn.to/38ttXlC
#Nadula #Nadulahair #Nadulawig
☛Youtube: https://www.youtube.com/c/NadulaHair
☛Tiktok: https://www.tiktok.com/@nadula.com
☛Instagram: https://www.instagram.com/nadulahair/
☛Facebook: https://www.facebook.com/groups/nadula...
WANNA COLLAB? BUSINESS INQUIRES?!
-----------------------------------------------------------------------
KEEP UP W TAI:
IG: @ItsGlamByTai
TikTok: @GlamByTai
Shop Wigs: theglambytai.com
Hey youtube: welcome back to my channel and i'm back with another video, i'm starting to love, putting out videos for you guys, i'm starting to get my energy back. So today's video is on this madula hair wig. Oh my god super cute. It'S a color that i have not done before so aside from the goodies that they gave me in the bag. This is what the wig is. Looking like, it's like a red brown like auburn color super cute. For the whole, i would but um it comes with three clips. You know the adjustable straps, it is a body weight wig and it's 24 inches, so yeah um, like i said i always have like everything in the description below. So you have to go ahead and check that out, but i bleached the knot which wasn't really like needed like od. I just personally do it on my wig. So it's like a universal thing. I do and i did go ahead and pluck it. It is a 13x4 lace front, so it wasn't really too hard to pluck um. What you guys see me doing right now is i'm taking my lace tint spray by evan. I believe this is a warm medium brown and i'm spraying that completely over the lace same way. I did with my bow cap. Okay, so i already knew that i wanted to do a side part with this wig. It just goes. I don't know i haven't had a side part in a little bit, so i was like you know what i'm going to do a sky part. So here you guys are seeing me like how exactly that part is. I did do like a curved shaped sky part. Um and i'm just perfecting that and then i'm going to take my hot comb and make sure that everything is nice and flat and our foundation is like super flat and nice um, but yeah it blends really really well, like lily's blends, really really. Well, i just go on ahead and add the lace tint spray, because i wanted to exactly match my scalp if that makes sense, but yeah i'm just flattening everything out making sure that my part is super defined, nice and crisp and clean and then we're going to Actually start working on it, so, okay, so i'm going to cut our ear tabs out. It wasn't much for me to cut so, as you guys can see it's barely in here. More so just the lace, the um wig itself fit my head really really well and i got a big ass forehead, but i also have a small head like head size, but my forehead is huge. So keep that in mind when you were buying a wig. That'S super important and just also be sure that you don't cut too much um lace off for your ear tabs, because that can make a break install okay. So i did go ahead and cut the lace off camera, as you all can see um. Normally. I do cut the lace off before i install my wigs. I know some people going ahead and install their wigs and then cut the lace off me personally. I just feel like this makes it easier and i'm able to measure exactly where i want the wig at once. I cut the lace off, but you do work for you, sis, so yeah here, i'm just mapping it out making sure that it's completely gon na fit. My head, i'm gon na pull the lace back a little bit and use my bow. Hold active lace, blue! I'M going to start with applying it at the top of my forehead in like a little section and then smearing it out with the back of my rat tail, and i don't use a blow dryer. If y'all know, i only let my lace blues air dry and i feel like this just gives it a smoother install for me um me personally, i don't like to blow dry, especially blue hole products because i feel like it gives a cast, but once it's looking Completely clear, there's no white you're going to take the top of your lacy you're, going to pull it completely forward as y'all can see, and this is why i say i cut my lace off before i install my wigs just because i know exactly where i'm placing Nellie'S at personally i like to work in sections so like i did the top part first and now moving on to our sides. So i'm going to do the same thing i did about like maybe two to three layers of my lace glue and i'm smoothing it out with my rat tail um and i i know some people, let their lace glue, completely get clear and then they'll apply. Another coat me i just kind of let it get a little like not all the way completely clear, but it's not cast white and then i'll go ahead and apply another layer, let it air dry and then it's time to tack it down. I'M going to use my comb, the back of my comb, just to make sure everything is laying nice and flat when i go ahead and blend it now. Here'S a tip um me personally, when i do go ahead and do my installs i know. Sometimes i do not measure correctly and i leave some spaces out. So i'm just going to take my lace glue and just apply it to where exactly the lace. Dude is not tacked down and i'm going to use the back of my rat tail and smooth that out and make sure everything is nice and flat and actually lay down okay. So what we do to one side we're going to do it to the other. Please do not mind up and moving my face crazy, because my newborn but yeah i'm going to um apply like i said i think two or hair is to each side um and then i'm smearing it out with the back of the rat tail. You want to make sure you're doing thin layers. I don't know if i mentioned that do thin layers um and when it gets completely clear. I'M tagging it down. I feel, like this part, is so satisfying like watching somebody lay their legs down. It'S like so satisfying. So here's a little top part that i'm talking about where, like they're, not completely glued down, i'm just gon na apply a little bit more glue and smear it out and lay it completely flat. Now you can see my bald cap a little bit, so i don't know if i showed you guys on camera, or i might have showed you guys on camera, i'm going to cut a little bit of that out because nobody wants to see a ball cap underneath At least like, but that's not cute, so i'm going to cut it out. I just went ahead and blended a little bit better, but yeah i'm going to take my free spray and apply that to like our hairline, just to make sure that we have no lifting and the lace leaves completely flat. So before i go ahead and tack. My wig down and actually like use my head, wrap to lay it down. I'M going to take out, what's going to be considered like our baby hairs, our edges, whatever you want to call them whatever you all call them newborns. Okay, so i'm going to take them out. I usually do like the arch of my eyebrow and go based on that um, and so here is what i was talking about. As far as like hiding my wig cap, i did take out a little bit more hair and i pulled the lid completely forward, use a little bit of my free spray to lay it down. So it's not lifting and boom. You can't even see my wig cap anymore, so i'm gon na do the same thing to the other side and then i'll go on ahead and apply um the nadula wig band that they gave me to actually lay everything down. Okay. So this is what it's looking like after i took it down for me was a little late, so i took my kiss pressed palette. I think this is called and i'm just going to apply a little bit of makeup on our hairline, just to make sure everything blends and there's no like white cast um just making it look like scalpses, okay and then we'll move on to the baby hairs. Okay, so here i'm just showing you guys how i cut my baby hairs, i do cut at an angle going upwards um for like both sides and then i'm going to take like a little itty bitty curling wand. I believe this is like half an inch or maybe even a quarter, inch um and i'm going to curl them up. I did have to do it a couple times because for some reason my curling wand was just not getting hot enough for me. So yeah you want to curl them up, and then i know some people that curl them down also just do whatever works for you, but i'm going to take a little bit of my wrapping foam and swoop our baby hairs. Now, here's the part where you're going to play a little bit and actually form a shape in the soup that you like. I did go back in and cut a little bit more of the baby hair because i feel like it was too long. It was too close to my eyebrow and that's not cute, so yeah you guys are seeing me just you know, form the actual swoop in the shape that i actually wanted it and then i'm blending it into our hairline. So it doesn't look like it's just foreheads plastic or marker. I mean it's just baby, just plastic on my forehead. If that makes sense, so i'm doing the same thing to our side: swoops, i'm taking it, cutting it using my curling wand to curl it now these size loops. I did do a little bit long, so you guys will see in a little bit that i go back in and cut them, but it's basically just playing with the shape and the reason why i like to use wrapping lotion is because i feel like it's a Better mold, like i, can move the baby hairs better with wrapping lotion um. I know some people use gel free spray, but me personally, oh mine, better turn up okay, so boom. This is what she's looking like after i did my makeup. Of course, i've had to blend my eyebrows with this look because it just is what it is. Um, i'm going to take a little bit of my morphe bronze palette and just add a little bit of makeup, making sure everything blends, um but yeah be sure to check out my tic toc at gland by ty, because i also do little mini reviews and many Tutorials on my tic toc, so you guys can see that in case you want any more tips on how to install this wig, but other than that yeah. You guys she is good to go. She'S super cute for the fall. I'M definitely gon na bring her back out for the whole, but in general this wig was so easy to install and it really is like low maintenance. I straightened her and i feel, like she'll, hold the curl really really really well because of the simple fact that once i was done at the end of the day, she wanted to curl up herself, okay, so yeah you guys! Thank you so much for watching um be sure to hit that subscribe button, and i will see you guys in my next video you
Comments
Sierra: What shade or brand name you used for your eyebrows ?
Alina Demina: Alles sehr schön. Aber zuerst zusammen die Nummern 10 und 1. Eine sleepfriendd.Online Brünette und eine andereq Blondine. Es wäre unfair, wenn ich 4 wählen würde