How To - Elastic Band Method Ft Beauty Forever Hair
- Posted on 22 July, 2018
- Fake Scalp Wig
- By Anonymous
Beauty Forever hair Official Website: http://bit.ly/2O0LN4b
Malaysian curly in the video: http://bit.ly/2yTp9aq
Top selling hair: http://bit.ly/2KeLzYZ
Aliexpress Beauty Forever Hair Store: http://bit.ly/2LvOaKH
Best selling hair on Aliexpress: http://bit.ly/2Nqa16O
Amazon Beauty Forever hair Store: https://amzn.to/2KSGkyB
Get FREE bundles AND 6% OFF: http://bit.ly/2mtsIuZ
Share to get HUGE coupons: http://bit.ly/2KxmVlB
YouTube monthly giveaway: http://bit.ly/2tJEowA
Instagram: http://bit.ly/IGBeautyForever
$4coupon code to save your money $$$: beauty1806
Hair details: Malaysian curly 4*20’with 18’closure
Social Media
Instagram - @GlambyMerry
Email - [email protected]
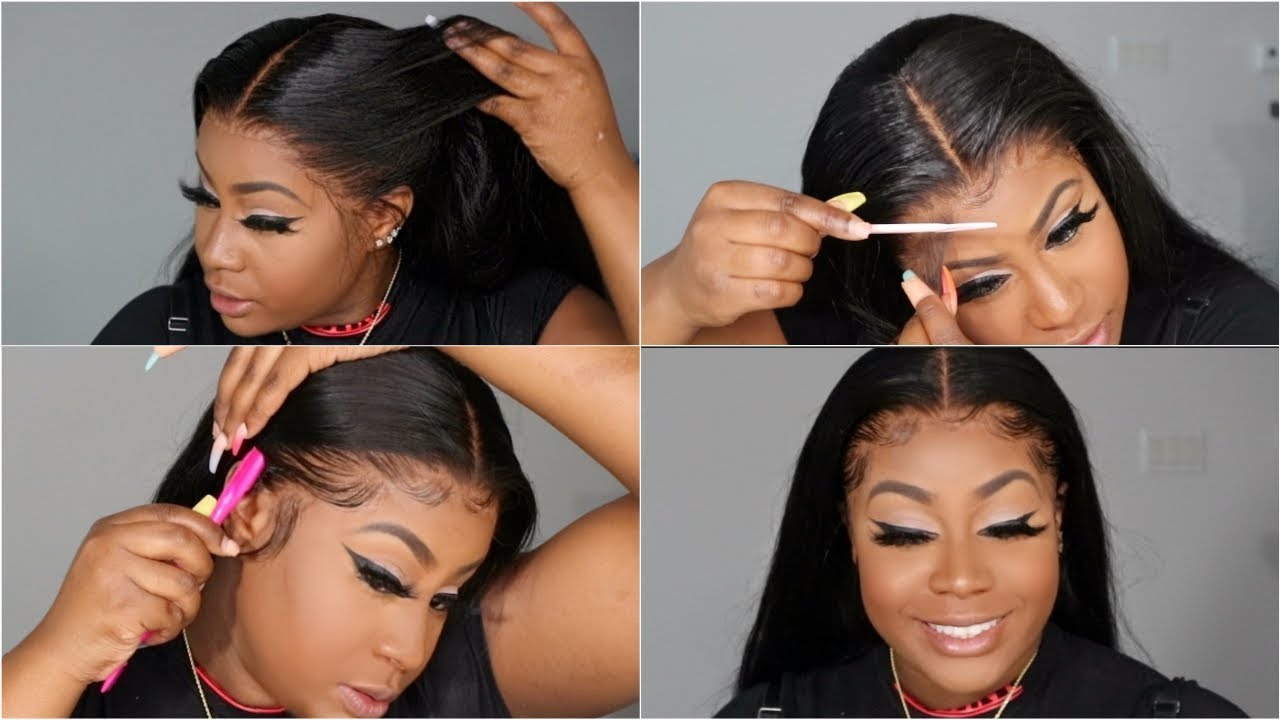
Hey guys welcome back to my channel, so today we're gon na be working with Beauty forever hair and I'm gon na be showing you guys how to use the elastic band method to create a bomb-ass closure. Wig for this tutorial we're gon na be using four bundles in 20 inches and a closure in 18 inches. I believe, and the closure is a three-part closure. I love the lace on this and I'm gon na show you guys how I install my wigs okay. Now, first things: first, I'm gon na be using the mesh cap to do my install and then I will also be using my block head and a couple of t-pain's I'll make sure to check my description below for links and details to these products. So you can get choice and if you get started so first things first, I like to use my TPS to secure the closure to the block head. So that way it doesn't move anywhere. When I begin to so make sure you lay nice and flat and then just begin to do your stitches little by little and make sure you have your stitch close to each other. So that way, your hair is nice and flat and it doesn't have a bump to it, okay, so to install or to sewing the bundles itself. I like to double the width, and I tried two fittings that fit in as much bundle as I could I fit in about three and a half bundles, and we had four and I made sure I left a very little gap in between. So I did very very like close stitching as you can see it took me quite a bit of time. You know I spent some time trying to make sure that I can fit every bundle and it's nice and secure, but yeah just take your time with it play some music while you're, you know creating your fake just have fun with the process yeah. So when you get to the top, I started to use just one left alone. I got even double the width because I wanted the top to be as flat as possible, so I didn't double it. If you double it at the top, it tends to get bulky. So try not to do that. Just have like single weft when you start getting to the front so that way, it's nice and flat, just like your closure and you have a bomb-ass week: okay, okay! So, when you're completely done make sure you cut out the mesh cap, that's on top of your closure, so that way it doesn't mess it up. Now for my elastic band, I already going to measure it towards my temperature temple to make sure that it's not too tight and then, of course, I just start stitching the elastic band on the very front of the of the of the closure like right, where it Begins, that's where I saw mantastic Bend, because I want the front part of my closure to lay as flat as possible. So it's very important for me to place it right there, the first half of the closure that you see those two pins laying on those are going to be cut off, so ignore that so we're really putting that elastic bang band at the very front of the Closure so yeah and then after you're done so in one part, just literally like pull your elastic band across just like that and fold it to the other end and then sew just like that. So that way, it's not crooked or anything you're, just gon na be sewing directly opposite the other end of the closure. So when you're done take your BW to bleach and your 30 Bellamy vol developer and mix just a little bit of a piece of that to create that thickness. That is, you know not too, naturally curly. So it doesn't run through your closure and just place that on there - and I left mine in for like 20 minutes, which was way too long, because I ended up accidentally ditching the closure itself. I mean the hair on the closure, so I am very, very careful with that. Make sure you tighten it appropriately. So that way, it does not become you. So what my tweezer, I'm just going to be tweezing a little bit of hair at a time the closure hair was very spur, so I accidentally tweeze way more than I needed to, but yeah just be careful. So for that install I'm just gon na be applying my foundation powder onto my hairnet, not my hair, and I oh my god. What am I afraid so my wig cap and then I hide a little bit of that same product to the closure itself and then just place the lid on, as you can see like clearly the bleach and lifting for a little bit too long. So it's just kind of like brassy and it got a little bit on point of the hair on the closure. So what I'm gon na be doing for that is, I'm gon na be taking my mascara, and this is like an old mascara, so I'm skinny taking that in my black color and just applying that to the roots where the bleach kind of bleached her hair. So, just being very, very careful - I am just gon na be applying that on to the hair, so when you're done just apply water to this bundles - and I swear this hair is gon na curl up on you like crazy. So this is what the finished product looked like. I hope you guys enjoyed this tutorial. Thank you guys so much for watching. We should give it a thumbs up share in the comment and I'll catch you guys in the next video have a mini-date encompass. Oh


Comments
Grace Ajayi: Good job :) you are so hardworking and curly hair really suits you . Just a tip - Anytime I overprocess my lace closure I use shimmer lights for blonde hair products on the closure to remove the brassiness, because the purple tones the orange colour . I recommend applying the shampoo/ condition and letting it sit on the closure for at least 10-15 minutes before rinsing it out . With continual use over time the brassiness fades.
Naomi PT: You done great. Just be careful with that cap it can come up small after you've sown the hair down and not fit in get the bigger and stretchy caps. Try not to pull on the cap and sow loosely and add pins at either end where your sewing and stretch the cap out. That will help the cap no come out to small for all those bigger headed girls
Virginia Stirnweis: You made it look so easy!
Monique Wright: Can you pin it up in a ponytail?love love love btw
Irene Paul: Beautiful hair, bt d part isn’t dat straight.. all d same well done
DivaNy hair:
Irene Paul: A gal is here on time
Renee: Is it worth it? I don’t wanna waste my money I need honest feedbacklike how does it hold up etc?