4C Edges On Wig | Wiggins Hair | Glueless 13X4 Lace
- Posted on 27 January, 2023
- HD Lace Wig
- By Anonymous
Looking for DISCOUNTED WIGS (very lightly worn), then be sure to check out my website- https://shopjanelmonet.com/collections...
Shirt in Video- https://shopjanelmonet.com/products/si...
Business email: [email protected]
IG: https://www.instagram.com/le.ahhh_/
Tiktok: https://www.tiktok.com/@leah_monet?
Hair Length: 24 inches
Price: $300 with coupon
Direct Link to Hair: https://www.wigginshair.com/4c-edge-ha...
TAGS: 4c edges, 4c edge wig, Wiggins hair, wiggins, 4c edge lacefront, curly wig, how to install wig, glueless wig, diy install wig, wig review, wiggins wig review, wiggins 4c edge wig
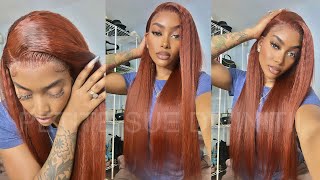
Hey YouTube: It's Liam Monet today we're going to jump right into this Wiggins wig review. So this is the 4C Edge hairline wig. I was super excited to try this it's a 13 by 4 inch lace, closure and it's supposed to have like the realistic hairline, with obviously the 4C Edge baby hairs. So this wig just took me a while to get right like it. Just took a lot of customization, I'm gon na walk you through all of that in this video, but be sure you're gon na need your twizz yo tweezers your scissors needle and thread elastic bands, like literally all of your hair stuff, just just pull it all out, Because you're gon na need it off. I took this picture immediately after I unboxed this unit. As you can see, the edges are thick okay and they are 4C texture, so that is not the texture of the rest of this hair. That'S like soft and wet and wavy it's a completely different texture, so you have to thin those edges out so much in order to create a natural look. So you can see here it's just it just looks so Wiggy and just oh, my God. I was like ready to send this unit back. I couldn't believe it came looking like this fresh out of the box, I'm like there's no way. I can just wear this unit and I had to go to work and I did not have time to deal with this, so I went on and put on my handy dandy, scarf um and it looked okay like a curl pattern and everything looks fine. So it looked decent with the scarf on, but I was like there's no way I can have those um edges out like that. The next day I went ahead and I kind of cut some more of the hairline lace off. So I got rid of some of the edges because I don't need a whole inch of edges in the front, so I cut some of that off and now I'm just going through and I'm plucking my part and I'm also plucking the hairline. So I'll show you that in just a second, so I'm just thinning it out. You really have to spend time thinning out the edges, but then you don't want to thin them out too much, because I mean we did just pay for a 4C Edge wig. So it's like, I want to be able to keep some of those edges, but I also don't need that much so just plug to your liking and I'm just kind of like showing you here um my method for plugging foreign foreign, I'm doing like I'm, not even The best plucker, I don't like doing a whole bunch of customizations to my wigs, but honestly you have to with this unit, like you, have to spend time customizing it. So at this point I am plucked out. For the day, I put a little bit of water on here and some oil, like some Garnier um, Garnier hobby, said, and so I'm just kind of like styling it a little bit with my um slick. Stick um just to kind of mold it to keep the hair kind of coming off of my face um. I think it makes it a little less Wiggy looking so I'm just styling a little bit right here before I try it back on foreign. This is me trying to weigh back on after I've done the plucking. Honestly, the lace looks a lot better. It looks a lot more natural, but the lace is lifted. So it's not laying super flat unless I have my hand down right there, so I'm actually going out in a few. So I'm gon na go ahead and just glue this down a little bit. I don't like gluing my wigs, but I will for this one just so that it lays a little bit flatter and of course, I'm going back in and I'm making those edges shorter and thinning them out, as I see fit so in this clip. You'Ll just see me gluing the wig down, just to kind of give it more of a seamless look. So we had day three now and so, like I said, I didn't feel like the lace was laying flat enough in the front. So I'm, like you, know what I'm gon na go ahead and use the elastic band that did come with the wig and I'm going to sew that on. I wish this already came sold on um. So it is a little bit of an extra step here, but they at least did provide the elastic band. So you will sew that elasticity directly on the lace, because that's kind of what pulls the lace to make it lay flat along the front hairline. So I'm just showing you my process and then you'll just want to repeat this on the same size be sure to measure your head before you cut your lace um so that you're not wasting any of your band. At this point, I'm like praying to God that this wig looks right. So you can see here the elastic band. I have it sewed on and it's measured perfectly to fit my head that it's not going to be too tight, but it is going to give me you know that flat. Look I want in the front. So as soon as I put this on, I immediately felt the difference. It just felt way more secure because, let's be real, I hate using the teeth and wigs. So my wig was kind of like just sitting on my head, so it feels a lot more secure with the elastic band and you can see along the hairline. It is laying so much flatter and it looks really good with the hair kind of coming off. Of the face, so I'm definitely happy with this wig. At this point, so I figured I would try my look with the middle part. So, as you can see, it already looks pretty good along that hairline. Just with this elastic band with it laying so flat um the edges, look pretty natural, so I'm actually a little impressed with this, so that girl was plucking, okay, um so anyway, I'm just kind of pulling the hair to the back, because I'm about to go ahead And tie my little scarf thingy um around it just so that I can kind of train the hairs to the baby hairs to lay a little bit flatter because they are kind of like up in the air a little bit um. So I will turn that I will put that on and then I'm gon na go ahead and just wet my hair down a little bit put a little bit of this. You know the Fructis Garnier, it's like the Sleek curl thing. I think it just kind of helps to find the curls and gives the hair the wig a really good shine. So I've been applying that as well as some leave-in conditioner, and so now I'm about to go ahead and just kind of unveil it for you and give you the final final look with the middle part. So it has been a long time coming, but I really quickly. I want to give you some quick pros and cons. So some of the pros, the overall look as you can see it looks pretty good after the customization it looks pretty natural. I, like the hairline, the lace, everything looks pretty pretty good on the front end. The curl pattern is gorgeous the curls, just reactivate um and just kind of go back to its natural state and, as you can see, it's really full. The density is really good on this unit. The cons, obviously, as I've said it's just too much customization, it's not pre-plucks at all. It'S too many edges. The edges are just way too thick. There'S no elastic band on here, so it just requires a lot of time and commitment to get this wig to look good and then. Lastly, this wig says: oh my God, like I literally take my jacket off and it's hair on the back of my jacket and I've purchased other wigs from this Fender and I've never had this much shedding before. So I'm gon na give this wig a 6 out of ten looks good, but it's also a part-time job.


Comments
Jazmin Holcombe: You definitely made that wig work!
Wiggins Hair: Thank you for sharing wiggins hair
Natural Brown Beauty: Wow that was for sure a lot of work but you made it come together in the end. Like you said cute but way to much work!