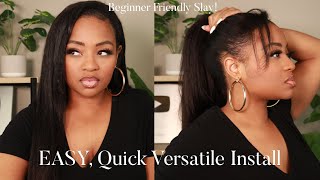
Beautiful Gold Sand Highlight 13X4 Frontal Transparent Lace Wig Ft. Arabella
- Posted on 28 January, 2023
- HD Lace Wig
- By Anonymous
I'm installing this 13X4 Golden Sandy blonde highlight wig from Arabella hair. Watch to see how it turns out! All hair information is below!
READ ME❤️❤️❤️❤️❤️
************** #ARABELLAHAIR OFFICIAL ************** ╱
The hair I'm using in the video➤http://bit.ly/3WjcJ0V
Hair info:13x4 Lace Front Highlight Gold Sand Straight wig 22 inch
Exclusive discount Code: AYTB get 18% Off
—————————————————————————
- Installment is available.Afterpay&Klarna&Credit card
- Free return service in 30 days
- Fast shipping service in 2-5 days
HOT STYLE RECOMMENDATION!!
[Top 1.]13x4 Loose Wave wig➤http://bit.ly/3w9SRmi
[Top 2.]5x5 Real Glueless Lace Body Wave wig➤http://bit.ly/3GE1Dhe
[Featured]Honey Blonde Piano Highlight Color wig➤http://bit.ly/3QHV0z3
New Red Purple Highlights Jerry Curly wig➤http://bit.ly/3XtvRdO
5x5 Real Glueless Lace Curly wig➤http://bit.ly/3XSWau7
360 Lace Body Wave wig➤http://bit.ly/3HaCsnV
#arabella hair social info:
Youtube: https://bit.ly/3Ou6vZe
Instagram:https://bit.ly/3QnQuEi
Tiktok:https://bit.ly/3zZbYSU
Contact for promotion:
Email: [email protected]
WhatsApp:+86 18937456160
What'S up y'all welcome back to my Channel or welcome to my channel. This is your first time here. My name is Diana and in this video I'm going to be showing you how I install this hair that I got from Arabella. All the information for this hair will be in the description box below. So, if you're interested in seeing me in install this hair, I want to know more about this hair. You got to keep on watching hey y'all, so the color of this hair is called gold sand. It is a 13 by 4, transparent lace, frontal wig, and this is in 22 inches. This wig is kind of similar to another wig that I had on my channel, but the highlights on the other wig was thicker. These are like the finer highlights. So let's go ahead and get into the video. My hair is already braided. I braided it straight back, um, nothing special there, so I'm gon na go ahead and slick back my edges, um. I think I used some got to be free spray and I blow dry. It but I cut that part out um, so I'm going to slick slick back my edges and put on my wig cap foreign. So the cap that I'm using is the cap that came with the hair. It'S that thin, transparent cap. I have been loving these. As you know, these can sometimes work a lot better than the thicker caps, because it's thinner and it just helps your lace lay better. So I'm just cutting out my ears now and I'm using my got to be free spray and I'm going all across my hairline and then I'm going to blow dry it good foreign. I know some people when they cut off the excess cap. They like to glue the cap to their head, but because there's like a wig cap is so thin. You really don't have to do that and plus it like, creates extra unnecessary layers of glue with this thin wig cap um. So I'm not going to do that, but what I am going to do is use this lace tint, that I got from the beauty, supply store and I'm going to spray this lace. Honestly, ever since I discovered this, I am not going back. It really makes all the difference, and this is a cream foundation that I'm using for my wig cap - it's black opal brand from Walmart. I like this better than the powder, because the cream I mean yeah, the cream doesn't get through to my hair, like the powder. Does so this wig fit relatively big on my head, so I had to cut off quite a bit of hair on the sides. This is a 13 by four, but I guess my forehead is small or my head is small in general, so I just had to cut off a lot of hair. I'M looking at the site now and the wig doesn't come in sizes, it's just one size. So if you have a bigger head, this will probably be good for you, foreign nothing changed, still use my wig dealer glue to apply my um wigs honestly, I'm gon na keep using it until it runs out and when it runs out I'll, probably try something else. I know there's better glues out there um, but this one I just want to use it to. I want to ride it to the wheels fall off y'all, because I really like this glue um but yeah. I wound up doing about like two layers of glue. I didn't do too many because I'm going to go through with the wig Bond spray, so I didn't need all those layers of glue foreign. So now I'm just parting, my hair, a little bit behind my hairline, because this is where I'm going to spray the wig Bond spray at this just helps the wig stay on better for me personally, because I have to cut my lace weird, because my hairline is Weird - and this just helps it stay secure and not slip and slide all over the place foreign. I just take my comb to kind of lift the hair that got stuck with the glue up for my hairline and just brush everything back into place and now it's time for my least favorite part of installs, which is cutting this lace. So I wound up having to cut this front piece off some of this hair because it came down too far on my forehead. I naturally have a big forehead, so I, in order to have like a natural, looking hairline, I had to get that out the way. So now I'm going through with some more of the wig Bond spray, just to make sure everything is laying flat not laying flat, but it's like sticking as it should making sure nothing lifted. As I was cutting off that lace um and don't mind my little bit of hair left on the side, that's my little raggedy hairline that I keep talking about. So I decided that I'm going to do a middle part for this install the last one was a side part. So I want to make this one a middle part, but what I had to do is because I cut off that little piece of hair in the front I kind of messed up my hairline, because I plucked the front, so I had to go through and re-pluck Like a behind my hairline to make it look natural all over again, because it just had like a blunt cut line, um the lace itself like the wig by itself, it's kind of like pre-plucked, but you still need to customize it a little bit. So now I'm going through and I'm just going to lay the top part of the wig flat and using my wax stick and I got to be free spray and hot comb. Thank you. So now I'm just going to go and part my edges, I'm starting with the little Sideburn pieces here I like to do these, because I naturally have sideburns on my real hairline that I refuse to cut so I'm going to put that in a wig as well And now, when I do my baby hairs, I'm first taking my um baby hair brush and I'm just gon na brush out how I want my baby hairs to look before I cut it. I don't have any product on it, I'm just using the brush and then I'm going to go through and cut it foreign. So now I'm just using my eco style gel and I'm going to lay my edges. I stopped using foam because for me, when I would use foam, it would lift up my hairline um. It would just loosen up the glue and loosen up everything else, but I don't get that with the gel. So that's why I like to use this foreign so because this is highlight hair. I went ahead and put some curls in it honestly. To be honest, I really wanted to straighten the hair um, but I did wind up straightening the hair, but I did it off. Camera and I actually like how it looks better curled than I do straightened, but in this moment, while I'm curling the hair, I'm like I wish I was straightening it, but it actually worked out so curling. It looks better. It makes the like highlights pop a little bit more and you can just see the color and it gives the hair some like body um curling, this hair. It took a little bit of time, not a lot of YouTube, like maybe like 20 minutes honestly, because this hair is very thick, so I just wanted to take my time to make sure that my curls stayed and didn't fall now I am just layering my hair. I only do it really in the front, I don't do it like in the back or anything just around my face, so I can frame my face. I just start like I I level and then well, I start a little bit below eye level and then I work my way up. I layered it a few times, but I think I did that off camera, but just in case I make a mistake. I'D rather like start longer and then get shorter instead of, like you know, starting like super short now, the last thing that I'm going to do is go through with my got to be free spray and just spray, it all across my hairline to kind of hide That little harshness and the lace just to make the lace melt a little bit better into my forehead. But besides that, we are done with this look. So I'm not sure of the density of this hair um that may be in the description box below I'm. Looking on the website and honestly, I didn't see a density but I'll try to find out that and get you that information if you're interested. But for me the wig that I was sent, this hair is thick. It is soft and it's really pretty it's not like super thick, but it's not thin either like it's a nice, decent, um density. It'S soft, it's manageable! I don't have any issues with like shedding or anything, but if you order this wig, let me know if you have any problems or if you love it. Let me know, but that's it for this video you guys thanks so much for watching adios till next time.
Comments
Plush Stanley: Beautiful install and wig. You slayed this❤
Shaina Jenkins: Omg soo nice can you list the products you used I want to try this for my bday
Nikki Harrison: So beautiful sis
Halimah C: Super cute unit!! You did a great job on it!
nijewel: was this sponsored?