Step-By-Step Wig Installation | Outre Chandell | Samsbeauty
- Posted on 24 January, 2023
- HD Lace Wig
- By Anonymous
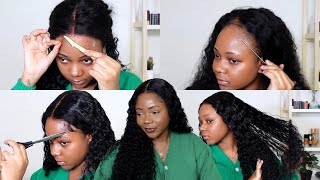
Outre Melted Hairline
https://www.samsbeauty.com/service/Out...
________________________SAMSBEAUTY Social Media_________________________
Subscribe to SamsBeauty on YouTube: https://www.youtube.com/user/samsbeaut...
Follow SamsBeauty on instagram: https://instagram.com/love_samsbeauty/...
Follow our TikTok: www.tiktok.com/@samsbeauty.com
Add SamsBeauty on Snapchat: love_samsbeauty
Follow SamsBeauty on twitter: https://twitter.com/samsbeauty
Like SamsBeauty on facebook page: https://www.facebook.com/love.samsbeau...
What’s Up Lovelies Welcome back to another YT Video.
Subscribe & Turn on your Post Notifications.
Stay Connected
Instagram : https://www.instagram.com/iamzionmarie...
Wig Resell Instagram: https://www.instagram.com/zionshair_/
VLOG CHANNEL : KEEPINGUPWITHZMARIE
https://youtube.com/@keepingupwithzmar...
Business Inquiries: [email protected]
What'S up lovelies welcome back to my YouTube channel and welcome to another video, as you guys can tell by the title today's video is going to be all about me installing this really pretty wig um. It was sent to me, of course, by Sam's Beauty. So a big thank you to them for sending another unit. Today'S video, I'm going to be switching it up. I'M gon na be really talking to you guys, giving you step by step on how I installed this unit. So if you guys are interested in seeing that make sure you stay tuned, hey my babies, so back with another video and we're back with a synthetic um installation - and I felt like I wanted to talk to y'all, because I haven't really sat down in front of The camera and kind of giving you all a thorough comment tutorial in a really long time and I know a lot of y'all love my synthetic wigs or synthetic wig installations. So today, I'm back with one and we're gon na talk through how to really make it. Give scalp okay, so this is today's unit um. This is by outre. This is their melted, hairline, um collection, and this is chandelle. I have chandelle in the color drff2 slash cherry red um. So this is what the stock car looks like the black uh, the 1B color is really pretty as well. I honestly should have got that, but y'all know I love a burgundy unit. As always, they do have a lot of colors that you can choose from. So if you're, not a fan of the red, feel free to choose from different colors, that's the stock card. This unit is already pre-parted for you. It is a side part which can be annoying if you're not a side, part girly, but that's okay. So this is what the construction looks like. So we don't really get a lot of um like hairline around the sides, but we do have a fair amount of hair um to work with right up here in the front, which is good and then you're going to get your curved apart. Um on the inside of the unit you're gon na get two Combs on the side. They do provide you with an elastic band. You have a comb in the back as well as your adjustable straps. Oh, what I'm gon na do first is, of course, cut this stock card off, and the good thing about outre is their synthetic units always come plucked or they're hand tied, but they are nicely hand tied in a way where it's not too bulky in the front. So I don't have to worry about plucking any hairs just yet, but what I'm going to do is tint my lace and lately I've been using uh. This is the Maybelline Fit Me Foundation. I have the color, it's spicy Brown. So that's what I've been using lately and I'm just going to use like a harder brush um. So I'm just going to take a little bit of that pour on the back of my hand, you don't need too much, because this doesn't really have too much lace. So, just a little bit and all right so now that I have my lace tinted, I'm going to go ahead and focus on the installation portion um. So I didn't really talk about the pattern or the curls on this hair. The curls are really pretty it's very bouncy as y'all can see. This honestly looks like some Barrel curls that have yet to be combed out. So I'm really excited to see what it looks like once it's combed out but um. If you wear a stocking cap or a wig cap, whatever feel free to tint your wig cap, if you do the stocking cap method, I'm lazy and I just will throw away cap on and I'm honestly not going to put anything on it all right. So throwing this on and, as you guys can see what this hairline is giving. So we like, I said we have a little space in the front to work with, and the foundation that we put on. If you have something that matches your skin tone perfectly it'll be so much easier to blend, if you're not sure like what Foundation to get because Foundation can be tricky um. I also use this is more of like my summertime color, but this is the Sally Hansen. Airbrush legs in the color deep glow - and this is like leg makeup - is what it says. I use this a lot in the summertime. At least somebody gave this to me, but it's by the company kafune. I don't hope, I'm pronouncing it correctly, but this is the lace melt mousse in the shade mocha. So if you guys don't have any foundation, feel free to use something like this, you can even use eyeshadow bronzer whatever you, ladies, can get your hands on that matches. Your skin tone, because it'll make applying your wigs way easier. Alright, so once I have the wig on my head, I'm gon na try and get a feel for it. Um shifting it making sure the part is where I want it to be making sure my ear Tabs are cool. So with this wig I do have a little extra space on the side and I always like to cut off the extra lace. That'S not needed, so I'm just going to cut around my ears over here on this side cut a little bit of a hair off with it. But that's fine, don't be afraid to cut to cut a little hair off when you're cutting your ear tags because you want it to fit comfortably, and you also don't want it to look bulky or like it's overlapping, so make sure that it fits you, nice and Snug and it's comfortable when you're wearing it so now that we have the wig on our head and we have cut our ear tabs off, I'm going to kind of Comb some of this hair back, get it out of my face. I'M going to clip this hair away, so it's not in my space. I already know I'm going to be using the even wonder: lace, adhesive spray. This is the red. I also use the yellow. I really just alternate between the two. I know a lot of people have been using the black. I personally haven't got my hands on it, but if you have, let me know what you think um. So what I do, since this is a frontal unit and frontal units can be a little bit more difficult. If you want to start in the middle you can. I just prefer to start on the side and you don't want to put too much spray because you don't want the hair to be flaky hard. I try to just put a little bit and I try to put a little right along the hairline foreign for me. Now that we have everything laid sometimes I'll go in and just put my elastic band on, but I don't really feel like doing all that extra today. So what I'm going to do is cut my lace if it makes it easier for you feel free to cut it in sections and if you want, you can also get an eyebrow razor that may make it easier. I will try with both, so you guys can see a pair of scissors um. You just want to make sure you're getting as close to that hairline as you possibly can, and you want to make sure you're cutting the lace off very unevenly. You don't want it to look like you got a hairline, so if you want you can go like this with the scissors, you can kind of just cut it real choppily, whatever you've, whatever feels most comfortable to you, but just avoid trying to cut your lace off Straight perfect, so this is what it's looking like. I know it's a little crusty, but of course we are going to fix that just taking it. This is what the zigzag motion and you're just cutting up and down up and down up and down like this. Nothing too special about it, but you really want to make sure that you're getting rid of any lace that has no hair strands attached to it, because it's just a waist and we don't want that. If we don't need it, it's a regular eyebrow razor. Nothing special about it and I'm just gon na take it. I do try to I do kind of tug on the lace just a bit so that I can get like a firm hold and you're just going to cut. Now. I do recommend if you're a beginner, maybe starting off with an eyebrow razor, is way easier because it's just less intimidating, you're, just kind of Shaving it off, rather than cutting it bit. Crusty um, since I cut the lace off, not everything is laid perfectly so again. I'M gon na go back in uh press it into place all right, so I did put my elastic band on and blow dried over the wet glue. So now I'm going to take this off looks much better. It'S okay! If you have an ashy line, um we're gon na get rid of all of that. Don'T worry so um to get rid of that line of like kind of demarcation. What you can do is either take some. What are these? What are these called Q-tips or you can also take some cotton rounds, I'm going to take a couple of Q-tips and I'm going to take some alcohol and I'm gon na go in just clean it off my skin and oh I'm gon na clean off any extra Glue that got on my skin, you know to cleaning it up, so that's looking a lot better already, but we're still not done. I'M gon na go in again with a little bit of that Fit Me Foundation. The reason I'm going in again is because, when you're gluing and putting all sorts of liquids, sometimes that color can fade away, so I'm just taking a very thin. I think this is an eyeshadow brush. This is by wet and wild, so you don't need anything special and I'm just going to dabble that in and put it on the hairline. The reason I'm using a smaller brush as opposed to something very you know wider, is just like to make sure I'm really getting into that hairline. Oh just so, I can make sure I'm really getting into the lace what to do so make sure you're really getting in there. You know, of course, we're going to get that part, I'm getting stuff all over here, another part. So what do you use this? To blend, I think, and I'm just gon na blend out that makeup, if you really care for me and really get in there like, if, as if you were beating your face, really get in there, just really, you know what I'm saying don't be afraid to spend Some time melting that lace, okay, just want to make sure you have something that matches your skin tone as best as it as it should now from a farm, because it's a very transparent video. You know I'm really trying to give y'all step by step. So I need to leave at least right now, a close and like right here. It really looks like it Blends, but, as you all can tell there's still a lot of demarcation and my least is still betraying me like. Let'S, let's be realistic, it does look good, but we're gon na make it look great, so the secret to doing so gets you some Spritz, I'm using Pump It Up. This is a black house need what you're gon na do. This is really what's gon na this was gon na eat the girls up you're gon na take your spurts. If you want to, you, can put it on your fingers and push it into the place. You'Re gon na repeat the same steps and we're gon na relax. Again, I've been going crazy. Foreign curls, like I really love it, so anyways, let's go ahead and take this off. I kept it on for a while see what we're giving. Oh, I used to walk to work. Everyday foreign foreign didn't happen. Remember foreign foreign all right. My love, so that is it for today's video. I hope that you guys enjoyed um. I hope I did a really good job of Thoroughly explaining what it is that I was doing kind of step by step. I wanted to come and talk to y'all because I feel, like I haven't, done a talk through video in a while and I just kind of wanted to update my everyday or my routine when it comes to installing my wigs. So hopefully this was helpful. This is what the hair is looking like. I did end up cutting a few layers up in the front just because I didn't really care for the way that they placed the layers. So I did go in and just kind of cut some layers, as you can see, just to frame my face a little bit better and then I did cut some layers towards the ends because I felt like they were just too thick and I'll say once I Put some layers in the bottom there's a lot less tangling um, because sometimes when you have a synthetic wig and it's just too much hair, it will tangle a lot quicker. So if you have a pair of thinning, shears feel free to use those towards the ends. If you think it needs it or if you just want to cut a few layers in it to thin it out, that's what I did and it worked so I will say this unit as far as shedding goes it should I'm not going to say it sheds, Like a crazy amount, but it sheds like a typical synthetic wig them out. Oh you know, if you don't know synthetic wigs do shed, some will shed a lot more than others with shedding. I will probably give this like a 5 out of 10.. It does shed, but it doesn't shed a lot. It is nice because these curls are so big and voluptuous and really bouncy that, even if you go a little while without combing it through, you won't be able to tell, and it won't look matted or Tangled or anything like that. So I love this wig. I think it's really cute. I love the color. I do recommend um keeping one of these in your purse, so that way, you know if you're out, running errands and you want to quickly comb through your hair. This a wide tooth comb is probably your best bet. Uh, hopefully you guys enjoyed this video, like I said I did my best to explain thoroughly if you guys have any questions on anything. Maybe it's below follow me on my Instagram also. I did make a second YouTube channel, so feel free to subscribe to that um. That is keeping up with Z, Marie that's gon na be my everyday life outside of beauty and wigs. Um you'll probably see a lot more of my personality on that channel. It'S a huge thank you to Sam's Beauty for sending us another wig to try out subscribe to this Channel and I'll see you guys in my next video love, y'all


Comments
Bella Monae: I am literally wearing this wig in 1B!!!❤