Quick Beginner Headband Wig Tutorial
- Posted on 17 April, 2021
- Headband Wig
- By Anonymous
Quick Beginner Headband Wig Tutorial ✨
I hope you guys enjoy this quick and easy beginner headband wig tutorial! Literally, my new favorite wig so be sure to check out LUVME HAIR and use my code KENE20 for 20% off!
♀️Direct Link for the wig: https://bit.ly/3srnzTt
Length: 18 inches
Other styles for headband wig: https://bit.ly/32wlBXn
LuvmeHair Website: https://bit.ly/3dsFmWl
Instagram: http://www.instagram.com/luvmehair/
Facebook: http://www.facebook.com/luvmehair/
YouTube: http://bit.ly/2OCjZrr
✨COLLABORATIONS✨:
Email: [email protected]
✨FOLLOW MY SOCIALS✨
Instagram: https://instagram.com/kene.kae
TikTok: https://vm.tiktok.com/ZMJB83y6b/
Twitter: https://twitter.com/kene_kae
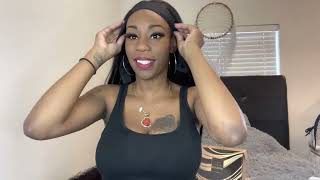
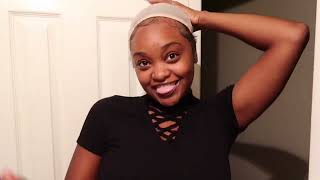
Down: what's good, it was popping youtube if you're new here my name is kenneth and i make college beauty and lifestyle related content, and today i'm going to be showing you guys how i put on a headband, wig um. This video is actually sponsored. The hair was sent to me by love me hair, so thank you guys so much for that worry, not y'all. I'M still going to give you all the real t on this hair, but if you already like what you see be sure to use my code, can a 20 for 20 off of your orders be sure to subscribe if you haven't and if you're subscribed. Thank you. So much and without further ado, let's get into this video all right, y'all. So first i'm going to do a quick unboxing of lovely hair. So this is the box that came in it also had this like cute bow on it. So just imagine it's on there. I actually broke it and we move, but just know that they're packaging with you and so first first, let me show you all the wigs, so the wig came in this bag out. This is kind of the wig, so it's a water wave and i believe it is 16 inches deep, wave, affordable, headband wigs. I will link the way that i got in the description box below and then what i like about this wig. So, of course, is the headband wig, so here's where the headband goes and then on the inside. It has like some clips that makes it easier to really secure this thing down and like on the back too. It has like this like little um band, that really make sure that this thing is on tight. You know, weird smells and like the hair quality seems overall good, i'm probably gon na like manipulate it with some product and stuff. When i put it on but loving it so far, and so next we have the headbands that the wig came with, so it came with five headbands in total, so cheetah print. You know a nice little pattern, another nice little pattern um and then this pattern. And then oh, here's, the fifth one, this one right here and of course you can use any other headband as well. So next they sent me a wig cap and it has two wig caps in here. So i'm very thankful for that, because i was down on my last wig cap and then they also sent me this cute little packet, which i'll probably use for like other things and then inside of it they sent me. You know the little edge scarf to kind of like hold down your hair or your edges or whatever, and they sent me this thing. I honestly am not sure what this does yet y'all. I will figure it out, but if you know you know - and this is probably helpful for something they sent me - an edges - brush love that and then they sent me some kind of tweezers and then they also sent me this cute. Clip that says, love me. You know branded all of that and then finally they sent me. Some love me bobby pins and i've already like taken some of the bobby pins out. So that's why it looks a little like you know empty. Then they also sent me this and it's kind of like an instruction manual. So it tells you like how to put on the wig and stuff how to contact them and then finally like in the box. I just noticed this, but it basically says enjoy your hair from now on from the founder, so i just thought that that was a cute little touch to put in it. So i feel, like a lot of thought, really went into this packaging so now to get into putting on this wig. So the first thing i'm going to be doing is putting on my wig cap to protect my braids or my hair. Underneath and so one thing i noticed when putting on headband wigs is you can slick your hair back and you can also braid it, but i'm going to be putting on another wig in a few days. That'S like lace front, so i want my hair to be braided down, of course. So whatever is your preference, but i did try to like kind of keep it a little more natural looking in the front so that when i want to put the headband on the headband wig on it kind of blends, i guess more so now i'm about to Do my edges, so i'm going to be taking the edge brush that they gave me, of course, and i'm going to be using this edge control and i'm also going to be using probably a little bit of my got to be to just make sure that everything Is really just laid down so about to get into them, and you can kind of just style your edges, to how you like them. So i'm just going to keep playing with my edges until i feel like it's at a point where i think they're cute. All right, i'm just taking a little bit of gel this bottle, doesn't match the gel that's in here. So it's actually extreme generally here, but i'm going to take that and kind of, like put it on my like braids, slash like flyaways to kind of keep those down real, quick push that back slide my wig cap back over it and there we go. So i think my edges look good. I'M gon na go ahead and put this lovely hair scarf on it to hold it down. Okay, so that's on there and i think what i'm going to do now is i'm going to blow dry it a little bit just to kind of speed up the process. So we can get this show on the all right road. So now i'm taking the scarf off okay. So it's down! It'S like i'm gon na put some water right here to get rid of that excess blue spray, all right, y'all so now to put on the wig. So i'm gon na open up the straps in the back so that i can like get it tight, real tight. Finally, and now i'm just going to start with the back and make sure it's like around the back of my head and i'm just going to pull it to the front and line up my mirror here and i'm just going to pull it to the front. The clips i wasn't really impressed if they like stayed, they went in or not, but i might as well just do it the proper way for y'all so put that one in there and then there's one more right there that i'm trying to get in there for Y'All - and this is on okay - so honestly, these clips kind of not feeling them because it doesn't really. Let me move the wig where i want to move it to, and it's looking like my edges, so i'm just going to place the wig where i want to place it without the clips. Now i'm going to secure it in the back and it's like basically to secure it in the back. All i'm gon na do is just clip like put the velcro, strap back together, all right so right now it's not it's not looking like much, but now i'm gon na kind of play with the hair manipulated with some water, i'm gon na be using so spray Bottle i'm going to be using my curls creme brulee um curl cream, i'm going to be using my gel and we're just going to kind of style it until i feel like it is where it needs to be. I'M going to put my hair, the top part and the ponytail, just like a section by section. So first i'm going to spray it down with some water. Take my dimming brush. Now i'm going to take some curl cream and taking my gel to just kind of like keep that as defined as it is right now let that wet look so yeah. That'S all i'm doing, and i'm about to just finish that for the rest of my hair. This is how it's looking so far, so this is the side i've done, and then this is the side. That'S not done, as you can see big difference. This side looks a lot more natural and just better literally so. I'M gon na hit this other side and we gon na be ready to put the headband on and be done there. You go all right y'all, so i'm done with the hair and i'm actually really loving this right now like. I honestly would wear it like this, but we're gon na try some headbands just because you know they send me. Some hair advantage got ta, put the headband on it's a headband wig, but honestly, like real talk, you can rock it just like this. So that's a extra headband. It is so i decided to go with this one because it matches like a brown shirt. You know to buy it. You know the bias so just gon na slide it through okay, okay, we're done - and this is so pretty y'all like, and it was so easy to do like you. Don'T no longer have to know how to slay your lace like, if you think about getting a heaven wig, definitely definitely get you a headband wig, because this is like perfect for every day yeah. But i'm loving how this turned out like this is the half of half down look, and i also really rock with this one. I will say that i wish that the hair was a little bit fuller, so it's a half a pack down you know like i wouldn't have to push all my hair to the front and i still think that it works. I think next time i just put less than a ponytail or something like that, but overall y'all it's giving what it what it's supposed to be giving all right y'all. So thank you so much for watching this video. I want to thank love me here again for sending me this. I clearly love it, and this is about to be my new go-to style and also be sure to use my coupon code. Can a 20 for 20 off of your orders be sure to leave a like if you like, this video comment, um what you liked, what you disliked anything you want to see from me as far as video content and be sure to follow all of my social Media accounts that are located in the description box below and i hope to see y'all in the next video bye
Comments
Alexis C.: This is so cute ❤️❤️❤️
Awele Asianah: Love this
ManYouWell: This video is lit.
Ja Reese:
Janice Blakey: First one here