How To Make Headband Wig// Beginner Friendly//Diy
- Posted on 06 September, 2021
- Headband Wig
- By Anonymous
Hi, my name is Adedoyin and in this video, I explained in details how you can make your headband wig from scratch.
Kindly support me by subscribing to my channel, thank you!
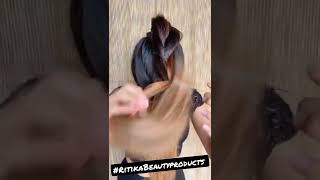
Hi guys and welcome back to my channel if you are new here, you are welcome and thank you so much for stopping by my name is adido and in today's video i'll be showing you how i achieved this beautiful headband wig. So it's going to be a diy video, how you can do your headband wig from scratch. So if this is the kind of video you would like to watch sit back, relax and, of course enjoy. So these are the materials needed for the band of the wig. This fabric is called scuba, it is a stretchy fabric. As you can see, it is very stretchy, so you need a stretchy fabric for your band and also vector. So this is how it looks. This is called vekro and, of course, your scissors and your tailor stroke. So the next thing is to insert your head circumference measurement to the fabric. Then you cut it out so for this tutorial, i'm using 20 inches by 6 inches. That means the length is 20 inch inches and the width is 6 inches and the reason why i'm using 20 inches is because the fabric is stretchy, normally an average head of an hair dot measures 21 to 23 inches, but because this is a stretchy fabric, we Are using here so i'm going to be reducing the 8th circumference to 20 inches. I hope that makes sense so after inserting the measurement i'll go ahead and cut it out so i'll fold. The piece like so and take it to my sewing machine and stitch after stitching. This is how it looks and i'll go ahead and turn it to the right side. Then i'll go ahead and close. The opening which i use in turning it to the right side and after stitching this is how it looks so. The next thing i'll be doing is to cut my velcro so i'll measure the width of the headband. Now so it measures 2.5 inches. So i'll cut out 2.5 inches on my vehicle, then i'll open the velcro and sew heat to the edges of the band like the way i'm doing right now. So you can decide to do this to secure the thread of the vehicle properly, so it won't be pulling okay, okay, so after stitching the velcro to the tips of the band, this is how it looks. So this is what your band should look like. After fixing the vehicle - and the next thing i'll be doing - is to attach the band to our wig cap, okay, so this is the wig cap i'll be using for this tutorial. This is how it looks so i'll go ahead and put it on my head. So as to know where i want my band to be okay, so i'll put my band on top of this wig cap, so i can determine where exactly i want my band to to start so so i'll. Take my taylor stroke to mark on the wig cap, where i want my band to start. I hope that makes sense to you, so i hope you guys can see the area where i marked out. So that is where i'll be joining the headband to the wig cap, and i also went ahead to determine the middle of my wig cap and that of my headband, so i'll be placing it together on that part. Now go ahead and join it. So after joining the band with the wig cap, this is how it looks. I hope you guys can see this properly. Okay, so i'll go ahead and cut the parts that i'm holding right now so i'll go ahead and cut that part. So this is the final look of the wig cap. This is how it looks so i'm just trying to put it on my head so that you guys can see how it looks clearly, okay, so this is the one i'll be using for this tutorial. It'S a little bit coily, so i'll open it up so that you guys can see how it looks. So the event came in three bundles, which should be enough for your wig and the texture is super soft and so good. So i went ahead and drew this line on the wig cap so as to serve as a guide when i'm finally attaching the weaving to the wig cap. You can use a sewing machine for this process, but i prefer to use my needle and trade do uh. Just pay attention to what i'm doing closely here so when you get to the tail end of your wig cap, this is how you should join the move onto the wig cap uh. So, by the time you are done, you just flip it over like so, and your headband wig is ready to be rocked day in day out. It'S the same road, we're gon na make the footsteps so take that, aside and just day in day out, it's we've always on the road so take that, aside and just day in day, walking steps just for a while.

Comments
Opatola Aderoke: Kudos to you! Watching from the beginning to the end, one can follow the steps to do the same unlike so many half detailed informations so many you-tubers do give.