Diy Curly Crochet Headband Wig || Under $40!!!
- Posted on 12 February, 2022
- Headband Wig
- By Anonymous
DIY CURLY CROCHET HEADBAND WIG || UNDER $40!!!
What's up everybody/
I'm here with another hair tutorial -- a DIY curly crochet wig! This is very easy to make and did I mention-- affordable? All of this cost me less than $40 to make! Do you make your own wigs/crochet wigs? Let me know in the comments below!
Be Sure To Like This Video and Subscribe!
Thanks for watching!
Follow Me on INSTAGRAM: https://www.instagram.com/miss_serena_...
For Business Inquiries: [email protected]
________________________________________________________________
"'For I know the plans I have for you,' declares the Lord, 'plans to prosper you and not to harm you, plans to give you hope and a future.'" Jeremiah 29:11 (NIV)
crochet wig cap, crochet wig tutorial, crochet wig leave out, crochet wig afro, crochet wig faux locs, crochet wig kanekalon hair, crochet wig cap hairstyles, crochet wig with bangs, crochet wigs with braiding hair, crochet wig braids, crochet wig diy, crochet wig cap faux locs, crochet wig straight hair, crochet wig with expressions hair, crochet wig u part hair straight hair, crochet short wig, crochet wig spring twist, crochet wig styles
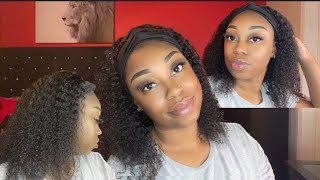
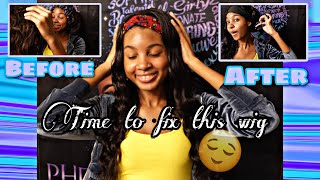
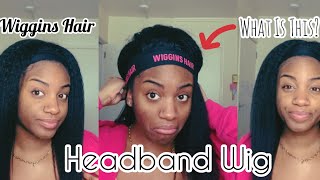
What'S up everybody i'm serena k and i hope that you guys are having an amazing day today, i'm going to be using the pearl curl 18 inch hair from freetress to create my curly crochet headband wig. So this is actually the same cap that i used in a previous video. I used it with straight hair but um. I just took that hair out and i'm going to be starting a fresh with this new hair, i'm just starting at the bottom like i normally would, and i'm just going to keep going. I want to space them out as much as i can, especially towards like the back and the bottom. It was. It won't be until i get a closer to the headband part, that i'll start putting them a little bit closer together. But when you're, especially when you're using uh curly hair like thick curly hair, you don't have to have the hair so bunched up together, because it does come out really really big. Unless you want it really really big but try to space it out. Some and i'm just continuing the process except i want to make the hair a little bit closer start, putting them a little bit closer because we are um closer towards the headband and you don't want too much spaces out in the front, especially if it's curly hair. It'S easy to hide a little bit in the back, but the front it needs to be well covered, so try to make them um close enough to where it's covered enough. So now that i'm pretty much at the headband, i'm going to be doing the invisible knot. Method, instead of making a regular knot, an invisible knot will simply just give it a more natural look. It'Ll fall a little bit easier. It'Ll just look a lot better than if i would have just done regular knots so to do an invisible knot. It'S pretty simple! I'M doing it right here, just slide it under, like you normally would close a latch pull it through, but instead of pulling all of the hair through. You would just split part of the hair in half and then split that underneath and then fold the rest over and this you guys is the finished product. So here you go. Here'S what it looks like um, it's big, i'm not used to wearing like curly hair. Often i used to a lot when i was younger a little bit younger um, but i feel like straight hair was just more manageable, but i do love how i look in curly hair as well. So i'm gon na do like a 360 and just show you guys how it looks like from the back. I did put mousse in it um because it was just kind of all over the place. I wanted to tame it down a little bit but uh yeah, and it was actually really really long. It was probably like. I don't know if you can see, but it was like way like towards like by my root um, so i had my mom cut it. Some so after i cut it, this is how long it is, but i love it. The hair is really really good. Uh cute, it's natural. Looking i like natural, looking curls um. I said that the headband is right here you can put whatever headband you want to, but i'm gon na just leave it. I don't feel like messing with trying to find a headband, but if you want to add another headband, you know spruce it up a bit. Have at it it's really really cute, i love it. The hair is really light natural. Looking it's it's good like i like it um. This is definitely something that i would just wear like to work and, if anything to work like, i might just put it like in a ponytail um or like in a bun or just something that i can wear uh. You know out and about going here and there running quick errands, that kind of thing um, but uh yeah. I i love it. I love it. I love how it came out you guys if you are not into headband wigs. I suggest that you hop on the bandwagon as well as learn how to make your own crochet headband wigs, because they're super easy to make you guys and they're very convenient and they're very affordable. And, yes, look at my videos. I did one with the straight hair. You can check that one out i might actually use. This is the same cap that i used in that video for that wig. The thing is, i had to take that straight hair out. It started to get tangled and old and i it's harder to crochet with straight hair on a wig cap than it was too curly. I don't know why um, but it was much harder for the hair to like stay and not like come loose or get tangled. You know so i just took it out and i was like let me just wear a straight hair, wig, so yeah. So this is it that's what i'm gon na do with 360 one more time. This is the final product. If you guys like this video - and you found it very helpful, make sure that you give it a nice big fat thumbs up, don't forget to hit the big fat red subscribe button and notification bell so that you get notified for whenever i do post well with All that being said, i'm signing out i'm serena k and i hope that you guys continue to have an amazing day. See you guys later, you

Comments
Joy Liberty N: It looks amazing