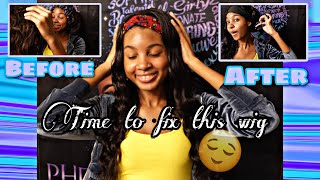
Diy Braided Headband Wig||Never Be Afraid To Try Something New||Practice And You'Ll Become Bett
- Posted on 01 February, 2021
- Headband Wig
- By Anonymous
Hope this week you are inspired by my DIY braided headband wig to try something new! Now is the time to make that thing you've always wanted to.
Braided Hair you can use
Crochet Hook
Wig Cap
I will receive commissions for purchases made through the links in this post.
For more information on what I do you can visit my Facebook business page
https://www.facebook.com/changingminds...
Introduction song was co-written by
https://www.facebook.com/duklon.stenne... or https://www.facebook.com/dukegospel
For more information on what I do you can visit my Facebook business page
https://www.facebook.com/changingminds...
Introduction song co written by
https://www.facebook.com/duklon.stenne... or https://www.facebook.com/dukegospel
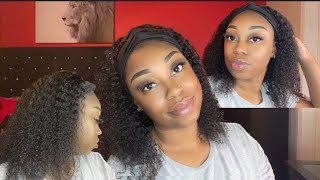
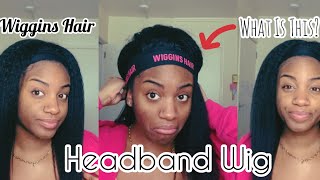
To my channel today we are attempting a braided wig. We have our tools here, a wig cap to crush a needle and our pre-braided. Here, let's see how it goes at the end, they will quickly disappear. Wow, i'm just placing the wig on the money king. So the wig cap is on the mannequin and just to keep it stable, we're putting in some pin around the four corners, so it doesn't shift guys. This is my first time. Okay, there you go and then we just start with adding the braids to the cap. As you can see, i've moved my way on the outside i've already added some and so far. I am just crocheting in the braids, giving it some space that doesn't get too crowded, so you put the needle in latch it and just put it through it's just that simple. You go again, i'm trying to fill in the spaces but still giving it enough room. So the hair doesn't become heavy and cumbersome, or at least that's my theory at this point, i'm almost through the middle section and here you're trying to limit the amount of space in between at the back. You had room to do so, but, as you get closer, that's the part that is going to be showing mostly, so you want to bring them a little bit closer together to close up the gap, make it a little bit more neater. Once you put on the wig and at this point in the video i would like to encourage you to try something new and really hope that you are inspired. I mean if you're like me, i watch a lot and lots of hair videos and i've definitely not tried as many as i watched. So i hope this encourages you to try something, maybe, and i'm of the philosophy that once somebody else can do it. I can do it too, as long as you put your mind to anything every and anything. Once you put your mind to it, you can achieve it. What are you planning to put your mind to at this point? I mean it's a new year. It'S a new year's to start new things, try new things and for me i've always wanted to be doing some more diys and i've because i love here and such i've started so here i'm trying to fill in the sides trying to close up as much gap Because you don't want when the wind blower, you definitely see so many white parts. So here we get again to the front, make sure we're putting it as close as possible to close the gap. So we don't have that, showing at the front we've now moved on to the other side with this type of wig cap, though, with the sectioning of the middle and the two sides, it helps you to be more guided in what you're doing, instead of just being Random, so i would encourage you, if you're going to try this style or at least try this wig, that you get this wig cap at this point we are definitely almost through. We have just a handful of braids left, so i'm just going in moving the braids see where i see most gaps are mostly white and i'm trying to place braids in those spaces. This section i got a little worried that i wasn't going to have enough braids, but then i remembered when i first bought the brownish color. I knew it wasn't going to be enough, and i made some on my own. I actually had some braids inside regular free braids and i braided some on my chair. So i remembered those at this point, so i decided that i was going to just use all the braid, the brown colored ones, and then i will go into the back where you know my less beautiful braids that i made would be added in the back to Fill it in and at this point you see that it is being it's filling in nicely we're not seeing the gaps when the hair falls and that's definitely what we want. We don't want anybody to know that we're wearing a wig. After all, nobody needs to know that we did not sit down for hours to breed our hair. It definitely took about an hour and it i think it took this long because i was recording, so i was pausing to adjust the camera and adjust the the mannequin head all right. So this is it 24 inches. This is it without the headband. It'S definitely a headband away guys, so you throw on your headband whatever color you want, so how you're here and who's going to know, look. Definitely i try for any. I'M so excited pause right now. Let me show you the headband, all right, auntie with the headbands camp was no. This is definitely money well spent well spent, it's definitely worth it. So if you enjoy this kind of tutorial, you can comment down below. If you want to see more of my little diys with here and other things, i do other things as well. So thank you so much for watching and be inspired to try something new. Today. You need a daily dose of blessing right up in your life. I know it'd be so very difficult and depressing, but i got ta hold on to the positive and keep on pressing the blessing. You know if you need it, then you can't stop

Comments
Just Shanna BE : Links to products used can be found in the description box
Aamina Butt: Hi Shanna! Great video - Will definitely try this out :D
The Least Of These Ministry-Even A Child: Hey Shanna. It has been a while. I love this video guving yourself a transformation and you are also teaching us how to do our own.
NickieF7: I'm inspired to have you make me one! That's what I'm putting my mind to.
Judzz Houser: Awesome job definitely going to try this
Sha-Jay Williams: Love it
The Rusheema Show: It looks so good! You have gifted hands sis. The wig looks good on you...nice.
Mallor Edwards: Good job! Looks good on you
BreeMack: You really did a nice job.. It looks good on you & I like the coloring. Its always good to try something new even if you think you won't be good at it. Take a chance right?
Selective Roots: inspirational. great work on the wig!!
Marvette Facey: That's SO cool that you get commission from those links. Will see if I can "pattanize" dem.
Lovable48: Practice makes perfect,it turned out great
Donna Haynes: Lovely
honei89: It's the excitement for me!!
Aamina Butt: Also, Subscribed :)
Marvette Facey: It neat and nice man, mi naa lie yuh. If it can hold on my locs in a stocking cap, I would pay you to make one for me so I can change up my look sometimes.
Moments With Marlo : I'm ready! Name your price and tell me what to bring
Marvette Facey: NOICEEEEEE; mi waah one please and tonx :).
Alicia Kim: Mi a try binge today!
NickieF7: Where were those pins when I needed them?
NickieF7: Me miss, ☝I want a headband wig
ItsBlogs ByRen: No man mannequin lippie is popping watch hairdresser, it's that simple! Good job though
Marvette Facey: Mi caah look away rom the lean lipstick weh Mallorie put on pan the mannequin's head. You HAVE to straighten it somehow for my mental health's sake star.
JUDZ MARS AND MINI: Me want one