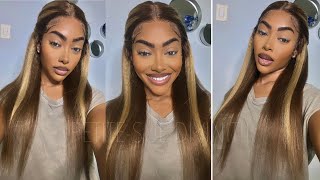
Best Red Wig Install | Feat. Pretty Icylinn | Start To Finish Frontal Wig Install !
- Posted on 29 November, 2021
- Lace Front Wig
- By Anonymous
!!!WELCOME TO MY CHANNEL EVERYONE !!!
In today’s video I will be going over the step by step process of this lace wig install. Any questions feel free to put them in the comments. Show love to my new channel !! Love you guys
*GET TO KNOW ME *
* My name is Amoyia
* I’ve been doing hair for about 5 years now
* This channel will revolve around my daily life and all things beauty
* I’m 18 (Pisces ♓️ gang)
* I am located in Queens, NY
Don’t forget to like, comment , share , and subscribe, I will be posting more content for you guys soon
Follow me on my socials⬇️
PERSONAL INSTAGRAM: @akg_moy
BUSINESS INSTAGRAM: glazestyles_
TIKTOK: glazestyles
SNAPCHAT: akg_moy
Email: [email protected]
What'S up guys welcome to my channel so today i'll be walking you through this in-store that i did on iceland stay tuned. So let's get started so here i'm putting on her cap. I got this cap from the beauty supply store. I always get caps from my local beauty supply store. You just want to make sure you're using a nude cap, something that you know is going to blend. That'S not too thick. It'S going to melt into her skin, so i'm just making sure it's on comfortable covering her ears because we're about to cut the ear tabs off. So with the small scissors. I take the scissors to puncture a hole in the middle and then i slowly um cut out her ear and you just want to be careful with this step, because you do not want to cut your client and you don't want to hurt nobody. But these scissors are very small and they're, not super sharp, so it should really be no hurting anybody with at this point. It'S iceland filling herself with the cap for me, but yeah. At this point i just sprayed down her cap with a holding spray. After putting on the cap right here, i'm showing you the wig, this is a 26 or 24 inch, i'm not too sure wig from hermosa hair. It came pre-colored, so i did not color this wig, but it is a transparent lace. As you can see, i plucked the wig off camera right here, i'm going back in with those same scissors and i'm cutting along the hairline. This way, i'm kind of just shaving out how i want her hairline to look also i'm being careful with this part, because i'm also lifting the cap gently just to make sure the um lace won't be too far down her forehead. We are literally so goofy y'all me and iceland were watching tick tocks this whole time. You see me dancing to the tic toc song, but yeah. I just did one side now, i'm going on to the other side and the same thing, as i said, just making sure i cut as close to the top as possible with my small scissors, because you want this to be precise. A good ball cap means a good install period. So now what i'm about to do is blend that cap in okay. So i'm taking a makeup um cream that is close to iceland's skin tone and i'm just taking it with a makeup brush that i got from amazon and i'm just taking it and i'm just patting it into the cap, because i want this to blend seamlessly. I want to make sure you don't see the cap underneath the lace so yeah. That'S what you see me doing right here. Just rub it in rub it in and rub it in. I use cream makeup. I don't use liquid and i don't use powder. I'M do using that same makeup and i'm putting it inside of the lace and, as you can see, this is a transparent lace, so it does have a whitish tone. So i really want to make sure i'm getting that makeup in good, because i don't want no flashback right here. I'M showing you this! You see that blend. You see that blend. I use the erica j glue and i just dot it across the um top with the glue itself and i used a rat tail comb to rub the glue in we're making tick tocks right here so kind of getting distracted. But you get the point to the salon. We was doing that tick tock guys, but here you see i'm going in with another layer and i'm smoothing it in make sure that glue is blended. Great okay, you don't want no lumps no bumps, no nothing. I want this to be nice and smooth, because this will also affect how seamless our install comes out so and also, as you can see, i don't use a small amount of glue. I use a pretty good amount of glue because one thing about this erika j glue. It does dry down clear even when i use a lot, so i like to make sure i use a good amount just to make sure the installs are lasting long. At this point i had just finished my second layer, i'm showing you i'm putting my third layer on now. So i use a total of three layers when laying down the blue. I don't really feel like it's necessary to put more than three layers, but it's all up to you and it's up to your clients um. Sometimes i have clients who say they want more than three layers, but really three layers is good. I never have no complaints. Three layers, especially because i don't do thin layers, so these are three strong layers of glue and also just to clarify. I'M specified that i do three strong layers, meaning i don't put a little bit, but i don't put an excessive amount to where i can't blend it in all of these layers are blended really well. I want to smooth this out as smooth as possible, because sometimes, if you put too much glue, you can't get it to lay the way you want it, because it's like too tacky it's too much going on so once my three layers are dry. It'S go time. Now i can lay the lace down into her skin or whatever. So what you see me doing here is just pulling up the wig in the back, because iceland has a lot of hair, so i like to do this just so. I can get the front to lay flat and then i'll adjust the back um. After laying the laces down the down took down, eight lay that lace oh laid at least okay. So here i'm just lining up the lace with the glue remember the glue was positioned to where i want her hairline to be so. I'M just lining that up and then i'm gon na make iceland hold it for me now. I'M gon na make iceland hold both sides for me. While i position the wig, then i will take my trusty rat tail comb and i'm just gon na smush and really rub in that um lace into the hairline, because i want this to be melted. Okay, do not do this step if the glue is still wet. I repeat: do not do this step if the glue is still wet because it will just turn into a disaster at this point, because the glue will start steeping through the lace, and we just do not want that so make sure everything is completely dry before you Do this step now, with my same little scissors, i'm gon na go and i'm gon na carve her ears out. I'M gon na cut her ears out just so. The wig lays on better she's, just showing you the lace period but yeah. So i'm doing this so that the wig lays better and so that i can get a better meltdown once the ears are carved up now i can start cutting the lace and i'm just cutting to where the glue is and i'm just cutting as close to the Hairline as possible, i don't want no extra lace because it just will affect the install. You won't get a seamless, install so take your time with this step, cl cut as close to the lace as possible and yeah. As you can see, i do not rush this step, i'm cutting very slow and i'm taking my time because at the same time i do not want to step iceland. I don't want to snip any other clients either. So just take your time with this step and just cut where the glue is once we have cut all the lace off, you should be looking something like this. Yes, here's a close-up. It'S given what it's supposed to give now, i'm just gon na go back in with my makeup and i'm just gon na touch up any parts that i feel like. I missed because, as i said, this is a transfer at least so sometimes you can see a little bit of the lace i'm just going over it and fun fact. Do you guys realize that, throughout this whole tutorial walkthrough, i've only really used my retail comb and my baby scissors, because you really don't need that much tools when it comes to this part - and i just want to encourage everybody that anybody can do this. It'S really not as hard as you think, and you don't want to overthink it as long as you practice practice makes perfect. You can do this so yeah right now, i'm just carving out her baby hairs with the rat tail comb, i'm positioning the baby hairs where i want them to be here, we're doing a little bit of more of a softer baby hair. Iceland normally likes really dramatic, but because we're doing color i decided yo. We need to do something more chill. You know more chill, so it's still given, but it's a little bit more chill. So i'm just making ice and hold that hair up. I'M putting her hair up again, another view, another view. Yes, it's looking really good right now, so we're gon na go in with our elastic band and we're gon na tie that down and we're gon na, let that sit for a little bit a little bit. So now i'm about to take off the band off camera. I blow dried her hair because it was a little bit damp because i had bleached the knots so i've taken off the bin and now we're about to get to the best part the baby hairs. Everybody loves them some baby hairs, so i'm just pushing the hair behind her ear. So it's not in my way when i'm laying the baby hairs and then again another close-up, you see how much of a difference the band makes like. I just love it like. I really love it here. I love it here, but yeah, i'm doing the same thing to the other side and i'm just pushing the hair behind her ear and she has a piercing there. So it was a little tender for her, but yeah we're just putting it right behind her ear and we're getting ready to lay so already. I cut that one piece now: i'm cutting the um sideburns and i'm cutting it in a diagonal and i'm just cutting it. How i want it to lay basically, so you cut your baby hairs. However, you want it to lay if you want long baby hairs cut long, baby hairs. If you want short, you cut short. If you want it to lay in a slit, you cut it in a diagonal like that's kind of the vibe, that we give i'm doing the new baby, hair method, the curling, the baby hairs and then laying it. So i'm taking my small flat iron and i'm just very carefully curling the baby hairs under some people curl it up. I don't get that, but i curl them under. So you just do what makes you comfortable and what makes your clients comfortable now with the edge brush, i'm about to spray some holding spray, and then i'm going to lay them. And i'm going to use my finger to guide me as i'm laying as you can see, i'm just using my finger to guide me. Here'S a close-up of her edges after we laid them. As you can see, it's giving very much scalp right now, still natural, but still giving is still giving iceland like she likes dramatic, she's, very cute. She likes all of that. So i have to give her what it's supposed to give right here, i'm just adding the band again and this time i'm leaving the band on for the longest time. I will leave the band on until i'm finished curling, because this is what's really gon na set. Our install in place you want to leave the band on for as long as you can. Yes, it is very tight. Yes, your client is going to hate you for it, but it's all about the install. We got to get a good, install, okay, so right here, i'm just taking my hot comb and i am flattening out the top. I want this to look as natural as possible. I want the hair to look like it's growing from her scalp, i'm just using my hand to reinforce it so hot comb and then i'm taking my hand, i'm just rubbing it along the hair. I don't know if this really works, but i just do it. It feels like i'm doing a little bit more extra, so i just do it but yep. That'S what you see me doing right here and yes, the hot comb is really hot and yes, your client is going to feel it through the wig. But trust me. Nobody has been harmed like you're, not gon na burn. Your client they're gon na feel the heat, but trust me they're not getting burnt. So if you feel the heat don't get worried, you'll be fine, it's all for the install it's all for a good install. Okay. Now, with my t3 curling iron, i'm using the curling iron to reinforce the top, so i'm flattening out the top and then i'm sectioning off a piece of hair and i'm going to curl. I like to do my curls away from the face, so you just take it and just roll and press and roll and press. I really don't know how to explain how to use a curling iron, but that's really what i do. I just do everything away from the face, because that's how i like my curls to lay especially when it's a middle part you want to give body you want to give bombshell. You want to give all of that so curl away from the face. Trust me you're going to love it when i curl i like to hold the curl in my hand, for like a couple of seconds before i let it go, because i really want to make sure that curl is holding really nicely and what i also do. I don't know if i caught it on camera, but i after i curl i go in and i spray some holding spray just to hold those curls nicely give the hair more bounce volume make sure those curls are not coming out. Again, i told you a client. Is going to hate you for this part, because it's on it was on her air. It was tight. It was on there for a long time, but i'm telling you the band is really. What helps me in the bed helps so now yeah. She got the chills that bend was hurting okay, but yeah she's feeling it. This is how you want your curls to look once you are done, and i don't use a big curling iron, because i want these curls to really stay for a long time. It just depends: i use a big curling iron when i want more of a loose look, but i kind of wanted that bombshell, thick curly look, so i take a small makeup brush that you would normally use, probably for eyebrows or whatever, and i just take some Of my makeup - and i just go along the part to find the part and yellow dance break period period period period period - oh she's, feeling herself - i love it. I love it now, i'm taking my old school comb and i'm just combing the hair away from the face, and that's why i wanted to curl the hair away from the face, because when you comb it, it just falls perfectly so now. All i do is just play with the curls at this point position it to where i want it and we're done. I hope you guys enjoyed this video like comment and subscribe. Show love i'm new to this youtube. So i just want you to tell a friend to tell a friend and yeah turn your posts notifications on comment, anything that you think i should have did differently or what you would like to see next, and i love you guys. Thank you for. Thank you. So much for the support and bye period period period period, i'mma kill y'all with the periods. Okay, bye. I was better living. I know,


Comments
Itss Khila Jayy: Your work is so so neat and pretty !I started my hair business doing braids a month or two ago but I want to get into the wig and installing Industry I also have my own treat business as well and girl you inspire to actually make that happen and keep going !
Relax with Nini: YOU DID THAT!
Taylor McFarland: Perfect
yeahitsann: Love it
Briasia Renae: Bombbb can’t wait for u to do my hair again
ThatGirlKay: love itt
Cameryn Williams: Beautiful job what elastic band did u use? Its so nice and thin???
Daniella Ageh: Ouu how did you get the parting so clean and what holding spray do you use ?
Raychel Brown: Slayed
Kiya Grand: I love it
Faye P: Beautiful what size is your curling irons?
SoThts.Kailah: What color dye did you use??
Amiya Davis: Is the wig dyed or did it come red?
Zylia Armoni: Are you using a phone or camera , the quality was amazing
Angie: This is everything how do I book
Kadija: YASSSSS! where is the hair from?
AL:
Marysa Georges: where is this hair from?
Xoxtheprettyjayda: Period
Destiny: What’s the name of the song