How To Make A Wig (Very Detailed)
- Posted on 18 January, 2019
- Lace Front Wig
- By Anonymous
All products used in this video are listed in this box.
YWigs offical website: www.ywigs.com
Hair Used: YWigs 6X6 Closure in 16 inches and Bundles in 16 18 20 inches
Direct link to the YWigs big 6X6 closure/mini frontal with 3 bundles:
https://www.ywigs.com/1-piece-66closur...
**Use the coupon "Darkis" to save $$$ when check out.**
*Connect with Ywigs:
http://www.instagram.com/ywigstore
https://www.facebook.com/Ywigstore/
Snapchat: Ywigs Hair
OTHER ITEMS USED IN THIS VIDEO:
Canvas wig head: https://amzn.to/2T0pPAH
Crock pot liners: https://amzn.to/2soL7Mk
Tripod wig stand: https://amzn.to/2qGngHb
Weaving Needles: https://amzn.to/2MdYYOB
Weaving Thread: https://amzn.to/2VWgA61
T-pins: https://amzn.to/2FcaWZe
Razor: https://amzn.to/2VqUS9U
Airbrush Legs: https://amzn.to/2VS4z1G
Blowdryer: https://amzn.to/2RWok8U
Curling wand: https://amzn.to/2RPE4Ha
Flat iron: https://amzn.to/2SPKlDv
Mesh Wig cap: https://amzn.to/2sv6Thl
Thanks so much for watching GlamFam! You know we love you boo!
Follow us on instagram @GetGlamFam
Much Love, Alison and Linwood
FTC notice: This box contains amazon affiliate links, which means that if you click them and make a purchase from amazon, we are able to earn a small commission. This does not impact our recommendations. Thanks as always for your support of our content!
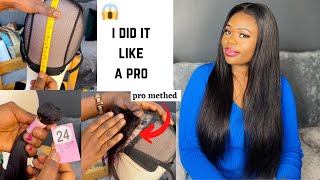
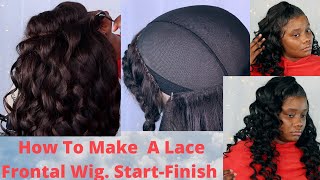
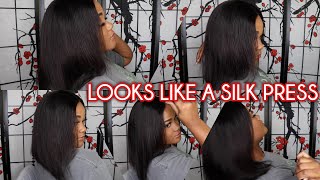
Hale FM Linwood here and today, I'm gon na, be showing you how to make a wig per your popular request. So before we get started on that, I want to take a moment to thank Y wix.com for providing the hair for this tutorial. Make sure you guys check them out, they sell all kinds of stuff, I'm going to be showing you something brand new from them. That, I really think is quite amazing here in just a moment before you get started with trying to make your wig, you will first want to measure your head, so you can either go ahead and get you some cheap measuring tape like this or just borrow something Your grandma or something nearby seamstress or something what are they calling them and Teamsters? I don't know anyway, so you're gon na go ahead and take the measuring tape like this here, wrap it around the head from the nape area up to the tip of the hairline, and you just basically want to go all the way around this. I hear you guys can see I'm right at about a 23, so that's gon na, let you know the size of the canvas block that you're gon na need. So you can customize it to your head size because the canvas block is coming at number of different sizes. If you make this too smaller on the styrofoam head, it's not gon na fit your head because your head is bigger than a styrofoam head. In most cases, few warnings ahead of time - I am a cosmetology instructor, so this is gon na, be an incredibly detailed tutorial and also I'm gon na be speaking pretty quickly throughout the entire tutorial. So if you have a hard time keeping up with stuff like that, keep in mind, you can't slow down this bead by pushing the little cog on the side. It will go ahead and have different speeds to to play this video at. If you need me to slow down at any point, I'm gon na be coming a lot of information. It'S gon na be incredibly in-depth, and hopefully that way it leaves you with less questions at the end. So, let's dive right, okay, so items that you'll be needing for this tutorial are as follows. We have over here, of course, needles and thread. I do buy my needles in bulk and honestly, it's better for you to go ahead and get them like that and to buy them from the beauty supply store, usually at the beauty, supply store, they're about a dollar a piece depending on where you are. They may be a little bit more than that, but you can get them on bulk and rather large amounts, sometimes packs of like 30 for about $ 10. So, honestly, it's a better deal to do that. That'S why I have infinity billion needles in the dyeing bag. Some weaving thread make sure that the red that you use is, in fact, hair weaving thread not sewing thread. This thread is a bit thicker and a lot more sturdy. So that way, it's less likely to break as you're sewing with it sewing thread, is really thin and easy to work with and honestly quite cheap, but sewing thread does break rather easily and you don't want your wig coming apart, really easily you're gon na need some T pins like these babies here by the way all these will be linked down in the description box below a wig cap. I like these mesh ones. Here you guys can see, is see-through, it's very lightweight and it's got a good degree of stretch to it. These do come in various sizes and I found them on Amazon. They are absolutely amazing. I will see if I can link them in the description box down below as well, but they're nice, because they're, breathable and lightweight, unlike the spandex, dome caps that are incredibly thick and heavy and will have you sweating like nobody's business. A canvas wig block like this one here and on the outside of it. I have a crock pot liner and basically, what I do is I go ahead and place that over it and I just T pin it on so you guys can see the pins in place here. What that's going to do is just prevent you from getting any type of the fabric underneath there on the block into your stitching when you're making the wig. It'S also gon na help out with preventing any type of hair color from getting on the canvas block, especially if you are doing hair color on a wig and also make sure that, if you're doing wet styling that you're not getting any type of moisture. Inside of the canvas block which can mildew or mold later headstand, so I've got a headstand like this one here that that canvas blocked its gon na go on you'll, be needing hair. So I'll go through that in just a moment and optional, we've got some tweezers here, some sort of cutting tool, so I've got a razor and I have sheers and you may also will you definitely also want to get a pair of junk shears. So let's talk about this hair, alright, so, as I stated earlier, the hair provided is from why wigs calm make sure you check them out and they made sure to put all of this hair here in this lovely bag. Here that you can carry your gym equipment or whatever in later, the reason why you did not see some of the the things I have down here list it in items you would need is because they send it with these items. So if you needed a wig cap, they send the wig cap with the hair and also, if you need it, an elastic band which I'll show you what that's for later. They did send an elastic band and comb to kind of help hold that wig secure your elastic band that they already cut and everything for you as well as a couple of combs and I'll, show you how to utilize those later in this tutorial. But let's dive into this hair, so we've got a 16 and 18 and a 20 inch bundle of straight hair. These are all natural color. They have not been processed with any sort of hair color, so they are virgin here. I'M gon na go ahead and open up the longest one, so we can feel for the quality. Okay. So starting off, I must say this: hair is impeccably silky. It feels amazing. Oh my gosh, I'm not seeing any split ends on the hair. It is wonderfully straight, but you do want to make sure that you are aware that whenever you're going for longer links like this one is a 20. So I would say, if you're going for 20 inches and above, like 20 to 24, things like that, you may need a bit more hair, because hair is traditionally sold by weight. So the longer the hair is the more here you have this way, that's accounting for the weight of that bundle, which means the bundle is not going to be as thick as it would be for something else. So I'll go ahead and open up the 16, and that way you guys can see the difference in the amount of hair you get okay, so here I've got these sixteen and I have the twenty, and I don't know if you guys can tell the difference in The thickness between the 20 and the 16, you can also tell this way: there's more hair on a 16 because there's less weight from the length of the hair. So you get more bang for your buck when you're going with the shorter length in terms of the amount of thickness you'll get. But if you're wanting longer here, you may have to buy an extra bundle. So, instead of doing three bundles, you may need boards. That'S something to note, of course, the sixteen inch hair feels just as impeccably solved as the 20 inch hair, which is rather impressive, but let's go ahead and talk about the GameChanger here now. Why wix.com also sent this lace closure here? This is a 16 inch closure. The thing that is amazing about it is the fact that this is a 6 by 6 inch closures is rather large, and it has a massive amount of parting space in it. The typical closure that you would see from most brands is going to be a 4 by 4. This one is large enough to fit across the entire top of the head and it has such a deep amount of pocket parting space. I mean this baby is so deep that it's having conversations about existentialism in the 19th century. Okay, the nice thing about it is: it gives you that full range of parting spaces across the entire top of the head, or if you wanted to put it slightly opposite side and get it even deeper part. You can do that as well. You guys can see they do have. Some of the hair is already going forward to be utilized as baby here and, of course, you can modify that. However, you like - and it doesn't look to be incredibly dense around the edge, so you may not have to do much squeezing there at all. So that's pretty much all they have to say about that. This baby here is the game changer, because most of time, you've got a closure that is about this big and in this instance, you have all of this space to work with here. So this is a massive amount of space, just to kind of show. You guys here that's have a huge closure, especially if you're, not one where you like, a full frontal closure or if you don't like the 360 closures that go all around the head. So the way that I'm making is gon na be a 21 inch wig, because it's for my beautiful wife Allison, who has a 21 inch head so you'll want to make sure that measurement that you use beforehand. You used to order the same size, canvas block like I said these come in various sizes, so this lady here is a 21 inch block. Just so you know the flat side of that block is the front. The rounded side is the back, and this is for the expanse of the head here. Just like you know, and just so you're not putting that cap on there backwards is go ahead and begin by taking your cap here and you're gon na place that on there now, I don't know how well you guys can see, but it kind of comes like A v-formation here, I'm gon na utilize that in the back so tag goes in the back on the front. You guys in see I've got this straight line here. I want you to think about that as the round of the head right up here, that's pretty much where you'd want that to sit, so I'm gon na place that portion on the front the tag portion on the back got to go ahead and just take a Couple of T pins and I'm going to pin here and there so primarily towards the back of the wig. I'M just going to go ahead and pin a couple in there like so and up front, I'm gon na be doing something a little bit different. What you guys will see here in just a moment now when threading needles, I always like to do two arms links on thread. So usually what I'll do is go ahead and take it and stretch one arm leg out. You know what I'm saying and then I'll take again and stretch another arms length out from there. You want to take your scissors, and this is where the cheap scissors come in and you just want to go ahead and cut that thread from there. I'M gon na go ahead and take one of my needles and we'll just thread that needle like so all, right now from there, you just want to go ahead and match up your ends and you're gon na tie a knot in the ends of it. Now I know that seems really basic for me to tell you that, but if I don't tell you someone's not going to tie a knot in the end and then they're going to be upset with me in the comments, so I'm gon na show you a super Easy trick on how to tie these ends, which, basically you just want to match them up like this here then you're gon na go ahead and take the end grip them between your index finger and your thumb wrap it around the index finger like this here and Then just roll your finger on out of there and slide, and you instantly have a knot in your thread that tip alone is worth so much money and it will save you so much time when it comes down to tying these. Typically, you want to thread anywhere from 13 to 15 needles cuz, that's about how much it's gon na take depending on the length of your arms and the amount of hair that you're using in there. So now you guys know why I have so many instead of having like two needles and having to you, stopped and threatened more needles for our next step. We'Re gon na go ahead and take this frontal now some people would like to go ahead and bleach. The knot I do have other tutorials, where I show how to bleach knots, but this ain't though so I will be going ahead and probably linking a couple of videos on how to do that. But I'm gon na put this closure in the area of the top of the head, where I would typically want it and what I'm gon na do. Is I'm going to go ahead and place that to where maybe the baby hair is right along the edge of the wig? The rest of that will just kind of be in place on up here. So this is where your T pins come into play and I'm just going to go ahead and grab a T, pin and pin on each of those corners right into that cap, as you guys can see here and do the same thing on the opposite side here And you want to make sure on this closure around the edge. The edge is kind of stronger, so you guys see like the bold portion here. Those are the areas that you'll want to pin through is able to take a lot more abuse because it's been structured in that area, so we're gon na pin that area all the way around and then from there we'll go ahead and move on forward into the Next step, depending on the front of the lace, make sure you pin a good waist down so that way, if there is any tearing it's not gon na mess up your closure bumps we've got that taken care of we're just gon na go ahead and begin to Stitch on the wig, so I'm gon na go ahead and show you guys here and I'll see. If I can get you pretty close on in here, so you can see exactly what's going on. Let me zoom you in here, so just so, you guys can see how this baby is pinned in place. Now from there. I'M gon na go ahead and begin on this corner here, we're just gon na hook right on in there and I'm gon na pull straight through once we've done that, don't pull it all the way through. Take your needle through the loop on your thread like this. Here and then pull that baby right on through that way, it gives you something a bit more to kind of anchor onto now. What I like to do, just so this thread isn't hanging, is go ahead and pull that baby in the direction that you're going to be to, and that way each stitch is going to go ahead and cover what you need so from there. I'M just gon na go right on underneath and through the wig cap and the closure and we're just gon na pull right on through there. Now the stitches, I'm doing is called a blanket stitch, which I'll show you more in detail when we start getting to West. Being put on there, but just so you guys can kind of understand you know want to make sure your stitching is rather close around the closure, because this is what's going to give that wig as much structure as possible. So I have now stitched all the way around the edge of the closure, with the exception of the front, you do not want to stitch under here, you're only going to stitch on the edges that are reinforced. So if it's not reinforced, don't stitch there, we're gon na leave this part of loose and I'll show you what to do with that a bit later, as I'm doing the rest of the wig, I won't really want to stitch through the actual elastic portion. I want to stitch the fabric that sits on top of the elastic portion like what you would see right here, not actually through this. But when you're sewing the closure on. You can stitch through the elastic because you want it to hold secure along the edge of that closure. Alright, so remember I told you guys the closures are 16 and then why why wigs comm went ahead and sent me a bundle of 16, 18 and 20? So because this is 16 up here, I'm gon na go ahead and make sure to use the bundle of 16 up a bit higher, we'll use 18 in the middle and we'll use 20 down along the bottoms. And that way we get more of a layered look out of it, so I've got this bundle of the 20 inch here that we talked about earlier, which, like I said it, feels impeccably soft, I'm really impressed with this hair. You guys like look, look how well this here. Is it's just it's amazing, so we're gon na go ahead and take that then from there just remove the rubber band. I just have a quick look at this here. You guys can see. The wet thing is rather flexible, which is fantastic. I cannot stand to work with thick wetting because you should be able to fold it and it'd be rather flat, so that part is actually quite nice, so that portion there it is nice there is minimal bearding. So bearding is the little straight hairs that stick out there. That'S where the hairs, fold-over and sewn in place that you want the bearding to be a bit shorter like this. Is here because the longer the bearding is the more tangling and knotting you would get at the base of the wet so that minimal amount of bearding is fantastic. Now, because you can easily customize these wigs when you're making them yourself, I'm going to go ahead and leave this hair folded in half and we're going to stitch two by two. I hope that makes them if not I'll, explain a little bit more here in just a moment. So a lot of times just see people or they'll just stitch one track, and this instance we're gon na be putting two tracks side-by-side and I'm gon na go ahead and begin taking them and securing them across the back section of the head, where the nape would Be and we'll stitch right on across there I'll pin that baby in place you guys and see. This is why I leave those t pins a little further out, so, if I need to, I can just hook right over that. So you know honestly, because I can do that - I'm not going to go ahead and pin that side in place. I'M gon na go ahead and take my needle and thread and we're just gon na start on the edge here and keep on moving forward starting at the end here, and I just want to go ahead. I'M gon na go right on underneath. Where that fold is. I want to go ahead and secure my thread to that. So I'm just going through the where the knotted section is and we're gon na go all the way down and then I'm going to go all the way underneath that weft and through so before. I take it all the way through. I just want to loop through that portion there, so we can catch now, it's going to help to secure it in place now remember earlier, I was telling you guys about a blanket stitch. Let me see if I can get you just a little bit closer. So what a blanket stitch is is when you are stitching and instead of you just kind of sewing right on along you're gon na go underneath the weft secure it into the cap and that top portion of the thread is gon na fold right over the top Of the needle there, so basically, this top portion goes over the thread that you're, using like a blanket and this just kind of helps to add a bit more security and lock that baby in place you'll hear some people call this a lock stitch. So this is a blanket stitch by proper sewing, and so I'm just going to go ahead and continue this pattern all the way across the back section of this wig from one corner of the nape to the other. Once I've gone from one corner to the next, I can either double knot or like, for instance here, because I don't have a ton of thread. I'M just gon na go ahead and stitch a couple of times in that same area and then finish out with a knot, make sure it's nice and snug and then just go ahead and trim that right on off of there. Then what you can do is I'm just gon na go ahead and place a pin about where I would want that on the other side. So that's where I want to take the track up to I'm gon na, go ahead on this side that I just finished at and fold that weft right on over I'm just gon na place it on top of that section on over there. So this way I'm able to just move right on up and continue stitching right on the cross, and it will come up a little bit, bring it back across this way until we run out of here so by now you may be wondering why would you even Make your own wig! This seems like so much work, but honestly, you can do it for a number of different reasons, so you can do it to be able to customize the week and make it heavier thickness for like what you would like. If you want more density, you can use it to get more length for less money, because you can actually save quite a bit this way or you can use it as a side hustle to be able to make extra cash, because now you're learning a skill that Other people are willing to pay for it's a great way to be able to earn a bit extra and to even take some of the old hair that you have and be able to customize it a bit because you can sometimes find here on better sales. Then you can wigs which, by the way, if you do prefer to just purchase a wig, you can purchase from Y wigs as well, but they sent me these bundles. So I figured hey. Why not? I'Ve had a lot of people asking me how to make wigs anyway, when you get to the corners and you're folding over, like this you'll want to make sure that you are not just sewing directly on top, so you want to create a ton of bulk. So what you'll do slide that that corner up just a smidge and it allows it to lay a lot flatter instead of having it bulk out? Quite so much so you don't want it to come out and on top of because then the bulk here is about the size of my finger. If we push it up and then stitch it down, it allows you just more seamlessly, go from edge to edge without creating a massive amount of bulk. So what I'm gon na do is I'm gon na start stitching on the mesh here instead of stitching on the actual weft and the reason why I'm doing? That is because I want to go ahead and sit pattern, a certain degree of flatness and allow the cap to transition with the west, and that way we get a lot more flatness and I can use that stitching to pull it up a bit. So it's not super bulky on that edge. I just finished up with the twenty inch bundle and now I'm gon na go in with the 18. So what we want to do is where I finished off here. I went ahead and I let my thread and now I'm just gon na go ahead and put a single knot in there to kind of help hold everything in place, so nothing comes a loose and that web does not try to slide out later. So if you feel like you need a second one feel free to put a second one in there, it's not gon na hurt anything there. We go okay. So what I'm gon na do? Is I'm going to go ahead and come through the corner of the weft? Here and I'm not going to go through the front one, I'm just going to go through the backside, so hope you guys can kind of see they're not through the front I'm through the back and the reason why I'm doing that is because I can just go Ahead and take that when I come from the backside that threads coming across the front, it'll hold the front more secure alright. So when I pick up that needle there remember that needle has gone through there, I want to reach right on underneath my previous section and we're just gon na continue on like we would if that track, had never stopped. But the only thing is: I want to secure underneath this one as well, so the same way that you double thread and double knot that one I'm gon na go ahead and double thread right underneath it or we started this section. That way, just kind of helps to hold everything nice and secure from there. I'M just going to continue on stitching, like I've been doing for everything else. Now, if you notice that you want less bulk, let me see if I can get you guys to see a little bit of here if you notice that you want less bulk, which you can do instead of stacking those tracks directly on top of each other and Having a stick out because here sticks out a bit from the hip, I tilt the head back some, I don't know. If that'll help, you guys see a bit more see how that sticks out. If we want to go ahead and get it to lay more flat. Instead of having them out like that, what you can actually do is, instead of placing them on top of one another like that, go ahead and lay them to where they're more flat, like this, so they're still touching. But you guys see how much flatter that helps that lay so now I said just going over the one it's I'm still reaching under and going underneath both tracks, but what it will do is allow the whole thing to lay a lot more flat because it allows For that top track to kind of overlay, the bottom one and it gives you a lot more flatness there. So, if you're concerned about creating too much bulk at the base, that's kind of how you would combat that in order to ensure that you don't have any issues there. I hope that that makes sense you guys difficult for me to kind of keep an eye on the camera and still be able to keep up with what I'm telling you, because I need to be able to see. But hopefully you guys can kind of pick up. What I'm talking about here and that way it doesn't create any extra bulk underneath there or on top, but that second track lays perfectly underneath the top one. So now I'm just gon na continue on back and forth, like I've been doing, and we will move on up the remainder of this head. Okay, you guys so I've gotten all the way up to the top - and this is the 16 inch bundle here. So what I'm gon na do because remember: I've got them folded to where I've got two tracks together. What I'm gon na do is I'm gon na cut this top track. Now that I'm up at the very top I'll go ahead and clip this portion right here and then from there, I can make sure that I've got less bulk, as I'm taking my last track. Right up around the edge, so I'm not gon na sew it on top of, but I'm just gon na stow it nice and close to the edge of that closure all the way around. So it lays nice and flat all the way down completely around the closure, and that way we can make sure there's a nice seamless, smooth transition from one to the next without any type of bulk right along the edge of that closure. So I'm gon na go ahead and do that and then I'll, let you guys see the finished, look a bit stitch portion and we'll move on into the next step. So now that you've got this wake finish. What we want to do is just go right around. I'M gon na start removing some of these key pins from the order of this wig, and that way I can go ahead and take this wig right on off of the wig head. I'M just gon na slide this baby right on off now. Here'S what I want to show you guys! This is why I have plastic wrap around there, because even with the plastic, I still managed to sew through the canvas portion on the wig. So what I'm gon na do, because I don't want to mess up the wig is I'm just gon na cut the fabric from the canvas wig block and who cares alright? So that's why the plastic is on there now what you'll want to do from here? After you've removed that wig from there is you're gon na go right on underneath the wig and right where that closure is there's going to be a pocket in there now. So what we want to do is go in and remove all of this from the wig. So we're not going to cut the lace closure, but we are going to go ahead and remove the black cap portion from just underneath there. So what I like to do is put my hand in there just like that, and then from there we're gon na get in nice and close. You can leave a little bit of lip as you don't want to cut the lace by accident, but we're gon na go ahead and get in nice and close and begin removing the excess of that mesh from the underside of the wig cap. All along the edges, where you have stitched now. This is why, earlier I've shown, you guys do not stitch around the front where it's not reinforced, because all of this portion here needs to basically be taken out, and we want to make sure that we leave everything in there intact. This is also why I said you can stitch through the elastic here, but you don't really want to do it anywhere else in the entire wig. Now I'm going to go ahead and flip this baby back right side out and I'm gon na toss it back on to the wig head. You guys see the difference now now you can see kind of how those knots and things are looking right on up front, and you know what usually I would do a bit of tweezing and things, but I like the density of the hairline that they have here. So I'm not gon na do a ton of tweezing or anything like that in this area, because I honestly think that this looks really good. If you guys can kind of see here. Let me zoom you in it's not too thick or bulky. It'S not like a Barbie hair line so why wix.com did an excellent job with that part as well. I really haven't found anything to complain about with this hair so far so from there. What I want to do is I'm gon na go ahead and start looking at where I want to put that part line and, of course, you can part literally anywhere in that wig that you want and there's a number of different ways that you can do this. So I could either go ahead and take a bit of powder foundation and lay it in the part line. Here. You could bleach the knots which I'm not going to show in this tutorial or, if you're, looking for a way that is simpler. What you can do is take this wig. Take it on off of there turn it back inside out and we're gon na turn it inside out, just like that, and I'm gon na place it back onto the wig head like so now. I know that probably seems crazy. Just give me a minute. We'Re gon na go ahead and begin pinning back have right back onto the wig head and what I'm gon na do here. Just take the tail end of my comb and slide on underneath we want to push all of this hair back and up underneath everything else cuz. I don't want this next step to be messing anything up, so I'm gon na go ahead and take my tail into my comb slide right underneath on this side as well, just like so and I'm gon na begin to pin the back of the wig as well. Just to kind of hold everything dirty in in place once you've done this step. You can either take your foundation and put it up underneath here pretty heavily or you can honestly get some Sally, Hansen's airbrush legs. If you don't want to go through bleaching, the nuts, like I said, I do have tutorials, where I show how to bleach knots this ain't that tutorial, so I'm gon na go ahead and take this. This is an Allison shade, which is deep glow and they have it in various shades, but I'll put it down the description box below as well, and what we're gon na do. Let me not put a hole in my wall. What we're gon na do is I'm gon na go ahead and just begin to spray that on you underside of this week and don't be afraid to get a little liberal with it, because you kind of want it to soak through just a little bit now. I must warn you in advance this stuff. It'S gon na make a mess. You guys can't see in camera where it's heavier, so I'm gon na go in and just spray it a bit more here in there. I think I got a little too happy in there. I say that, right before I spray more on there, you can either allow it to air dry or you can blow-dry that, because I am impatient, I'm gon na blow dry up, but I went ahead and blow dried it and it's not completely dry but, as I Said earlier impatient, so womp now you guys can see the downside of using that spray, as it does kind of get a little bit of everywhere, but that does come off with a little bit of like a wet towel water. So I'm not tripping about that at all, but just so you're aware and we're just gon na take these pins on out and go ahead and do this here now, if you're wanting a more professional look, I would suggest bleaching the nuts or, if you want to Look where, like you're, not having to worry with all that, but this is honestly one of the easiest and quickest ways to go ahead and get this taken care of. So from there. I'M gon na lift that wig back right side out and we're gon na pop. It back onto the cap - and you guys can kind of see here just by doing that it gives you more of that shade that you're looking for at the root area. So as I'm taking it and parting that here out now, I'm getting more of those tones that the scalp would typically give without having to go and bleach knots. Things like that, so the nice thing is here. It allows you to really easily get that tone at the scalp area, with no major ordeal and if you feel like you've got a little bit too much going on. You can miss with just a bit of water and white with a towel and the excess comes right on off of the hair or you can just take a damp towel and wipe it alright. So for the next step, I want to be able to see exactly. What'S going on so I'm just gon na go ahead and miss my chow, like I told you guys earlier and first I'm gon na go up underneath here and wipe the excess right on off of the plastic wrap here and then that way I can go ahead And see exactly how light those nuts are, and I'm gon na wipe the excess right on off of the hair around this edge here as well. Now I feel like on this portion. If you wanted to cut baby here in the way you could, but I feel like it's almost like a baby hair pandemic on YouTube right now, everybody in a momma is trying to do some doggone baby here and I'm just like. Can we calm down with the baby here? Cuz? That'S not baby! Here, that's hair baby! You a grown man. Okay, so we're gon na go ahead and have a look at that. I want it flowing away from the face, so it looks really nice and natural. So I've got a curling wand. You can use a pressing comb. You can use a curling iron, whatever floats your boat, but I'm just gon na. Take that and lay these just back and away from the face, keep in mind. Your iron does not have to be 4,000 degrees for this. This hair is naturally pretty fine and straight so don't be trippin. Now, if at this point you have a certain part line that you would like to put in that wig from there, you can easily take that wig and add in whatever part lines you would like. So in this instance, I'm gon na go ahead and do right over here because Alison likes her part on the right side of her head and I'm just gon na take my curling wand right on into that parting space like so, and that way you can easily Have that part line there now the nice thing is with you doing that it allows you to easily have that part line in there without having to go through any major stuff. No foaming wrap, no pressing comb all over the place, all that type of stuff. From here I'm gon na go ahead and Flatiron this hair and I'll look and see how much cutting we need to do. Scuse me scuse me a party, it's a buddy of you. Now it's a buddy of it. You know with the body every year now as a body of it now mm okay. So what I'm gon na do here just go ahead and take this hair right on out. I'M gon na look for that shortest section of hair here, and this is what I'm gon na blend that 16 with that 20. So what we're gon na do is just bring that hair all forward like so I'm gon na take my razor. You can use your shears for this, whatever you want, and I'm just gon na lightly go down the shaft of this here now, just to show you how to do that with your shears same technique, same premise, really, but you're, just gon na take your shears pull It on forward and from there just slide while you cut and that way, you're able to blend the short with the long. So if you don't want to do a ton of cutting on that length because there's not any split ends and by all means feel free to keep it as it is, look at that hair tell me that's not good quality hair y'all, this stuff is so movable And silky this stuff is great: no complaints from this hair at all curls really easily no complaints whatsoever. Now on this next portion, what I'm gon na do is go ahead and push this hair away from the front. I would typically take a pair of kind of a sharp but junk shears for this, because you really don't want to use like your good quality shears to me. These are cheap shears because they were under $ 50. My hair cutting shears are usually like 250, but if you're, not professionals and you could just use whatever she is like sewing - shears things like that - just to make sure they're sharp. So your line is nice and smooth. You want to go ahead and trim up nice and close to the lace, so I'm just gon na go ahead and cut and slide right on the cross knob. You can't slide your shears popping up sharp enough, so I'm gon na go ahead and do that right across the front all the way across there from there I'm gon na go ahead and snatch this baby off to there I'll show you guys how you can attach Combs and all that so let's say for this part you're wanting to go ahead and attach combs. What you would do is go back to the nape area now, because there's so much lace up here, I'm not gon na put any combs up along the front. I'M just gon na go to the corners of the nape. I'M gon na sew one here and we'll sell another one right here. So that way, we've got both the corners of the Nate and it can link underneath whatever braid you would have in the back and just stitch it on, like you would do the tracks on the top of the week once you've stitch it on you're, just gon Na repeat it on the opposite side right on over: where am i right on over here and then from there? We are pretty much good to go and we can attach the band okay. So, as I stated earlier, why wig sent an elastic band with the wig, and I know some of you are probably wondering with us for basically what that does. It goes inside the wig. You want it to go pretty much from ear to ear here, but that's gon na do is help to hold that closure down more flush to the skin up along here now, since it's about a six by six closure, it's gon na go from about the edges Of parietal Ridge on one side to the edge of the parietal Ridge on the other. So if we did it right down the center, I just wanted to go about another three to three and a half and just back that angle to it would fall just behind the ears and that way it holds nice and securely. Hopefully, that's not too confusing, but I'll show you guys what I mean here so being that we went from the center portion of the wig. What I'm gon na do is go ahead and look at this wig, where the closure portion ends. I'M gon na come up above the elastic band that the wig isn't made with so we're gon na go from there and then from now. I want to jump down about three to three and a half inches with it stretch. So that way, I can kind of know alright, that's about where I need it to be. I'M gon na go ahead and Stitch the elastic band starting right about there on the inside of that wig. So from there I'm just gon na go right on the head at the edge of the other elastic band. I'M going to attach those not because the edge of this can fray we're going to make sure to go a little deeper into the elastic portion of the band. So don't just try to go right up on the edge like this come a little deeper down. Now. Keep in mind, you want this to be a little snug, so if you have a larger hit in the back, you may need a longer piece of elastic. That'S why it helps to check from here, to ear and honestly, it's better to do this after you've sized the week to see how well it fits on your head, because everyone does not like the elastic band being added to it. Usually Alison is not a huge fan, but I want to make sure I cover all of the bases with this tutorial. So I'm gon na go ahead and tie off on this side and I'm going to stitch on the other side in the same spot and I'll get it on else, and let you guys have a look all right, so you guys this is some bomb hair. Is here it's so soft, so silky and has no catch in it whatsoever, no shedding like man. That'S crazy right! This hair is like butter, and this hairline is just so perfect. Look at that and we've got a nice little parting area all the way back. So you want to do all those little ponytails, whatever you can and we this is nice they're like a monkey stock. Didn'T literally, you know either slow it down you. Can you blow it down? If you don't want to that's whatever you want to do, whatever your evenings for, can when take this baby off and be done with it for the day you can't you don't have to deal with all that, because the hairline is perfect. Perfect
Comments
Rachel Schofield: Thank you for being so easy and enjoyable to watch. So many Youtubers put on a fake, overly-high-energy persona and I find it absolutely unbearable. Impeccable video!
Natalie Is saved: I’m literally learning from you and I’m going to make my first wig thank you for making these videos ❤️
Roxie1225: Thank you for this video! It was very helpful and informative. Thank you for zooming in because not a lot of people do that. Yesss! Finally someone called out the whole “baby hair “trend here on YT. It ain’t baby hair when it’s eligible for Medicare.
Modele Odebiyi: A very clear and straightforward tutorial. Thanks, Linwood. The finished wig really suits your wife.
Grace M.: Seamstress! Linwood you dropped gems. I want to learn how to make custom wigs. Your tutorial is so easy to follow. Allison is gorgeous. The wig came out flawless. Love your work. Enjoy your foolery. As always thanks for sharing and blessings on top of blessings.
angela anderson: Glam fam you’ve done it again!!! Great tutorial and great outcome!!! The wig looks great on the wife!!!! I ❤️ it
Ericka J Stevens: Excellent tutorial!!! I loved how detailed and humorous you are. The wig turned out beautifully!!! It looks beautiful on your beautiful wife! ♀️❤
Salima Sweet: I have thought about making a wig for awhile now. Thank you for making this video easy to follow. Getting tired of dying my hair, this way I can change it without the hassle.
Precious Henry: OMG! I'm literally in the process of making a wig to be installed on Saturday. You're right on time. Haven't even watched yet but I know this is right on time. Thank you GlamFam
Deborah Tolbert: Hey Lynwood great How ToMake a Wig. Thanks for not being “baby hair”craze I especially liked tip on knotting the thread at end. Lynwood you are a natural teacher!! Hi Alison you guys are so beautiful..Be blessed my Sister & Brother!!
Latrice Byrd: Ms. Alison makes everything look good. Thank you Both. This was an awesome tutorial.
Givemesuga _: I love this video thank you so much . As an inspiring cosmetologist I was upset my school wasnt taking advantage of the big wig trend going on lately and not teaching us how to do them . I really appreciate it thanks
Brenda Jefferson: Awesome . Thank you for this video. Very detailed from start to finish and the end result is amazing on Alison! ❤️
Honi Griffin: OMG ty you so much for this very detailed make your own wig!! Just even telling us an easy way to knot the end of the thread is priceless!! Ty
Cynthia Petty: Wow it came out so perfect, and on your wife she looks beautiful with it on. I never sat back and really tripped off how the wigs are made but you did a great job, the hair looks like she bought it out a store im very impressed.
jsdunigan: This is an excellent, detailed tutorial!!! Thank you! The spray tan tip is genius!!!!
Fiona Hawkes: Absolutely amazing video right here!... This has got to be the best wig making tutorial out there Thanks so much for showing all the detail much appreciated
Nakeita Declaire: Thank you for this wonderfully done I started making my own wigs now
Relly Fpooh: Thank you Linwood and Allison. That was a great tutorial. I feel much more confident now. Must get this hair.
Don W: This video is exactly what I needed today. Thank you both.
Robyn Stewart: This was, hands down, the absolute BEST class I have ever had! Thank you so much, Linwood, for taking the time and trouble to film this for us. I have watched other wig making tutorials but your attention to detail and how you explained everything was invaluable. Thank you seems so small but it’s what I have. Thank you, thank you, thank you. ❤️❤️❤️❤️❤️
Nellie DeBose: Great tutorial. I enjoyed it. You made it so seamless that I can possibly do this to. Thank you thank you so much.
LdyLeo818: This was done so beautifully and styled perfectly for your gorgeous wife.God bless your family and business
Ruth Williams: This is an EXCELLENT tutorial! Thanks for being so thorough and explicit. This is a wealth of information, not only about wig making but so many more facts and tid bits that are pertinent. Great stuff. I wish you great success in your endeavors.
Julie's Braids & Beauty: Love it! So detailed thank you!
Arniessie Owens: This is the best video on how to make a wig Ever! I've seen many videos on YouTube but my Glamfam y'all on it! I can't wait to try this technique. Thanks again
Marilyn Davis: Thank you for such a detailed tutorial. It was very helpful. I especially liked your instructions on how to do the top joining the closure. Also how to make the closure more natural for the parting.
Salone Sis: This is fantastic... Gives me the confidence to at least make an attempt! Thank you!
Elizabeth bursey: I don't comment often at all, but I want to thank you ever so much for taking out the time to share your knowledge!
kylie gibson: thank you for making this its so helpful iv'e been wanting to start making my own wigs and now i feel confident enough, def gonna watch this while i make my wig thank you so much <3
S thomas: I really appreciate you taking the time to show all the steps to make the wig I learned a lot. Also I love your channel. All the information you give to your subscribers.
ladydeemeeshy: Thank you so much! Your tutorial was fun to watch and very informative.
Andrea Belinda: WOW!! That is super nice and I see where I made my mistakes!! The head size and the wig cap to sew the hair onto was barely able to go on my head!! Now I can start over and do it right!! Yourwife is BEAUTIFUL!!And a Super⭐Star!!
Deborah Teel: Awesome. Very detailed. I appreciate the time and effort. Great job.
Monie Mone: OMG! This is the best wig making tutorial I have seen on YouTube!!!! Thank you! Thank you! Thank you for taking the time out to do this for your viewers! Please do a tutorial on bleaching knots for chocolate ladies.....
ImadeULook: You are a blessing. You made that wig beautifully thank you so much for this tutorial it is truly amazing I've been waiting for one like this for a long time bless you Will you ever give a tutorial on how to add extensions to a wig for length?
Heather Howell: You are so blessed and amazing!! So, so detailed and idiot proof thank you so much!!
Dee Rooks: Just so talented, and very well spoken! Thank you for all you do..❤️
Karina Estrella: Loved it. Thank you so much for the very detailed and informative video!
Stephanie McGee: Y’all did that! Thanks for the detailed video.
Landy Voltaire: Thank you so much for your detailed video! I feel like I can make a wig!
I Am A Stone 😊: This is the best tutorial I've seen on how to make a wig! Thank you for sharing!
Read Love Listen: Hallelujah! This is right on time. I’m starting back to wearing wigs after 5 years. I like that it’s super detailed. This will be the first video on my wig maker playlist.
Clara Nicole💋: Thank you for making this video and teaching me how to make a wig sewing style your amazing!!! Your wife looks so beautiful also I absolutely loved this tutorial
Tammy Willis: Thank you soon much for this. I love the way you teach. I love that you're funny as well. Keeps it interesting. I was wanting to seriously learn how to do this because I'd like to male some money. God did the world a huge blessing by making you. Blessings to your family as well.
D S: A seamstress...only watched about 3 vids, new sub needs! I know nothing of wigs nor know how to braid BUT your detailed instructions and tips melts the intimidation for me...just a lil! Thank you so much. Beautiful family!!
Allison Matthews: Very good tutorial. Love it! Thank you!
Renee Hicks: Excellent wig. I like when a wig looks natural, like it’s growing from your own scalp. This wig looked very natural with beautiful. Hopefully she will great a lot of wear from this wig. She looked beautiful.
Jamie Smith: I can't believe i'm just now seeing this video! sooo helpful! I have started making my own wigs two years ago and each time I make one, I am stumped as to what I can do to make it better. I am going to try the blanket stitch this time. I do have a question though. How do you finish off the last weft when you get up to the closure if you are using a 4x4 closure? Is it the same way you demonstrated in this video? I feel like when I close off the weft where the closure is, the weft is still very noticeable.
Sherry Breaux: I love your tutorial for making this wig. It is beautiful and video was very detailed.
Ella's Oxoxo: Ooooh my Alison! I’m a glam fan fam. That wig! You look simply marvelous I have to study this. Your family is so ✨
Myrlene Thegrateful One: Great tutorial! I really admired your work!
Maryellen Dawson: Hello Linwood. You do beautiful work. My mother used to sew everything from men’s suits to doll clothes, to school auditorium drapes and made most of my clothes. I wish she still had an interest in it because I know she would have been able to make a wig by following you. Unfortunately at 96, she has simply lost interest and I have nowhere to turn. I am 69 and though I’ve tried many times, I’m just unable to sew. I’m wondering if you happen to make wigs for other people. I would sure love that. If you don’t, can you recommend someone who does such a good job like you? I have a Petite head just under 21” and I don’t have one wig that fits me properly, And they mostly just look like too much hair on me. It’s that the wig caps are all too big and they bag in one place or another but especially at the crown. And the sides usually come down too low. I’ve watched your video twice now and am awestruck at the process you do and your perfectionistic work. Thank you for making this video. I really enjoyed it. Just wish I had the skill to do it, but I definitely don’t. I can’t see a button on straight!! Well I’ll be looking for your reply Linwood. Thank you in advance. Your wife is a lucky woman all the way around. I’m sure she is lovely too.
Shieva: Well, this video motivated me to do it even more. This is easy! Thank you!
A W: Thank you!!! Best wig making tutorial ever! Let me go get those bundles I had sitting somewhere... I want to learn how to make a custom hand-tied frontal for a widow's peak. I have a tambour latch hook but I need to get ventilating needles. I have some hair that I cut off another wig that was too long and I will practice with that on some Swiss lace or bridal tulle before using the good stuff.
Royal Remedy: Awesome and so detailed. Your wife is a baddie! So after watching two cornrow tutorials and this one I have subscribed, thank you for teaching so well
L'JENITA ANDERSON: Thank you so much I really appreciate you for showing us this classes you for everything
brenda james: The best detailed wig making video on YT. You are an excellent instructor. Thank you for providing great quality informative videos.
Chanae Brown: This is a really good video. I don't need to make a wig, but you're an amazing teacher. Thanks for all of this education
Juliet Jones: Several years ago, my daughter and I attended the Armed Forces Natural Hair show and you and your wife were two of the speakers. You gave out great information then and I'm glad to see you're still educating the public.
Chris Smith: Love watching you creat beautiful styles, and your wife is fabulous. The perfect model.
Brittanie Logel: Thank you so much for posting this video. I have been researching wigs and found the ones that allow the most versatility are out of my budget. I'm a DIYer and appreciate the knowledge you are bestowing. I do have a question, would you recommend if an individual wanted to do a blonde wig, should they purchase 613 hair and tone/dye it? Or should they purchase the black hair and bleach then tone or dye it? It seems purchasing the 613 would alleviate at least one step, no? *Edited to add: Also, to cut down the visibility of the cap and thread is it recommended to purchase a lighter cap and thread or buy the black cap and thread and then bleach them? I'm new to hair prosthetics, please forgive my ignorance. TIA ❤ you guys!
Nia: This was fabulous; thank you!
Kia Brooks: Thankyou for sharing. I kind of know how to sew with fabric so you definitely made this look like something I can try.
Amazing Kali: You are absolutely amazing!!!! And your wife is such a lucky woman. Thank you for this!
Sue: Watched the whole thing! Took notes now its time for me to order some hair and get to work!
Lisa Blackshear-Taylor: You are Awesome and helpful, I have been thinking an out making my own wig the one I like is always sold out, I am a center part girl. The closure was what I needed to complete my vision. Mrs. Allyson (my way of spelling it) is Beautiful. The wig is Perfect on her.
Detra Jackson: Wow! I am not a hairstylist or a wig maker...not sure why this came across my recommendations but I think it would be AMAZING to have a husband who does all of this that can use his wife as the muse!!!
Karen Danzey: Thank you for doing this tutorial... also I love the vibe that you bring as a husband and wife...
Leutia Grey: AMAZING. You are exquisite in your delivery and instruction. ❤️
Nyree A.: This was fantastic. I’m one of the people that would’ve got in that ass about not explaining how to handle the needle . You literally explained step by step and didn’t assume or fast forward on any steps. I’ve also had trouble with understanding the needle part especially so thank you so much for this. It’s really helping. It was plain English and you are a great communicator. I really appreciated the video and enjoyed it. Amazing, you have a new subscriber. ❤️
Sol Bingham: I’m glad you said that baby hairs is like a pandemic. I am so tired of seeing laid edges.
Contact Me: It's great to know you are an instructor in this industry. Keep teaching.
Chanel W: Best detailed video I have seen so far. And I watch tons of them
Jackie Hazel: This looks just like the hair is growing from her scalp, thanks so much for sharing!, soo informative! ✌
Patrice Henry: Thanks for being so professional! Blessings be!
marc chesley: Bb boy I just had to watch subscribe and give a thumbs up! You are a breath of fresh air in your technique and style of teaching! I don't make wigs but I just enjoyed watching adding more knowledge in the not knowing department. God bless you there are a lot of women who will definitely need and enjoy this informational tutorial! Looking forward to seeing more videos!♥️
Desiree Orosco: Your so funny and informative just found my new favorite channel. Just started looking into wigs and clip in as my hair is not growing long like I want it too! Thank you for all the information
Fiona Samuels: Looking good Alison... your husband did an AMAZING job as usual ...training us to make wigs to look as half as good as you ... hey notification peeps
Natural Gal Nichol: The outcome was beautiful!!
L. Duke: I am mind blown at the talent happening here! .. Thank for sharing this tutorial!
Gerry R: Brilliant tutorial as always thanks
Pamela Walker: Thank you so much!!! I used to make wigs now I can again because of your video.
MPGisBTSArmyBae Fighting: Great video, if I thought I could do this, I would. Awesome video!
Daphne Henry: Definitely detailed! Fantastic
Leah Watson: Love love love this video Linwood you're a great instructor and a great hairstylist. Seriously you rock❤❤❤❤❤
L B Hawkins: Hi GlamFam, thanks for the details in this video, very helpful. I hopped on the website before the video was over. Blessings
Abiola Gbadamosi: Well detailed tutorial. Thank you
Aileen Jackson: I am so leary about buying hair online. I'm glad to know this hair is legit! Thanks for this tutorial. Alison, you are gorgeous!
Poo Poo Platter Productions: Thanks.. that was detailed and thorough!! Much needed...people forget little details... thanks
larla03: I could not wait to see Alison in this. I can definitely do this. Thanks you two!
Esther Auguste: I’m so excited that I got this notification. I love making wigs. Its sk therapeutic for me
Kayla Boone: This is so helpful! Time to make another wig and get it completely right this time.
rrstyles4u: Such a great video! Thanks for taking the time.
Maria Bediare: Very very nice and smooth class you gave. Keep more coming.
Shamonia Johnson: You did an awesome job as usual!!!
ShaneQua Pressley: I don't know why I hadn't watched your wig making video many moons ago, I've been subscribed for a good many years... my mother, her entire prayer groups, and myself are keeping u and your family in out thoughts and prayers... thank you for being such an amazing virtual instructor!!!
Danielle Hicks: Excellence personified! New to your channel. To be completely transparent, I will not be creating a wig (-no patience for it). HOWEVER, you did provide greater understanding of what to look for in quality of craftsmanship for wig construction and types-/size of hair. I will be catching up on your other videos during the holiday break. Love this video.
Starr Love: Absolutely beautiful
meme Charles: I like the way you instructs . You are so passionate in teaching. Excellent worker