The Only Water Wave Wig You Need | Start To Finish Frontal Install | Ft Unice Hair
- Posted on 18 August, 2022
- T Part Wig
- By Anonymous
Get Extra 10% Off+ Free Robe Use The Speical Code: Necklace
●▬▬▬▬▬▬▬▬▬♛#UNice Hair♛ ▬▬▬▬▬▬▬▬▬●
I’m using highlight brown water wave wig 24": https://st.unice.com/bk248
https://www.unice.com/ More Discount In UNice: https://st.unice.com/bk24b
Download “UNice” App (Extra 5$ OFF) ➤ https://link.unice.com/appdownload-you...
Within 30 Days, NO Reason Free Return For Subscribers Orders
Afterpay & klarna & Quadpay & Sezzle, PAY 4 Equal payment Within 6 weeks!
☛NEW arrival precious blonde wigs in UNice: https://st.unice.com/bk24d
Affordable & Popular Glueless V-part Hairstyles: https://st.unice.com/bk24e
GET FREE HAIR With Friends Help on ”UNice” App➤ https://link.unice.com/bargain-ytb
Aliexpress TOP UNice Hair store➤ https://s.click.aliexpress.com/e/_pvse...
Amazon UNice Hair Store ➤ https://amzn.to/3afUszy
[email protected]: https://www.tiktok.com/@unicehairoffic...?
Instagram @unicehair: https://www.instagram.com/unicehair/
UNice YouTube Channel: https://www.youtube.com/c/UniceHair
Facebook @UNiceMall: https://business.facebook.com/UNiceMal...
Facebook UNice Fans Club Free Wig Giveaway: https://st.unice.com/afcc9
#unicehair #unicehdlace #unice
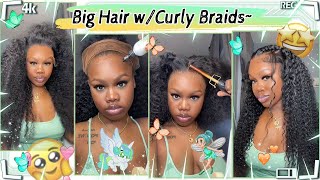
Hi guys it's zoe and welcome back to my channel, i hope you're all doing amazing. Today, i'm going to show you how i installed this beautiful wig from eunice hair getting into the box as usual. These are all the gifts i got. Eunice always knows how to gift people guys, and you will get these as well. When you order your wig. So don't you worry, i got a couple of the standard bits, a little like wig headband and guys they sent me jewelry. What flipping wig brand do you know we'll send you a jewelry? I'Ve got a bracelet earrings a ring and a necklace, and i just can't believe it because what do you mean jewellery? So this is a closer look on what it looked like, and it's just so beautiful and thanking us for this, because i just i just can't believe it getting into the wig. This is what it looked like. It is a brown curly wig. I got 24 inches um and this is what it looked like out of the packaging. It'S a beautiful water wave texture, so it's not too too tight, and you still retain a lot of length for this. So i think the length curly is still 24 inches, rather than it being 24 inches when it's stretched, if that makes any sense. So this is what the lace look like. The inside of the cap is a 13x4 lace and it comes with this adjustable headband, and this is the lace color, a beautiful, transparent, hd lace. As always and here's a closer look at the knots, i did go ahead and bleach the knots off camera and just washed the hair. But if you want to see how i do that, just make sure you check out my other videos, because i have shown this before - i went ahead and plucked the wig off camera as well, which you'll see in a second like what it looks like. But this is the result of all of that: here's, the wig freshly air dried and just look at the color get into the color and the depth and dimension of the highlights. It'S just so beautiful. So moving on to the install i'm grabbing that headband it's removable and adjustable, and i'm just going to measure it to my head, i, like my wigs to be super super snug, so it lays completely flat - and it's really tight on my head so that i know It'S not going to go anywhere, so i just did that and then clipped it back on. As you can see, i'm doing here, i'm now grabbing my foundation color. I wear born this way in the shade spice drum and i'm taking about one and a half pumps of that on a dense, kabuki brush and i'm just going to work that into the hairline. I just focus on the front because the back doesn't really matter, as you can see, i'm really working in that product and really taking my time to make sure it's properly saturated all over the hairline. This lace is super easy to tint when you're buying lace fronts guys make sure that the wig is hd or that the bare minimum, the lace is transparent or like a beige tone. If you're, like my complexion, because the last thing you want is gray lace, you won't get the same results otherwise, but this is how it looked once i tinted the lace, as you can see beautiful and it now matches my skin perfectly. I went ahead and just popped the wig on, as you can see here, and just look at how beautiful it is. I just can't believe it. This is like such holiday, hair vibes. Don'T you think so? I just positioned it on my head and you know i decided to go for a side part because i feel like curly, hair and the side part is just a match made in heaven um. I did that off the head on a mannequin head before i put it on, i'm gon na go ahead and clip the hair out of the way, so i can really focus on the hairline properly. I don't want anything getting in my way of making this install perfect. I'M now grabbing my scissors and i'm making four little cuts into the lace. As you can see i'm doing here, this is just going to make glueing down easier. If you watch my channel, you already know my routine guys but yeah. This is what i'm gon na do and i'm just gon na make sure i cut off the excess around the ears as well. Once i do this, i'm grabbing my rubbing alcohol on a cotton pad and i'm just gon na clean up my forehead a bit because i don't want any makeup oils grease anything interfering with the glue. Because again, this will prevent a seamless install for the glue. I'M grabbing the better the melt, um wig glue. This is literally the best glue guys it is so strong and it doesn't irritate my skin. It'S just it's just the best. So if you guys are looking for a new igloo make sure you go grab this. I went for two layers for this glue and i just made sure that i waited for each layer to dry completely clear before moving on to the next and, as you can see, i'm using the back of an eyebrow razor head she's, the back of any flat Surface a makeup brush literally anything, can get it um, but yeah as long as you get the glue nice and even that's all that matters, so i'm just gon na do this all around the hairline. Now it's been super super hot in england. Recently, it's literally been like 30 35 degrees every single day, and this glue has held up so well guys um, i'm even going to ibiza next week, so i'm gon na definitely be vlogging that and i'm bringing this wig with me because i just love it. So much and it's just given holiday bay, tropical bay so make sure you look out for that, but i'm sure that it's gon na last in this heat, with this glue once i've put all my layers of glue down, i'm now going to go ahead and place. The lace back over the top of that and repeat that on all the little sections that i cut once all of that is down to make sure that there's no lifting of the lace, i'm grabbing that eunice headband that came in the package and i'm just going To tightly secure it around my forehead leave it on for about 5-10 minutes before taking it off and going in with my eyebrow razors and cutting off all the excess lace. The reason i use an eyebrow razor is because we want a jagged line. We do not want a straight cut line because that will take away from the realism, so this really creates a nice frayed edge on the lace, and it just makes everything look so much better. Once i've cut all the lace off, i'm grabbing a tiny detail brush and i'm just going to go ahead and just go over with some of my face powder over any little edges that i can still see. Moving on to the baby hairs, i'm now just sectioning them off um. I always start sort of mid brow and then go all the way down to my ear. So i can have cute little sideburns and i'm just gon na do that on both sides. I don't want to go too heavy with the baby hairs, because i wanted the main star of the show to be the actual hairline, and i just don't want to take away from that. Once i've sectioned off the baby hairs, i'm grabbing my eyebrow raises again and i'm just gon na cut in a diagonal line shorter at the front of my face and then a bit longer towards the sides. I'M now grabbing my hair straighteners and i'm just going to curl the baby hairs going inwards towards the face and i've seen some people do it going outwards. But i just feel like this looks a lot better for me. I'M now going to grab my got to be hairspray and i'm gon na curl all the baby hairs and just play around and see how i want to style my baby hairs today, but with curly hair. I really like to make sure that it blends in seamlessly with the rest of the hairline and it just i don't know it just matches the vibe of the rest of the hair, i'm just gon na. Do that all the way around, and i found that using got to be hair spray prevents the baby hairs from looking really stiff and like just stuck down on your head. This is literally the best method that i found and then grabbing some hair mousse. This is just my ors hair mousse, i'm going to apply that all over the hairline and just comb that through i don't actually know why i did this um. I think i really couldn't tell you guys, but yeah. That'S that's what i did for this look once i do that, i'm just going to tie the hair down again to make sure that the baby hair stay in place, and i'm going to leave that on this is actually later on in the evenings. I went to get some food. Someone came around my house and we ordered some food, so this is later on in the same day, but i just left the headband on for that long um, but moving on to the styling of the actual hair, i'm just wetting. All the hair with my um water bottle, before going in with my cantu leave-in conditioner repair cream. You can use whatever guys and i'm taking my got to be glued gel as well mixing a hefty amount of that in the palms of my hand, the more product the better and i'm literally just gon na run that all the way through the hair i found With this hair texture, i do actually prefer it when it's like more dry, just because it's the cult isn't as tight, so i don't have to like over saturate the products or like have it super super wet to make it look, not puffy. If that makes any sense, so i just did this out of habit, but it would have looked amazing just completely dry as well. I'M making sure i really scrunch the hair towards the bottom as well, just to make sure that it doesn't look weighed down and that the curl is still redefined and looking beautiful - and i just did this all over my head once i did that i'm taking off The eunice headband and just fixing up the front a little bit making sure it looks clean and perfect, and this is the final result guys this hair is so beautiful. I cannot wait to wear this on holiday 10 out of 10 from me. I hope you guys enjoyed this video make sure you give me a like comment. Subscribe and i'll see you very very soon take care guys, bye,
Comments
Dee Luther: First Comment Super Stunning thumbnail tho Beyond Gorgeous u are Ur Makeup always on Point Nice Cheeks Structure EnJoy the rest of your Wonderful Week Happy Fabulous Weekend Ahead Be Bless N Stay safe always
JORDAN PAIGE: Gorgeoussss