Customizing My Lace On My Head + Reddish Brown 3C Curl Ft Unice Hair
- Posted on 03 September, 2022
- T Part Wig
- By Anonymous
Get Extra 10% Off+ Free Robe Use The Speical Code: Nicelace
●▬▬▬▬▬▬▬▬▬♛#UNice Hair♛ ▬▬▬▬▬▬▬▬▬●
I’m using Reddish Brown Curly wig 26inch: https://st.unice.com/c2g21
➤More discount in UNice: https://st.unice.com/c2g26
Download “UNice” App (Extra 5$ OFF) ➤ https://link.unice.com/appdownload-you...
Within 30 Days, NO Reason Free Return For Subscribers Orders
Afterpay & klarna & Quadpay & Sezzle, PAY 4 Equal payment Within 6 weeks!
GET FREE HAIR With Friends Help on ”UNice” App➤ https://link.unice.com/bargain-ytb
☛NEW arrival precious blonde wigs in UNice: https://st.unice.com/c2g27
Affordable & Popular Glueless V-part Hairstyles: https://st.unice.com/c2g29
Aliexpress TOP UNice Hair store➤ https://s.click.aliexpress.com/e/_pvse...
Amazon UNice Hair Store ➤ https://amzn.to/3afUszy
[email protected]: https://www.tiktok.com/@unicehairoffic...?
Instagram @unicehair: https://www.instagram.com/unicehair/
UNice YouTube Channel: https://www.youtube.com/c/UniceHair
Facebook @UNiceMall: https://business.facebook.com/UNiceMal...
Facebook UNice Fans Club Free Wig Giveaway: https://st.unice.com/afcc9
#unicehair #unicehdlace #unice
——————————————————————
♡KEEP UP WITH ME♡
IG: @Hypnoticlaadyy 43k
TikTok: @Hypnoticlaadyy 28k
Email: [email protected] ——————————————————————
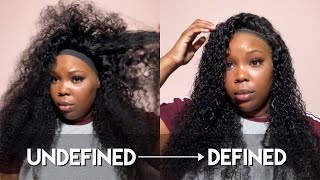
What'S up, ladies welcome back to my channel, it's your girl, hypnotic lady and the company i will be working with today is yumi's hair. Of course, they sent me a wig cap, cute little silk or satin bonnet, of course, their unique elastic bands and, of course, a cute little unique: silk drawstring bag to store my wig once i am done, and some 3d eunice mink lashes. This is the unit. This is their reddish brown, 3c curly, 13x4 lace wig. It is 24 inches and 180 density. It did come with three combs adjustable straps and an adjustable elastic band. This is what the lace is. Looking like fresh out of the pack, all i had to do was bleach the knots um going straight in i'm just going to hot comb. This hairline. I want everything, nice, nice and neat. I have my hot comb set on 425 and this is con air. I got this from your local target if you guys want a description, i'm sorry! If a link listed below, let me know in um the comments and i will leave it in the description box, but i am just going ahead and hot combing. All of this making sure everything is nice and slick, because we will be doing a no baby hair, look um up close and personal. I wanted to show you guys what the hair is looking like. It'S already definitely giving scalp and this color was very much giving to me. Okay, i fell in love with this look after we got done all in all, and i hope you guys enjoyed the process of this tutorial now, jumping into what my caption says. Plucking your unit, while it is on your head um, i hardly ever do this, but i had to do it for today and i just happened to get it all on camera. So i figured why not show you guys um. This is basically a unit that came pre-plugged, but obviously once i put it on it, wasn't plugged enough to my liking, um, i'm just going in in the thicker sections that you guys could see, or at least that i can see and just thinning those sections out Until everything looks even um and thin within the same level, you know i'm just it's really just an eye thing, but i'm taking some tweezer man tweezers and i am using a slanted point and i do have the slant going away from my face. So like say, if you were looking for my perspective, the slant is going backwards, going away from my face and not coming forwards. If that makes any sense and as you guys can see like i said, i'm just going in taking my time, this is sped up. Just for the second video um plucking out the front of the hairline, and as i comb out the excess hair, you can obviously see what has been plugged and what hasn't this side portion right here was a great example. You guys can see how thick it was. Looking how full the hairline was looking up front and then, as i'm going in and squeezing it it is slowly but gradually and surely you know thinning out to my liking. Now this part is optional. You don't have to do this. I am a little perfectionist, which is why i say go in and pluck it you don't really have to do it. It was pretty good looking with it being pre-plugged already, but you know me just being me: i had to go in and customize it to my exact liking and what i wanted it to look like repeating the same steps on the other side. Until i get the size thinned out to my liking and then once that's done, i'm going to go in with my erica j adhesive and we're going to get ready to lay this bad boy down. Using my erica j, adhesive, um and sorry y'all for the brightness of my camera, i was trying to get it to tone down a little bit but, as you guys can see, i'm going straight in with my adhesive putting it right in front of my hairline. We are doing a no ball cap method because i feel like i don't need one and i'm just going to do three to four thin layers of this adhesive and i'm going to smooth everything out with the popsicle stick and let that dry using my songbird blow. Dryer, you want to use the blow dryer or heat it up until everything is clear. It'S going to dry completely clear and that's when you know it's ready now, i'm just completing um the same steps on the other side. While i let that up that opposite side dry and while that is cooking up, like i said i just smear everything in with my popsicle stick and my second side that i already that i first started on was already dry. So i just went ahead and did the second layer and i'm gon na smooth everything out using my popsicle stick and, like i said my songbird blow dryer going in between until everything dries clear. We'Re gon na do this about two or three times until i make well until i get the tackiness of my liking with the wig, you can do as many layers as you want, but i spelled the two or three sorry, three or four was perfect enough. For me now, i'm going in with my third layer and i'm just repeating the same steps, as i just said, smoothing everything out with my popsicle stick and then i go in with my songbird blow dryer blow dry until it's clear and then once it's clear. I am going to get ready to press this lace in cut off the excess lace and wrap up this install what i would do to make it feel just like this, like this missionary now, while taking my rabbit, not my rabbit rat tail comb, i am just Combing the lace into the adhesive, like so giving it a nice firm press while combing that um lace into the glue you don't have to do too much like i said when i did with me doing three or four layers. I just made sure i had a nice little firm hold and now i'm going in with my eyebrow razor and we're going to cut straight down the middle and cut off the excess lace on both sides. Once that is done, i am going to go in with my eben or even however, you pronounce it wonder: lace spray we're going to lay that right on top and that kind of just melts everything together, definitely seals the deal, and while that is baking up, i'm Going to put my unique headband on we're, going to lay everything down and then get into defining this curl pattern: styling the hair and wrapping this video up. Oh let next i'm gon na go in with my kiss cream foundation in the shade honey beige, and i'm just going to pop that right into the perimeter of my lace. Just to make sure everything is nice and blended, because it was looking a little bit ashy or white. Now i'm going to take my ebon wonder, lace, spray and i'm just going to pop that in directly on top, where i put the makeup and as you guys can see, the adhesive spray just kind of automatic automatically melts the hair or the lace into the skin. Giving exactly what i needed to once i get through with that, i'm going to blow dry with my songbird blow dryer and using the edge of my rat tail comb just to make sure everything is nice and sealed, and then i'm going to go in with my Unique wig bands um that they provided with for me, you can just use your velcro straps in the back, strap it together and then move on about your day. It'S not super super tight um to the point where you know to leave a line of mark demarcation or anything like that or cut off circulation, or give you a headache which i love now, i'm just going to take my handy dandy, little water bottle and my Paddle brush there's nothing in this water bottle, but just water and i'm just spraying the hair all over. I'M not getting it soaking wet but just wet enough to where i can detangle it. I would recommend starting from the bottom and then working way up to the top when you detangle the hair just so you can reduce any type of shedding or anything like that. With you know any type of curly hair. I always recommend you start detangling from the bottom and then work your way up to the top, but once we get all of that, um done i'm going to repeat the same steps on the other side, just detangling from the bottom, as you guys can see working. My way up to the top, once i get everything nice and defined, how i like it, we're going to pop that band off and i'm going to put some finishing touches on this lace, define my part and that will wrap up this video. This is what the lace is looking like once we've, let it sit for about maybe five ten minutes and i am in love. I love the snow baby hair. Look like i said: y'all, i'm just falling more and more in love with it and trying to steer clear from the baby hair. Now i'm just going to take some la pro girl concealer, and i think this is in the shade, medium beige and i'm just going to buff that out with my finger, make it look as seamless as possible. I didn't want it to look like you know. There was just makeup sitting on top of the lace, so i blended out with my finger and then went in with a makeup brush and buffed everything out now this is the finished look y'all. The hair is, i would say about maybe 40 to 50 percent dry. It was still a little bit damp, but i had no problem with this. Hair definitely recommend 10 out of 10. The density was super super full, i didn't see, see any tracks or anything like that. I got minimal shedding with this being curly hair up close and personal. I want to show you guys what the hairline is. Looking like with no baby hair, you already know how i get down. This is the other side. I did have like a little piece of hair coming down, but don't worry about that baby! It'S giving scalp! Okay! Now, if you guys like this video - and you like these hair reviews with unique's hair, because your knees hair has been doing the damn thing lately, okay, let me know what y'all think about this color. I think it's going to be perfect, for this fall. 2022 fall. This auburn reddish brown, looking color, was definitely giving me life. Okay, i felt like a spice girl. You hear me super super cute. I got so many compliments on this hair. Everybody was asking me where'd you get it did you do the color anything like that, like no girl, it came cuz. Some color came just like this fresh out the pack. This is what the back is. Looking like full head to toe, like, i said, no track showing luster body, definitely giving. This is a 24 inch unit and i am five foot even so, as you guys can see, even with the curls, it still fall into that booty. Okay, that's what you want now. Let me know what y'all think in the comment section: do you prefer seeing pre-colored, wigs or regular natural colored, wigs on my channel? Do you like seeing more curly textured units, or do you like seeing style units like straight or body wave and we crimping or curling the hair? Overall, i give this a 10 out of 10, definitely going to be my go-to for this fall slash winter. This is again eunice hair. This is their 24 inch, 13 by 4 hd lace in the color, reddish brown and 180 density. Let me know what you like: what you guys think in the comment section below and i'll see you all later.

Comments
NATURALY MIYA: First pin me
SpiritualHealing333: The color is everything and of course the slay is on point.
♡Antonio♡: Looks similar to my natural hair love this
THE BARBIE: We missed you & here you go blessings us with a banger Love this look on you ladyy What bleach & developer would you recommend for bleaching the knots on precolored lacewigs and natural color lacewigs?
The 3rd Marissa: I like this curl pattern and the reddish brown color.
Jackie Davis: I Love that color ❤ !! Great job On the hairline Sis OMG your Lashes are always .
joshualynn stovall: That color is everything for the fall
Blessed_Highly_Favored_Libra: The Hair Color Is Stunning bae u always come thu with the slay Hunni Bunni ❤❤❤❤
LA Will: Just flawless like always
Ave Gloriosa mater: I like seeing any style that doesn't involve baby hair....
Tamika Lowry: Luv that color looks beautiful
Frida: You're gorgeous queen godbless you
Donnesha Reed: Yes ma'am I love it honey
Dee Luther: GREAT VIDEO AS ALWAYS GORGEOUS THUMBNAIL THO SOOO DAMN BEAUTIFUL YOU ARE UR MAKEUP ALWAYS ON POINT CUTE ASS EYELASHES THO HAPPY FABULOUS WEEKEND BE BLESS N STAY SAFE ALWAYS
Marsha Smith: What is the name of that glue that you put around the edges of your hair to keep your lace down your hair look good I love that style thank you for sharing
faithful: I love the wig but the site only sales 150 density