Why Your Wigs Aren'T Laying Right - How To: Detailed Wig Install | Myesha Polnett
- Posted on 05 April, 2020
- T Part Wig
- By Anonymous
Y'ALL AINT READY FOR THIS WIG INSTALL! I hope you guys enjoy this video! As I've mentioned in the video this application isn't for everyone so stay tuned for different install methods! Comment below some of your favorite techniques/products to use for your wigs. Love you! Xoxo
___________________________________________________________________________
FOLLOW MY SOCIALS
https://www.instagram.com/myesha.polne...
https://twitter.com/mua_myesha
Business- [email protected]
PRODUCTS MENTIONED:
YOU CAN FIND MOST OF THESE PRODUCTS ON MY AMAZON STOREFRONT, LINK BELOW
RPG Show wig: mua001
Eco styling gel
Deluxe Wig Cap
Bed Head hard head hairspray
Got2b ultra glued invincible styling hair gel
Ghost Bond lace wig adhesive
SHOP MY ESSENTIAL PRODUCTS ON MY AMAZON STOREFRONT
https://www.amazon.com/shop/mua_myesha...
Intro Music: ALL NIGHT ( J-LOUIS X DREWSTHATDUDE )
Background Music: Epidemic Sounds
FAQ:
Camera: Canon EOS Rebel t7i w/ EF 17-44mm lens (bought separately)
Age: 22
Ethnicity: Black & White
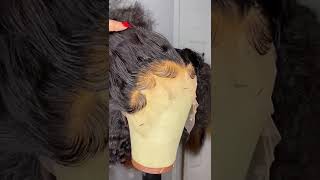
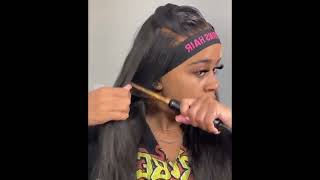
What'S up guys and welcome back to the channel, as you could tell, your girl is blonde? Yes, she's blonde! Today'S video is actually how I apply my lace friend, so this video is going to be super in depth about how to use a glue. So if you are looking to apply a super flawless wig and you don't mind all the steps and all the processes, this wig application, then this is a video for you. If you're someone who just wants to build a wig on and go, you you're not gon na want to watch this. This is all waste of time for you and I do have easier methods that are simplified, that are quick. That will get you out the door, but this video is really to show you guys how to really get a super flawless, wig application. So with that being said, if you're interested in this video, then please keep watching all right. You guys so I'm bout to take my hair down. My hair has been blown out and it was straightened and I added some little curls at the end. But as you can see, it's oily, it's stringy, it's a lot of things. So I typically like to wear my wigs when my hair is getting to this point, because I don't want to wash my hair right now, I'm being lazy and it just needs help. You know alright. So I have my hair parted down the middle, and this is to basically prep my hair for braiding. Personally, I do two little braids down this way. It'S super easy for me and it works because my hair isn't super thick and it's not super long now, if you have really short hair, I'm talking about highly very short, obviously you're not going to be braiding your hair, but if you do have longer hair than Me and even maybe thicker hair you're gon na want to do maybe multiple braids, like six, maybe eight, depending on your hair and what you can do and if you can't braid I've seen people just braid from down here or if you twist it whatever works. For you, you just need to make sure that your hair is flat underneath your wig cap. So that's really what it is. It'S not a big deal. If you don't want to braid your hair, you don't have to, and if you want to have other methods you can have what their methods just do, what you need to do to get your hair to be flat. Now, I'm not going to teach you guys how to braid, because someone needs to teach me, but I'm just gon na speed through this part and yeah okay. So our hair is braided again, I'm not much of a braid or don't come for me in the braids. But it gets the job done. It'S not a big deal. Next, I'm going to take my because of the length of my hair again it's longer or if it's about the same length, you might want to do this if it's shorter or again, you're, not braiding, because your hair is super. Super short. You don't worry about this, but I twist it like this. You know like one side over here and I just kind of twist it around and I lay it super flat, the braids against my head and I start pinning it as you can see - and I just pin it down like that. So it lays super flat in the wig cap. Next is slicking back any baby hair, so just any wild hair that you may have in the front of your hairline. Now I have a big forehead as you can see, so you know for me. I have room when it comes to my wig applications, but if you have a smaller forehead and it's really tricky for you, because you still have hairs, I would just recommend slicking back as much hair and as tightly as you can so that you can't just have A smooth application, you use my Eco styling gel this is the olive oil one. This whoo this brush is so I'm so embarrassed. Okay, dive ingest, my British okay, but I'm just going to I like to kind of like slick my baby hairs back, but I like to kind of do it in the form of how they would lay down if I were to style them. Only because my hair is so fine, that's I feel like if I just push them all the way back like I, I could like damage them and just kind of like tear at them and pull them out, and I don't want to do that because again, I Need my baby hairs because my forehead is just huge, so I need all the shrinkage I can get. I know a lot of these steps are gon na seem like really like tedious and I'm really crazy. But this tutorial is really for people who are really interested in knowing like how to lay their wigs down to where they look super flawless and they don't mind all the steps and all the application processes. This is for you guys, if you are someone who just wants to put throwing awake and go. This is not the tutorial for you, but I actually have methods to do that and I have super quick short methods that make it super super easy for those who just can't really sit down and do all this or maybe don't have all the things that you Need to do all this, so don't worry about that again, like I told you guys, this is how I kind of like to slick my hair back at the end of the day. You just need to make sure that your hair is not going everywhere. It'S not being wild, it's not getting caught, because if it gets caught in the glue process and that's gon na be really frustrating so make sure everything's just slipped back and everything just looks smooth. And if you have a way that you want to lay your hairs down, because you know that your hair is a little brittle like mine or a little fine, and you just want to make sure that it's still protected underneath you do it just like this. Next, we're going to wig caps, it's really important that you find a wig cap that matches your color or, if something close and of course, you can always put foundation on it to make sure that it matches you perfectly. But you need to make sure that your wig cap matches you the wig cap that I like to use. This is the deluxe wig cap. You can find a set, your local beauty supply store. You can get it off Amazon. I get at my local beauty. Supply store - and it always comes with two and I'm just gon na open it up and I'm gon na use only one. I like this one for my complexion, because it's like more neutral and I feel like that's kind of the color - that I need, because sometimes I get wig caps that are just super yellow and on my girl who's, this color, who is who's this color? Okay, hey guys so right now. I know that everything looks really off, but I am missing some footage. I don't know what happened to it. I needed to show you guys this step, because it is important and I don't want you guys to miss out, but I still want to give you guys a video. So here I am with this crazy lighting and not anything really said that just to show you guys this crucial step that I think is really important. So although my hair isn't braided we're just gon na pretend that it is and you're gon na take your wig cap and this color, it doesn't really suit me again. Don'T worry about that way to take fine wig cap and I'm going to apply it to my head like so so you have your wig cap on and again your X's hair is braided a slicked back. So it's neat and slicked back underneath the wig cap. What you're gon na do is take a pair of scissors. These are one of my favorite pairs of scissors, especially when I am doing my hair and I just cut holes where my ears are. This is going to allow you to keep the wig cap on and really secure, while you're spraying it down. So here you are with the wig cap and again you want to keep your wig cap a little further down, maybe towards your eyebrows and if there's too much tension or it feels really uncomfortable because the wig cap is kind of tight, you can cut the middle Of it and you can loosen that tension so that way it's not super uncomfortable as you're going through this process. So here we are with our wig cap and again I know that mine is not looking like it's supposed to, but again I'm trying to show you a little demonstration of what you need to do if you were to be applying your wig. I take some of my favorite hairspray. This is the bent head hard head hairspray. You can also use the got to be glue. Free spray, either/or works they're, both really really great. I'M going to pretend that I'm spraying this, but I'm going to show you guys kind of like what I'm doing, I'm going to spray this hairspray along my hairline, so I'm only bringing the spray round here. I don't want to spray it right here. I don't want to spray it anywhere else, but along my hairline. The main reason why you're wearing a wig cap to begin with is because you are protecting your hair and your edges and you are camouflaging your hair. So for someone like myself, who has dark, hair and is trying to wear blond wig, I want to make sure that my hair, my dark hair, is it seeping through the lace so again a week hat really helps with that, while you're spraying your hair down, you Can use your hairdryer on cool and spray, the perimeter of your hair to make sure it dries faster or you can just kind of walk around and if you have the time of day let it dry on its own. But that's really what you want to do. So you want to make sure that everything is completely dry. The hairspray is completely dry, because this next step is crucial and if it's not dry, then basically you got to start all over. So when it's dry, you're gon na take your scissors and remember, we sprayed our hairspray along this perimeter, so you're gon na basically cut your wig happen again. This is not going to look exactly how it's supposed to, because I didn't spray my hair, let alone my hair as I'm braided or slicked back, but what you're gon na do. Is you want to take these scissors and you're gon na cut your wig cap along the perimeter of your hairline, so wherever you spray to you're gon na cut it around so you're, basically cutting it, putting it around the hairline and it's going to basically look kind Of like this, but like oh not like that, it's basically gon na look like that and you're gon na. Basically look, oh that's the whole point. But again you want to make sure that the wig cap is completely dry before you do these steps and you want to make sure that you don't get extra hair spray along your forehead. You apply your wig, you don't want the lace to sit directly on top of your wig cap. You want the lace actually melt into your skin, which I will show you later on in the video hope that this little clip shows you guys a little bit of what you're supposed to do it. I hope that you understand what I was trying to show you guys, because I'm so upset that I'm missing this clip. I hope that you guys could understand it. That'S not! I'M gon na have tons of more quick videos coming out anyway, so I hope you guys can follow along and you can see where I am going with it. He said this is results. Tell you guys about their from Anasazi Beverly Hills. These are her eyebrows scissors, but they are just so good they're, so sharp and I really like them. So I'm gon na finish off cutting this side and then I'll show you the rest of the process. Okay, so we cut off most of the wig cap in the front, and now this side is not really laying down, but that's not a big deal because we're going to do something else, that's going to lay this flat down. This is more ideal, of course, but I was in those janky scissors. Thank God. I found these ones, but what I'm going to do now is I'm gon na get up close and personal with a lightweight cap and I'm going to really trim off any excess. That is really hanging, so if you can get as close to your skin as possible without cutting your skin, be very careful because I don't want you guys to cut yourself, but just cut off as much as you can and if there's still some that's hanging. It'S not a big deal, but we want to do our best to really make sure that we cut as much as we can. I did my best to really trim around the wig cap and really get it as short as possible, but the next step is something that I personally do you don't have to do it, but this just makes everything look more flawless. I'M going to take my got to be glue gel. This is the black one and my bet head spray and I'm going to mix these together. I'M happy I'm just gon na put it on this lid. I mix these two together because the hairspray allows the gel to get tackier and it dries down faster. So I'm going to just take my finger and dip it in there and I just go over the very edges and lay it down and as you can see, this is going to allow your wig cap to look way more flawless. Underneath your wig then obviously leading it like this, I'm also going to use my blow dryer on cool just to dry it down and making sure that the tackiness of this glue doesn't lift the cap. That would be horrible. Alright, you guys so, as you can see, the wig cap is laid and this area right here we fixed just using the product and laying it down as much as you can. If you have hair sticking out, don't worry too much, I know. Sometimes, people get really scared when it comes to glue, because if the glue gets on the hair you're feeling like your edges, are going to pulled out as long as you remove your way properly. That won't happen, but right now, as you can see, there is some shine right in this area here. So what we're going to do is we're gon na take some rubbing alcohol and we're going to kinda just get rid of that shine before we apply our glue before we begin our process of applying glue, you're going to need your wig. This is the wig that I'm going to be wearing. This is from our PG show wigs. They actually named this wig kind of after my instagram handle when it was MUA underscore Myesha, and now it's just my real name, but we're gon na wear this beautiful blonde wig. I just feel like it's so cute and every time I wear it, I just get such good compliments. So this is the way we're gon na be wearing today and you need to apply what's your head, so all right, you guys, so we are done. It looks super good, I'm just kidding all right, so the reason why we apply our wig is so that way we can make sure that our wig measures up to our peril I'm. So I think the biggest thing for me is making sure that it's going to match the sides. This is a wig, that's already pre-cut, so I need to make sure that it matches where I originally cut it and, along with this side as well, but you just want to make sure everything is laying the way it needs to lay before applying the glue, because Once you apply it, there's really no going back, I'm going to take this hair and I'm going to pin it back. I know that I'm gon na have my hairline at the front right here. So I'm going to push my wig back a little bit and we're gon na go into blue, so the glue that I'm going to use is this Ghost bond glue. Now this step is really crucial and this is going to be what makes or breaks your wig application. So if you apply too much you're, just gon na be out of luck, but if you apply too little you're going to see that your leg is lifting, it's not laying down you're gon na have to keep reapplying. It'S gon na be an issue. I'M going to begin by dotting, where I want my lace to lay again make sure that no hair is in the way. I just had a little piece of hair, but that's okay. You can just move it up the way and yeah you're gon na dot it. Where you're gon na lay your way, I'm going to use the rat tail comb and I'm going to push this upward, because I am not bringing my wig further down than this. So I don't want to move my blue further down because it's not going to get covered by my wig and it's just gon na be some glue, sticking out, which is not good at all. I'M not going to a second application right on top of the application that I did and I'm going to just keep pressing it upwards and it's going to dry down as you're pressing it. So I typically don't really need to use my blow-dryer. Sometimes, if I do apply a little bit more than you know, I can do that as well. I'M personally going to be doing two layers of glue. You guys can do three. You could do four. It really depends on how long you want to wear your way. I am going to now take my wig and I'm going to slide it forward and I'm going to gently lay it on top of the glue that we sat. I don't want to press it in just yet, because if I do that, then, if I need to adjust it, we're gon na be pulling up the glue and it's gon na leave like a really weird looking effect. Now I'm going to press it in, and I take like this comb a part of my little baby hair brush and I push it down. It is sitting where it should be sitting and we still have this right here. That'S not glued down, as you can see. Don'T worry about that because we can go back in and add more glue to the edges, I'm even going to slightly pull this up, because I know that this is not glued down so and I'm following the wig cap as much as I can - and I actually Follow it a little closer, then I do the top of this hair line because I usually cut the sides of the wig a little closer to the wig cap and okay, you asked you guys can see it is drying down, but I let it dry down until It'S about clear and then I reapply a second coat now you need to let this completely dry down. It still will be tacky, but you need to let it completely dry it down, because when you don't it's more liquidy and it's still white it it's more prone to seep through your lace and then when it seeps through the lace and gets onto the hair. And then you have a whole another issue, alright guys, so it is dry. So now we are going to flip this back. This can be a little tricky on the sides. It'S a little bit more difficult than like the top of the hairline, but it obviously works. So just pull it down and sometimes the hair can get in the way, so just try your best. This is one of those things that you really just need to practice. This isn't something that just happens like you really just have to really practice. A lot of the skills that I have learned from wig applications was trial and error, because I've watched people and I'm trying to figure out how they're doing it and it's really trial and error. For me, wigs is not something that you watch once you see. Somebody do it and then you do it perfectly and everything's all great being you just. Do it perfectly every time the point of me saying that it's just to let you know that if it doesn't work out after you watching my video, it's not because of you. It'S just it's literally, you have to practice, you have to keep working at it, you have to keep perfecting it, and you also have to really look at what you did wrong or what could have allowed your wig to not look as good and assess that and Understand, okay! Now what do I do to fix it so that my wig application is better? That'S literally what I had to do. This is still lifting up, because I didn't apply glue this far because I didn't know exactly where this was going to land per se. So I didn't put glue all the way down here, but I will you would rather have excess that hasn't been glued down just yet versus too much glue and you're. Looking crazy. Alright, you guys so I laid down this side, but there's still some areas that need to be glued down for it to look like it's supposed to. So what I'm going to do is you can grab whatever you want? I just have this in front because it wasn't part of my little wig cap. I'M just gon na put a little dollop of glue on here, because again we don't need a lot of glue because of the areas that are lifting are like little areas that don't require too much glue. I'M taking my comb and I am just mixing it a little bit to get it on the tip of the comb and then I'm gon na start with this part here, just because this is the biggest area that needs to be glued down, and I am just Pressing that onto the skin - and I am kind of mimicking the shape of this area here so that way, all of the lace is a hearing to wig glue. Okay, so that's done, and now I need to take care of the hairline, the top of the hairline, and I am going to pull this back as far as it will go. That will just let me know how much I need to apply and begin to start. Seeing again, if you put a little too much further down, you can see all these hairs get in the way you can just wipe it off with your finger, but you have to be quick because, as you can probably tell it dries down really fast, this side Has already dried down a bit, so I'm gon na start to push this down into the blue. Alright, you guys so here we are with the wig. That'S laid down, but still looks wait yeah. So this is where we kind of finesse the lace a little bit with a few baby hair, it's nothing too thick or super crazy. Now, if you have it laced for our Bullock's wig, where the lace looks really good and it's laying down really good and it's not really noticeable, then by all means you don't need to do baby hair. But with this you know, I feel like it's needed and that's what we're gon na do and those who want to learn how to do some baby hairs. They can just follow this mom. So, in order to create baby hairs now mind you, I have some hairs that were already made for baby hairs and that I trimmed when I first got this wig, but I'm going to try to show you guys if I can, how to create them. So go ahead and pull down some hairs the front now the trick is for like natural-looking baby hairs, it's only pull down like a few strands. You don't need to pull down like. Let'S stay like this much hair. That'S way too much a few strands will be perfect and now obviously this hair is blonde. So it's not going to look like other things you may have seen, because this is blonde hair, so the baby hairs are gon na be blonde. So I'm taking my scissors and I'm just going against the hair like I just did, and I don't want to like butcher it like this bike chocolate, because this looks super fake gon na take a little bit of my got to be gel. I can get some out and I'm going to find some to my finger, make sure that the hairs that you want are out and the ones that you don't are place back and I am going to apply this Here. I am going to start and begin. My little swoop you're, just gon na, really treat it like the baby hairs that you may have already like what your natural hair. So this area here was from like when I last cut my baby hairs and I obviously trimmed that way too short. But it's not a big deal, just manipulate what you can, then you want to get down here and you want to take your comb and pull out just enough, and I kind of like measure it by how it's gon na look and just bring it down now. When it comes to like the sideburn area, I don't really trim way too much, but it's just enough, like that's fine to me like this, is not a big deal, that's kind of like how I style it, and it's not perfect, like this area, is a little Crazy-Looking, let me trim that now. I have some hairs right here that I want to bring the opposite way is going to just lightly trim this and it comes to baby hair. So it's really trying trial and error. It'S really like. If you have baby yours, you know what I'm talking about if you're already you you know what I'm talking about when it comes to even your natural baby hairs, because when I do mine, they always come out different all the time and it's always a process. It'S not one swoop when we're good, it's always a process, and it's all about manipulating and that's why I like say: don't use too much product because you're gon na constantly move the baby hairs around until you really really find a position where you like them. So, as you can see, this side is done. This is fine to me. I like how it looks, and I feel like now, it's looking more like hair versus this side, which is just looking like your edges, is nappy. What are you doing if you look close enough? Okay, people you're going to see that this is a wig. This is not to completely disguise the fact that this is a wig, and this is supposed to be my real hair and I'm trying to trick everyone in the world. This is not it. This is just changing up your hairstyle doing what you want to do. So we have the baby hairs that I already showed you guys, and then we have this side. My skin's a little red because I kind of went in on the baby hairs and just was really going crazy with the brush. So we did a make. Our part look more like scalp, so I'm gon na take my concealer. This is a little bit lighter than me, which we'll do, because naturally your scalp is lighter than your face. Okay, so now we have an actual part, and the only other thing that I'm going to do is take my hot comb and go over the roots here, like you guys. So I just tucked to this hair behind my ears, because I kind of like the look, but I want my baby hairs out honestly. I'M really happy about how this turned out because, like I was saying earlier since there's days where, like your wigs, just flopped, and you could be a pro there's just days where they just flop, they don't look good and of course, on my camera. So I'm thinking up, of course it's not gon na turn out well, but I think it did. It looks really really good. You know this kind of application is for someone who was really into wigs, who really actually loves the whole process of applying a wig and making it look flawless. I know it may seem like a lot to some people and I get it. I do have easier methods. I have methods that can get you out the dough in 15 minutes, okay, but this is for someone who wants to wear their wigs for a really long time or maybe they're going somewhere where they need to look flawless. They can't be clocked, they need to look good and whatever the occasion is you're gon na look really good with this application. Hope that you guys really like this. So if you did, let me know in the comments or if you have any suggestions or ideas or different methods that you have that you want to share with people. I would love to see that too. Thank you guys so much for watching and please subscribe. You know you want to you know if the wig looks good you'll subscribe. If you don't subscribe, then clearly, then you didn't like the wig as far as the hair details and where I got it from the inches and all that good stuff. I will have all of that listed in the description box below. I really enjoyed filming this and let me know if you want to see more because you know I'm down for it until next time. I love you guys. Bye,


Comments
RPGSHOW LACE WIGS: So detailed!!! This look is everything!
Alexis Monet: Love watching and following you Myy!! you’re so beautiful and talented!! Please share us your tips on a faster method too- maybe just using the got 2 be styling gel and freeze spray?. This video is great and so thorough- i cant wait to try it! I need to grab some of that ghost glue first though but will have to wait for this quarantine to be over
Shia Ijea: Love this! Would love the video on the quick method as well!
Shania Johnson: I love this video thank you so much❤❤❤
Taylor Edmond: Thank you for the video!! How long is this wig?
Nora Nasir: i ordered it few days ago ugh cant wait till it arrives i hope its exactly the same as urs
Benedetta Bi: you are beautiful ❤️❤️I wanted to know what you used to tone the wig???
Savanna: Makeup look for the thumbnail picture please. <3
Cindy Marrero: Did you bleach the knots? Or was it transparent lace?