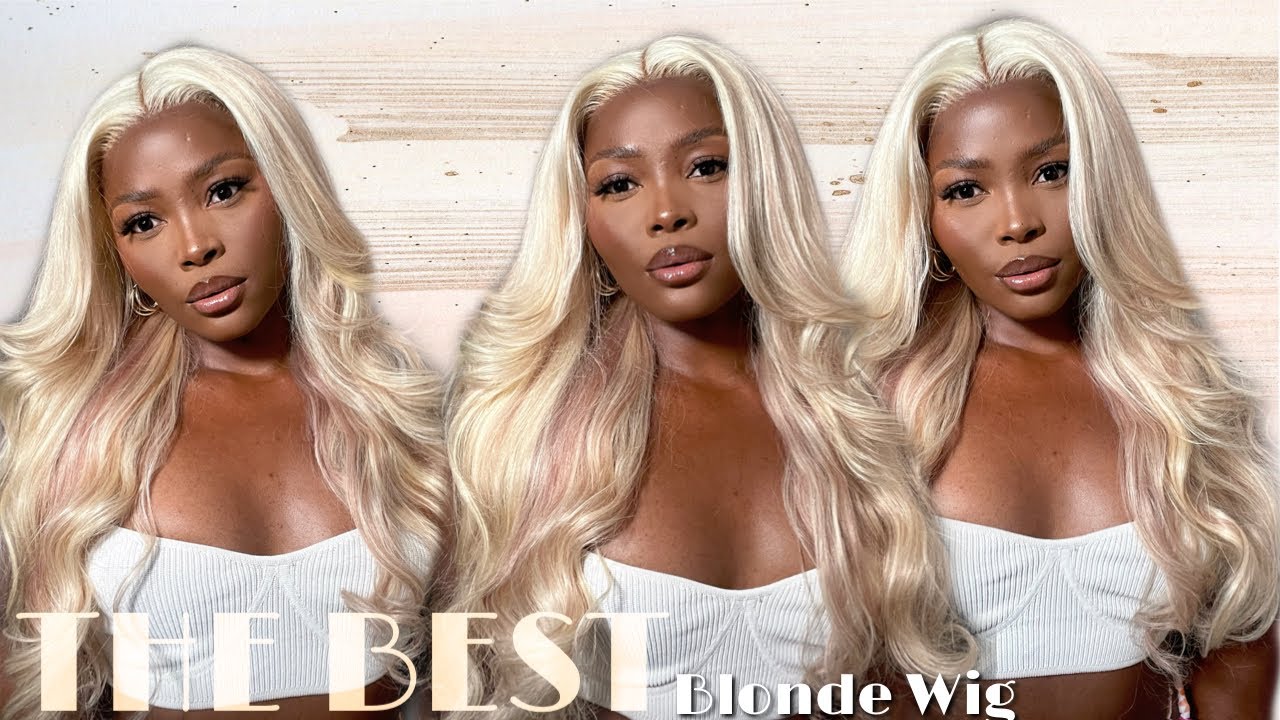
*Very In-Dept & Detailed* Bleaching, Plucking, Install, & Styling Blonde Balayage Wig Megalookshair
- Posted on 29 September, 2022
- T Part Wig
- By Anonymous
Hello my beautiful subscribers (and non subs) ☺️
Wig sales page - @CAwigss
Personal instagram- @holaa_caro
EMAIL- [email protected]
●▬▬▬▬▬▬▬▬▬✤#MegalookHair✤▬▬▬▬▬▬▬▬●
Get Extra 16% Off With Code: MYTD16
♥Same Hair I’m Using in the video:➤➤ https://tinyurl.com/4rz7n4te
Hair Info: balayage 13X4 lace front 26 inch body wave wig
Fire #balayage wigs:➤ https://tinyurl.com/yc2ae5yz
Official website➤ https://bit.ly/3A9cKwL
New Trendy Color Wigs:➤ https://tinyurl.com/ymphhaut
#33 Dark Auburn Color Wig :➤ https://tinyurl.com/4x6yfs9x
#4 chestnut color wig :➤ https://tinyurl.com/32yhzeh6
#Ginger color wigs:➤ https://tinyurl.com/dxzjf5b5
Autumn UP TO 70% OFF +Extra Coupon Code
Flash Sale :➤ https://tinyurl.com/43zc7yy4
Buy One Get One Free:➤ https://tinyurl.com/4ta6stsj
Wig Under $99 :➤ https://tinyurl.com/435ecbuh
Contact us:
Contact us: E-mail: [email protected]
Whatsapp: +8618903741680
YTB : https://tinyurl.com/2p8arc9z
INS:https://www.instagram.com/megalookhair...
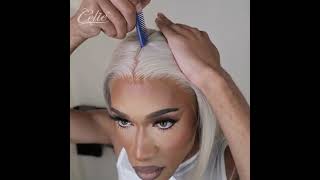
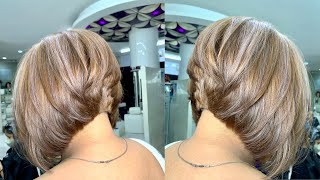
Foreign detail to follow me through a lovely journey of how I customize my wigs, so the wig we're working with today is this wig from megalit Hair Company. I can't find the packaging it came with, but honestly packaging didn't really care these days about packaging. I, like just know about the hair, so this is a blonde dyed wig from them. One thing I can say about Mega Look hair company the few times I've worked with them. Their colored wigs are really good, like they do a really good job at coloring. The wigs for you, because you know sometimes we let the companies color the wigs for you, the color. It can be a little blotchy, but they they do. The thing like look at that mm-hmm and they also I've, noticed they also like to add a little glueless band, so it can be worn, gluelessly. So first thing: first, I'm going to be going ahead and bleaching. The knots on this unit for my beginners out there wondering what knots are and why we should bleach them. So this wig, if you can see at the root, I'm not sure my camera's picking that up. But you see the little black dots that you can see at the root or the base of this wig, because basically the wig. The way that frontals or laced units are made is that the hair strands are tied into the little grid situation thing going on on the lace and they like are tied into a knot which is called knots, bam. Those things right there at the bottom and the good thing about this wig, is that the knots are honestly quite small, which is what you want, sometimes not to be really big, which is so annoying and hard to work, with the reason why I, like the bleach, My knot is so that when I apply the bleach I'm going to be put so that way when I apply the bleach, it basically turns these dark little knots on the bottom and turns into a blonde light color to kind of make it look like it's disappearing Into your scalp, to give it more of a realistic coming out of your scalp effect, so, with that said, sit back, relax grab your tea grab your coffee into this wigging style, okay! So here's my little bleaching Bowl, so we just a old bowl that I don't use anymore. That does need it to be my bleaching Bowl. I have my bleaching tools. Got a nice little brush for mixing, got it from Sally's, and I have my little spatula wooden popsicle. Stick that I like to use to apply my bleach um. I think I would say is you can use anything to apply the bleaching solution just make sure it's not metal, because metal does kind of like ruin. The whole reaction. That'S going on so plastic wood, a brush, no matter each that I'm going to be using. Is this one right here, I've started using these recently, I really like it. It is the blonde Brilliance Express line bleach, I'm a fan of this bleach in particular, because it's much more gentler. It has like conditioning um products in it. So that way, like it kind of, helps, not damage the knots when you're bleaching, because in true transparency bleaching, your knots does kind of affect them, because it is a chemical process and you how chemical processing is with hair. It weakens the bonds in the hair, which weakens the hair so bleaching. It does slightly weaken your knots, which is why you're probably getting shedding over time with your knots, it's more pricey, it's more of a professional grade. You don't have to use this. Your beginner get you regular BW standard powder and it works just as good like I was saying I will be mixing the bleach with a 20 volume developer and I'm using 24 because it requires this brand in particular, requires I believe, 15 to 25. Nothing more! So I'm just gon na go in with one for my frontals I like to use about. I like to use a plastic spoon to measure it, but I like to use about two scoops of the bleach powder. You don't need too much, and then what I would say is another tip is when you're pouring in your developer, pour it in Smoke slowly, because it's a certain texture and consistency that you want to reach with it. So when you pour too much in it gets too runny too fast, so pour it slowly. So you can control the consistency. I don't know why I'm using this to mix. That'S why I'm getting so nervous on camera y'all. Make me nervous, I don't know but yeah. So I'm gon na add a little bit more and then just go and barely mix that up put your wrist into it. All right got a little more right now. This is still kind of too chalky and thick like it's more like a paste, I'm not going for a pace we're going for. Like I don't know, a nice creamy, buttercream, frosting or soft serve a few moments later, all right, I'm pretty good with this texture. It'S nice and spreadable and creamy. It'S not chalky, and it's not dripping off my little spoon. It'S like, I guess what I call this yeah like buttercream frosting, like my brush, can swirl easily and simply through it's not dragging. I went like pushing back so just going with some hairspray just to help me push everything back and make sure it all stays to the back. See hairline is nice and pushed back, and the reason why we do this is because we don't want to mistakenly get bleach. That starts to drip onto your hairline. Like I said, we are just trying to bleach the knots at the bottom. Not the actual hair got my bleach, nice and ready, and the reason why I say you don't want it to be too um, liquidy or runny is because, like I said earlier, we're just trying to bleach the knots on the bottom right. So if it's too runny it's going to start dripping into your hairline and now you've, bleached and colored, your actual hairline, which is not what we're going for. I like to start my way from the back because, like I said, the back has the biggest knots. They probably need like a longer processing time, but yeah, I'm just gon na go in and start you know, applying the bleach, adding light pressure just enough to push it through and cover those knots in the bottom, but not too much where I'm now bleaching the hair. It'S kind of like you're buttering, your toast. Now, if you're a beginner, don't be cocky and think you got it, it's okay. Take a moment, sometimes pause flip the hair to see how much pressure you're applying they haven't pushed too much. I don't know if y'all can see, but, as you can see back here, those knots are fully saturated up here. The knots are still peeking through a little bit. Can you see you see how you can you can't even see the knots, because it's all covered up with bleach right there that's correct up here, it's still sitting on top of it, so I know I'm going to go back in and put a little more pressure. It'S really a balancing act between making sure you're pushing the bleach further enough to cover the dots, but not pushing it too much where you're over bleaching the hair right. So that's why? How thick your um bleach powder is, or whatever is very important, as you can see the knots are covered. You can't see them at all right here. I need to push more because you can still see the knots a little bit, but with practice, I'm just continuously doing it. You kind of start to learn by muscle memory, how much pressure you need and that's why I like this bleach, a lot because it doesn't like leak that much. I don't know that makes sense something about this bleach is just it's just Elite. If you have the money to invest in this brand, go ahead! Y'All, because it's good, I'm just gon na peek in the front to see if I need to push in some more nuts are very small in the front. I'M trying not to push too much on the front because since they're, very small they're going to get covered easily and just kind of focus on pushing back here. Okay, let me stop pushing before I mess around. I go ahead and put the foil paper in this wallpaper kind of just helps, you know, add Heat which helps it react faster, and I try. This part is so nerve-wracking because I try my hardest to not push the bleach any more further than I've pushed it. All right make sure I got everything all around. I was gon na put this tissue paper in the middle kind of just help. It hold its shape better and I like to let it process foot this way. So that way you know, gravity doesn't do its thing and get the hair and get the bleach to start dripping down into the hairline. So for me, I never give like a specific time on how long I like to let the hair process, because every wig is different. The hair takes different, but I just always say set a 10 minute timer and do that and check on it in intervals, and once you see it go from like a dark color to a certain light blonde, they can go ahead and wash it cover that up. Not apply too much pressure because I don't want to push anything place it on there and Alexa set a 15 minute timer all right y'all. This it's literally only been 15 minutes, and the knots have definitely especially in the back. You can see - have lightened a lot. Um, I think I want to wait just a little bit longer see if you you're kind of nervous, I would suggest washing it off now that you see the color lighting, but I'm really trying to get that visible, scalp type of look, so I'm gon na. Let it get just a little bit lighter, I'm gon na wait, five more minutes and then I'm gon na wash it out just give it a little more time. Basically, I'm gon na go ahead and wash this out now, I'm not trying to risk the hair starting to shed on me a few moments later. As you can see, the knots are very much blonde and no longer black. I would say the hair on this processed. Very fast, a lot faster than typically, I expected. Thank goodness, I put a timer, and I do this in interval to wash I'm using this um. It'S called Silk elements. Neutralizing shampoo. I like it because it's a neutralizing shampoo, so that way it's going to help. Stop all the processing - and you know you see how like it automatically turned pink once the once it like, starts to like turn white as you're washing it. That'S how you know that all the chemical reaction stuff is done kind of like when you used to relax your hair. You know in the shampoo that would give you it'll tell you to keep washing it until like it starts to foam White, so yeah just keep washing it through. So I know everything is nice and clear, make sure I'm washing it out of the hair as well. I'M not trying to start bleaching my hair mistakenly foreign ly white. That means I've washed out all the bleach completely. That'S a couple of pushes and rinses. Now, when you part the hairs you can see, it looks more blonde more like it's going into your scalp. It looks like I'm parting actual scalp a lot better than how it looked when I did not bleach the knots all right now to tell my knots turning the knots, meaning just kind of just neutralize them a little bit, because they kind of have an orange yellow Tone, as you can see going on, so I'm going to be using a mixture of this yellow and purple shampoo. I like to use both because the blue shampoo helps to cancel out the orange tones and then the purple is for the yellow tone. I am a bit nervous on using this toning shampoo because I don't want it to like end up toning, the highlights and the hair, so I'm going to try to just really focus it mainly. You know the lace as much as possible, I'm not going to let it sit on the hair too long, because I don't want to start. You know mistakenly dyeing the actual hair blue, because sometimes when you leave purple shampoo on too long, you can over tone your tone, your hair, and if you have blonde hair, it will turn a purplish bluish hint scrub it in like. So I guess I'm just gon na scrub it into the hair itself. So that way, if the hair ends up toning, it's gon na at least be one tone color and not having random rare tones going on. So I'm just going to massage the rest of the shampoo into the rest of the hair, okay and finally, I'm just going to put conditioner in the hair and let it sit for probably like what 30-ish mess. As long as I can sit before I go to bed and I just like to put conditioner you know just to help keep the hair, soft and bouncy and shine give her the full hairdresser treatment all right. It'S been honestly, it's like a long time. I'M gon na just go ahead, probably like two three hours wash this out, so the next step is plucking. The hairline here is a look at how the hairline looks like out of the box. It'S like this. I would say it's slightly pre-plucked. You see like it has a little thinning out in here to mimic realistic hairline and they did a good decent job like if you're a beginner, you don't fight plucking. You can go ahead and just install this wig just like this, but I like to get my wigs a bit more plucked. I like them more thinned out, I like to plug my wigs when they're dry you can pluck when the wig is wet, but I feel like the wet when it's wet the knots just come out too easily and it gets like just uncontrollably for me. So I'm just gon na use this little makeshift um, hair, dryer Hood. I got from Amazon where you just like put it over your wig and you attach your regular blow dryer you can just attach you know your regular blow dryer to the nozzle part. So that way, it's going to help me just dry, the hairline a bit, so I can plug the hair going in with my nice and hot hot comb. 400. No 500 degrees Fahrenheit to be exact. Just help me really push back that hairline for plucking. It'S really important that you push back the hairline, so you can see the knots they're standing straight and you can really make sure you see what you're doing to pluck. I only use these tweezers. These are the Revlon men Diamond Series. Slant tip. Tweezer has a slant tip and when I pluck I like to pluck with the tip honestly, it depends, but I try to like play with the tip pointing forward. If it's very, like specific type of knot, I will use the pointy side to really get that stubborn knot. You know, but the type of tweezer you use doesn't matter. I'Ve realized the cheap tweezers, just don't tweeze as well. Sometimes your tweezer can be too sharp and you end up plucking a hole in it. So try out different tweezers to figure out the ones that work the best for you, that's what works best for me. What I'm doing right now is I'm just parting out. The pre-plucked part of the hairline like y'all, see how like is like thinned out right here. I'M plucking, where it's like, starts to get a little bit. Thicker, I'm gon na start plucking behind that, even if your hairline doesn't come as pre-plucked as this wig, I still always pluck behind a couple few rows. This just kind of helps prevent me from over plucking in the front and it just looks a lot more natural and it helps me as well in the debate. If I want to do baby hairs, I still have some hairs to play with, because I'm always over plucking down here and y'all can see how like the hairline's, like already like you know, it's like hair, no hair, hair, no hair, hair, no hair as we're trying To do basically you're just trying to pluck in between the hairlines and create like little hairline gappings that makes sense just thinning out the hairlines going down this way and they're plucking the same spot and you're trying to pull the hair out from the roof. So like. Let me just start plucking, I guess right, so I'm grabbing the hair from the root I drag back like you just saw, and then I just skip a little space and I plug next to that Skip's face and just work. My way down mess it up. I'M grabbing, I don't know how many hairs I'm grabbing. It'S probably I don't know three to four try to not make big old tooth gaps. You feel me, but do make sure you're pulling from the root, which is why I also keep my hand up here to pull it back like a ponytail, so that way it's creating tension in the new the knots would definitely come out from the root. This way come on now, I'm gon na go a little bit higher up. I'M not plucking this in place, I'm gon na go and I'm not also creating the gaps in the same area. It'S like kind of off-centered, you know, but I'm trying to like mouth thin out a little backer back in the hairline. The knots on this unit come out really easy. Sometimes, if you have like really strong stubborn knots, pulling it out can cause some holes. So it's probably not even used probably just the wig, but I also was thinking if it has stronger knots. Doesn'T that mean that it's less likely to shed because the knots are stronger? You know so maybe it's kind of good to have strong knots in your wig. But you think about longevity. I just thought I had. I feel like that's pretty good. For me. I'Ve been trying to like not over, pluck my wigs these days because I feel, like I've been going to ham and if I don't know, because I think we're plucking the wig before is that you don't have to do it to Perfection. You can definitely pluck a little bit and then once you install the wig you're like I want a more thinned out hairline, you can still go ahead and pluck more when you install the wigs. That'S why you know less is more. Sometimes, okay, that's enough! It'S like! I feel like I'm creeped on the edge of over plucking and then once I've done that push the front back up and now I'm just gon na very lightly, like barely anything, go down the line and pluck a little bit in the front, like literally barely anything. Ah, I plug a little bit too much right there. I fear I must have over plugged just a little bit right here on the side, but I'm just gon na hope that the hair, when it dries fully it's gon na get thicker and that over plucking won't be that noticeable. But I mean it's still giving it a scalp, though you know people we have thin hair lines. It'S natural she's, realistic, okay, because I got a couple ball patches in my real hairline. So that's realistic right there and now I'm going to go ahead and put the other side plucked on both sides and I'm gon na. Let the hair finish air drying overnight, because it didn't dry all the way, because it was mainly The Roots I dried and we will be installing this wig tomorrow. I'M excited, I see her potential tomorrow, all right next day, hi hello, let's install this wig, so I've already tried to like make on Pinterest a little mood board, because whenever I'm doing my hairstyles, it really helps me have some inspiration. So I could know you know what I'm looking towards, and I saw this y'all see that. Can you see you see like a little side, part the light waves? I was like. Oh I'm definitely gon na. Do this soft baby hairs, something like this. You see that you, you feel the nerd, that's that's the vibe I wan na go for because I just been really obsessed with curls, like body wave curls these days, I'm trying to get better at curling, my hair. The first thing I want to do before. I start to install it. Is I'm going to change this from a middle part to a side part? I said this is my last detailed video I like doing my side, Parts on the mannequin head or just parting. The wigging American head is a lot more easier for those of you who are not great Partners like I know I am so this way I can see like you know everything and I'm just gon na do a rough part on my head, real quick. So that way, I can finish it off in the mannequin. Usually I use mousse such as this part, because noose will help me set and to set the shape, but I don't have any more moves right now, so I'm just using my water as my motor. It'S not the best but use what you got honestly. I suggest, if you're, trying to like get that curved hairline too. Just literally doing your mannequin head, get a photo in front of you like I'm doing right now and just try your best to mimic that shape. I guess another tip too, when I'm trying to get that perfect curved side. Part. Look I brush all the hair forward, like I would, if I'm gon na, do a side swoop right like about to swoop the hair, like you know, like a little swoop over moment and I brush it forward, and I just try to like carve out a bit Like a curved heart, the hair brushed forward like a c, you know like this is kind of like roughly this shape, I'm going for you see how like it's curved, you see that like goes like shrimp, you know a curved and pushing it forward like this really Helps me to see the shape I'm going for and then now I'm just trying to part and clean out the back there you go, that's the shape. That'S the part! Everything molded out, I'm gon na, go back in with this mold real, quick and put that over the hair. Okay. Lastly, I'm just gon na press the hairline out, since it's already on the mannequin heads just to save me from burning myself, because I always burn myself. I'M making sure I'm really pressing down and getting all the way through the lathe, not just the top. If I didn't mold it with the with the um water and stuff earlier, I'd be going in section by section to make sure it's all flat. But since it's already molded it, I don't have to do that boom. There you go on the bright side, it looks so cute. Now I'm gon na prep, my head for the wig. I have braids, you can't really tell but there's braids under there and I'm just gon na put my wig cap on push it back, because the wig cap is just to protect the braids I'm getting caught in a clip. I'M gon na get some edge control and just clean up my hairline push all these little flyaways back. You'Ll see all these little extra steps. That'S that attention to detail I'm talking about, but if you keep asking yourself why your wigging styles are not coming out as bomb as you know, they could that's because baby you're not doing all the extra steps you're not paying attention to that detail. Okay, push it all back again there we go, I like to make sure I push it back further enough because I don't want it to be peeking. Under my you know my lace and whatnot okay. Last step last prep step before I finally put this wig on and that is to tint my lace in with my Foundation. This is my Maybelline matte poreless Fit Me Foundation, shade 365., I'm just going to use that to tint the lace. So that way, you know it Blends better in with me, so, let's buff that in you know, what's an interesting question I got is what do I do with the lace in the back of my wigs and I never thought about showing you guys what I do To that, because I'm just in my mind's kind of like I thought we all kind of knew, you know you can't assume everything you know not. Everything is beginner level friendly in your mind. So what I do with the back lace, if it's just like a regular three, a regular frontal or closure, where there's no actual, like lace, because there's tracks on this back piece of lace. I don't know why they put lace in the back like there's actual, not tracks or whatever so honestly, y'all. All I do. I just cut it off like I just cut it, that's it and as far as like the straps and stuff, I do clip them on because it makes the head the wig like fit round around my head. This unit also has a like a what's. It called. Has a headband elastic band installed in the back, which helps you wear it gluelessly. If it doesn't fit you right off me put it on. You need a tighter. What I would do is, I would cut it and then tie it like in the knot. Like a back of my head for it to fit me better, put it on hey, okay, yay. I finally have the wig on my head 10 years later, but let me put my headphones in because I'm gon na be watching Desperate Housewives. While I do this, because that's what calms me in stressful times, stressful times, meaning this wig and still I'm also simultaneously filming a tick tock. While I do this y'all, so I'm looking directly at y'all, I apologize just if you're wondering how to properly cut off the lace around your ear. So just how to like properly cut your lace off. I do have a detailed video out on that, but I just like to you know part the lace around my ears and cut oh, come in a little bit too much. Okay, let's go perfect fit all around love them spray. My lace down, I'm gon na, be using this bed head hairspray. This is like literally just a regular hairspray, but the hole on it is really good and it helps me stick down my lace. It'S a temporary hold, so it's not a glue, it's just a hairspray. It comes off with water. I I've been installing my wig a little bit differently than having doing it before. I would like spray under the lace and then put on the product, but these guys I've kind of like I like pre-cutting the lace and then spraying it down. Let me show you what I mean. Actually, I'm gon na do one big section like I was saying I like to just right: cut off the lace and make sure you're cutting it up and down motion cut it off, and I like to cook as much lace as possible and then what I do Is spray under that using the spray going make sure you use your fingers well to make sure it's even, and I make sure I'm getting everywhere that I know the spray is going to go on for the side, I'm going to go ahead and pull out the Sideburn hair blow dryer and just push everything down and it's on a hot setting, hot setting, low heat. I mean low power and I just push it all in with my right tail comb and then push down all that weight. See if I can do that. For this, so I just go in again cut off as much lace as possible, making sure I'm cutting it up and down jacket motion to get a raw cut on the lace, because it just lays better that way, and this time I'm gon na spray it over. Because I can't you know, lift my lace like I did earlier, I'm just gon na spray over the lace, like so making sure I'm tapping that product in and then get my blow dryer Instagram it's melting and disappearing into the hairline. That'S what we're here for all right, Godly, Suede and now I'm gon na put this last band on here just to hold everything down before I swoop the baby hairs just to give the lace a moment to sit and simmer. But I'm gon na go ahead and just slant cut these sideburns off, while they're just chilling all right. Now it's been a minute place has been sitting. I just feel like this new all right now, let's do some baby hairs, so I've already kind of have them. Semi-Parted out like this, using this little tiny mini flat iron from Amazon, and I think I'm gon na curl it inward. I feel like the inward curl works better, so make sure you get a nice tight, curl going to diagonal jacket motion now to lay the baby hairs, I'm using my Eco Styler gel foreign plastic band back on now, let's get to starling. I want to keep some my long layers, I'm going to use this razor comb that got from the blue spray store to help me cut the layers. It'S going to drag it down. Like a you know, plant to the angle, foreign, okay. There we go. I'Ve got some nice Shaggy layers, I'm gon na spray, this primer through it, because it's like a heat protectant as well, especially since it's blonde hair. Well, it has blonde hair in it. I know it's gon na be a little dry. It'S gon na need some Heat Protector. Okay, so I'm gon na be so I'm gon na be curling. My hair with my Remington one inch. I think it's like anti-static plate flat iron. I got this from Walmart years ago for like twenty dollars. This is my most. I honestly your beginner you're, looking for a good flat iron, this one it's affordable and it does the job so now flat iron curls, I'm gon na try my best to explain it for y'all. I clamp it. I'M gon na flip it like this and it kind of just work. My way down. This will probably just make more sense if you kind of just mimic what I'm doing visually and I just keep like slowly opening the flat iron to feed the hair through, and then I hold the curls in my hand like this to let it cool always let Your curls cool before dropping that's, why some people do pin curls because pin curling or just curling the pink, pinning the curl and letting it hold its shape. First, before you drop, it really helps it like last longer and helps the curl like have more of a shape. Thank you, myself, foreign. Stick to me all right for the right side. I just keep both sides, I'm just trying to imagine my I'm twisting it to the back right, the back, not the front the back so now for this side, clamp it twist it to the back and then just keep working my way down. Sometimes the hair will easily slide or I have to like you, know gently open and close it and drag it down. I can't believe all right now, let's see what we are working with here, there's always that one curl that you have to re-curl. Okay, I kind of want it, so I just went ahead and just brushed the front towards my face, because I want the curls to come into my face like this. Now I'm going to do is just kind of like finish everything off there's a lot of flyaways, but honestly, that's expected to be expected added some wax onto the top of the hair, and now I'm gon na use this little hard brush situation and just smoothing all The flyaways just to clean up the look, I'm also using the brush like brush through the hair a little bit just to like you know, relax any frizzy parts, but I'm not brushing it all the way to the ends. So that way it doesn't lose its shape. Finally, I'm gon na go in with this big old, pink holding spray. I love this spray because, like it adds like a light fold to the hair and it's like the original Pink um, you know oil sheen, so that helps add a little bit of shine as well to everything. I'M just going to put it up here. So I can keep its little curl shape. Wow here we are finished. Look. This is so cute, I'm loving it. I'M feeling it guess who forgot to record a proper outro this guy, but it's only because y'all by time I was dead installing this wig. It was at three o'clock in the morning. Like always, and I was tired - I was delusional, but I do look good. Like you see this hair, this look was giving. I love the curls all the extra work and the little steps I put into this customization really pulled off because look at this see it. You see her, but we're finally done. Thank you guys so much for watching this video. I hope you enjoyed this video. I hope you learned something and of course I hope you like comment and subscribe duh. Sorry, it's also very late. As I'm adding this video. I just keep doing things late at night, I'm a night owl. What can I say but um yeah. I hope to see you guys in another one and thank you so much for watching. Yes, this video is quite long, but that's really the whole point of these start to finish detailed tutorials, to show you how much work you have to put into some of your units to get them to look. You know straight out of the scalp. If you did make it all the way to the end, you are a real one and your wig installs are gon na be more slayed because you stuck to the end because you are committed to the game just like me, but okay guys. I will see you guys in another one like comment and subscribe, say hi to your mom, your dad's, you know greet the family for me and peace out Girl Scouts good. My oh, this hair looks so good. I can't get over it yeah goodbye, guys,

Comments
Ntsako Cassandra Hobyane: Why do I keep watching basically the same video all over again w so much excitement? Girl I love your content. I’m obsessed. Thanks for the consistency Caroline❤
Lordes Nyamaah: I'm literally obsessed with this look!
Jackie Davis: That goes really well with your SKIN TONE !!
Trinity: love ur in depth videos im prayin when i do this install it come out cute
Tashanda Myers: Oh my girl back at it again with another in-depth slay
Tori time: I bought a cheap tweezer for maybe like a dollar and its slanted best tweezers ever!! It's not too sharp and gets the hair out easily
Betty Flomo: Love the hair, so pretty. btw love your nails color, what’s the name of the polish?
Erika Woods: Absolutely love desperate housewives nice video
minimalish: this colour is everythingg ms. caroline!!!!!
Tori time: I've seen people make a soap mixture with the toning shampoo then add the lace it prevents the staining the say
Megalook Wig: thanks so much for your sharing dear we hope your fans can also like this color
Planet NINK: Her biggest Fan
sothatschy: Yayyy another video
ImNotSallySuberry: that lace front is a 13x6?
Tori time: Oooo I need snacks for this video
Иван Петрович: Hi hanga talaga derededd.Online ako sa sipag at paensya isang ikaw. Ito ang hinihintay ko all this time. napakagandangl musika at palabas I Like you baby //
Tori time: First