How To Make | A Headband Wig | Made From A Ponytail Wig | Work Of Excellence Tv
- Posted on 21 November, 2020
- T Part Wig
- By Anonymous
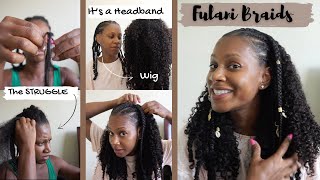
There are so many ways to make a headband wig. So today I made my headband wig with 2 ponytails. Enjoy and try it and let me know. Comment if you have any questions.
Website workofexcellence.com
IG@workofexcellence
Business Only [email protected]
Mail Box PO Box 6096 Silver Spring MD 20916
Subscribe Here https://www.youtube.com/channel/UC32s9...
Thank You For Supporting Our Channel
Halo Headband By
IG@leustalk_outlet
#headbandwig
#howtomakeaheadbandwig
#workofexcellencetv
Today we will be making us a wig band and we're not going to make the average wig band we're going to be making our wig band with two ponytail string. Wigs - and here is the pack the milky way - 100 human hair, wet and wavy. So now i take the two ponytail um wigs and i leave the drawstring straight out. You know because that's how it comes - and i don't want to take my drawstring out, because this is something that we're trying to see how it's going to come out. So i don't want to take my draw string out because this hair costs 30. 29.99 and if this doesn't come out, i can always unhook the um thread and i can still wear them as ponytail wigs. So i don't want to cut this right now. So i have my thread and i have my needle and i'm going to take the two bands on this side here and i'm going to connect them. And i try to make sure that they're even and that the hair is out of the way. And i'm going to sew it all the way up to here to connect the two. So i start with the first, and i continue sewing this all the way up put it in between pull, want to try to make sure you get it as even as possible. Now, i'm going to show you guys, maybe about one or two strands put it through pull it, make sure that the hair is not in it, because i just want these connections right here. Do y'all see that okay, so i'm going to continue in fast mode. Bringing this all the way up to the top, so i can close them all in together, wow, okay! So now i already sewed both together. Okay, here's the front - and this is that it's um straight stage. Okay, if i wet it, it'll curl up okay. So now we have the wig band okay, so i'm going to take this wig band and i'm going to cut it down the middle okay like that and now ends up like this. So when i put the wig band on, i'm only going to put it from here to the end of here. Okay, so i'm going to leave it like i'm going to put it on the band from here and i'll show you guys how i am going to do it okay, so i'm trying to make sure you guys got good angle. So i put the wig band on top of the ridges at the beginning, and i kind of gave myself a guide by um using the pen to pin it down where i want it, and my main focus is to have a headband here and then i can Flip this part over long as that back part, is holding you. You understand what i'm trying to do here. So that's what i'm trying to create, i'm going to start sewing from the edge here and i'm taking the stitch from inside i'm not going through the front. I'M just going through the back and i'm bringing it here in this ridge, i'll probably try to zoom in to make sure you guys see exactly what i'm doing. I get my thread pretty long, but not too long because you don't want your thread to get tangled and then i have another one sitting here on the side waiting if i run out of thread so now, i'm just going to keep going all the way. Until i get to this middle because the middle kind of goes down a little bit in the v, because the two circles have um meat, but it still has that little v and i'm gon na show you how i'm gon na go around that part. I'M just going to continue till i get to that part. Okay. So now we are getting to that little dip. I'M gon na move that before i can really see what i'm doing just trying to give you an idea of everything that i'm doing and every now and then and take another look up the front here and see where i am just to make sure that that Is closed in right there! So now that i have closed in that middle piece right here, i'm going to go on and finish like. I did this side, so i'm going to speed it up because it's just repetition right now: okay, i'm going to share the good with the bad. I tried it on with this band and this band is not really tight enough and it's not holding like a wig. Would so what i'm going to do is remove this band, so what i'm going to do is just cut it off, and i am going to put some combs right here on the side just for when i pull it put it in these two sides are held Down, i have a comb up top comb on the bottom and down here now at this time. If your wig comes out good, you can cut these strings out and it will give you a little more leverage, but for right now till it comes out the way i want it to come out. I'M gon na leave these strings because i may have to use this as a ponytail wig, so just to give you that little tid bit right there, because it's not really in the way of anything right now, anyway. Okay, now i'm going to take these velcro strips and i'm just going to cut off just a piece to this size here: okay and it sticks on the bottom - i probably for long-term use - i would probably sew it on so i'm trying to see. Let me see how i want to put it so i'm going to put this side on the outside of here. It doesn't matter which way you put it. However, you desire this sticks, but for long-term use. I would take the needle and i would just put a couple of threads in it - just to hold it, but for now this is how we're going to do it. Okay, just for time purposes, take this part off and you're going to put it on the inside. So right now, it'll stick for a minute, but i really would like i said, make two or three little shows just to hold it in, because nobody sees it it's in the back of your hair, okay. Okay, now that i put on my hairband wig here it is, i put my hair back and ponytail. I put it in and yes, the clips that i put on the velcro on the back, make sure that you sew it on. Don'T just let the glue because it will not hold kept popping loose, so i had to go and i had to sew each side. I just put three stitches to hold it, and then i pulled it to the back and i stitched it now. Let me give you some other pointers that i learned in making this um headband wig. Now you thank goodness. I did not take the drawstrings out because it all depends on the size of your head. I have a little small head, so i kept saying oh it's kind of bulky on the sides, even though i i put the cone on the sides, i lost the footage. I thought i was taping when i put the combs on and i can't find the footage. So i put the two um cones on the side and, like i told you, i took the headband wig off of it this right here, the the band. I took that off because it wasn't really holding anything. Thank goodness that i did and i put two combs on the side, but i still kept feeling like it was like bulky. You know i took the drawstring and i pulled from this end because you know the middle ends are sold together. So i took - and i pulled it until it fit right, and i did it again on that side so lucky i did not cut them. So do not cut it until it's fit to your head. I wouldn't cut it because i i'll always have to fit it to my head, where it is now, i'm going to tie it because it fits really good. Now this is the hair. Let me get the pack, this is the hair and this is the straight stage of this ponytail. So this is the straight stage. I don't really know if it takes a curl or not, but i was letting the curling iron get hot and let's see, let's test it and see. Okay and let's see how it takes a curl. Oh now it does take a curl. You don't have to make it curl as tight as i made my curl, but i just wanted to make sure with this hair because it says 100 human hair, but i think there's some fibers in here synthetic fibers, that's inside here it does take a curl. So i'm going to curl it right, quick and then i'm going to wet it and show you how it looks um after i curl it, i'm gon na put my headband. I have it right here on for you to see. I have a whole lot of headbands to pick from um. I even have my halo right here that i could put on as well. Y'All better get y'all halos on instagram. Let us talk outlets to get y'all halos. So, let's curl this here, okay, i just gave it a quick little curl. I didn't want to curl it tight because it's not real long, and this is the way i like it. I don't like my hair, real real long and so now i'm going to put on my headband and, like i said i have so many to choose from so here it is here it is curly and this was a quick curl. Okay, i didn't take my time with it. I just wanted a quick curl because i'm getting ready to wet it before i can show you guys how it looks wet so now this is it wet. I wet it, the more you wet it, the more wavier it becomes so now i put on my cap - and here is my hair band wig out of two ponytail. You can pretty much make a hairband wig out of anything. You want a old wig. You can transform it into a hairband wig. You can weave some hair and make a headband wig, and you know you don't even have to know how to make a wig. It'S so easy to make a headband wig bye.
Comments
Audrey Hamlor: Such a great ideal cuz. I will be trying this!!
Renee Wright: Easy style to make for yourself. You made it clear so you can do it yourself
washia00: Great Job!! Professionally Done.
Sierra Thomas: Such a brilliant idea
Behti: This is so cute and convenient!
Lulther Washington: I love your headband wig keep up the good work
Jocina Kujna: I really like the greeting from jocina kujna