Bleach And Pluck A Frontal Like A Pro | Very Detailed
- Posted on 14 July, 2020
- T Part Wig
- By Anonymous
Coupon code:LOVEUNICE
Our website: https://amzn.to/2TRF14r
+ link to same deep wave lace front wig 24inch in video: https://amzn.to/2ZGrcr3
+ link to UNice Hair Amazon Store: https://amzn.to/2XcwGgl
------------------UNice Hot Selling Wigs ------------------
★Body wave 13x6 lace front wigs➤:https://amzn.to/39mepzl
★Ombre Brown Highlight lace front wigs: https://amzn.to/35qYjlQ
★13X6 lace frontal wigs curly hair:➤https://amzn.to/2YYV3ez
★Straight13x6 lace front wigs ➤: https://amzn.to/2WrVXhy
★13x4 lace front bob wigs ➤: https://amzn.to/2UN6eUb
★water wave 13x6 lace front wigs➤:https://amzn.to/2UxmCbx
★Ombre highlight lace front bob wigs:https://amzn.to/2yBtlvE
★Glueless Straight human hair wig with bang➤: https://amzn.to/2WJeurk
★Streaks highlight 13x4 lace front wigs➤: https://amzn.to/2NGZ0Q5
★Transparent lace front wig with bangs: https://amzn.to/2xtbBCc
---------------------------------------------
Email:[email protected]
Whatsapp:+8613290756878
Chat with UNice: https://api.whatsapp.com/send?phone=86...
Follow UNice hair Instagram https://www.instagram.com/unicehair_am...
IG:@unicehair_amazon https://www.instagram.com/unicehair_am...
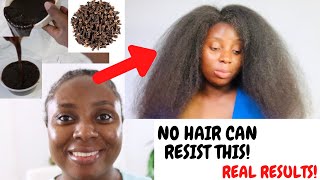
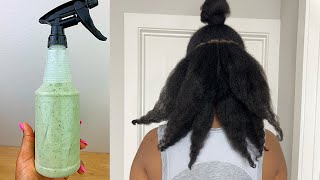
So what is up Africana fan? I know the commence, but that's beside the point you're now working on my here today. This is not gon na be a very slay. Today today is going to be our first class. Okay, the first episode of the free frontal collapse. 101, okay, so today's video will be sponsored by you knees here, and this is the thirteen by six deep wave hair and the interest of twenty four inches and I believe the density is 180. So this is how the hem is looking like. Alright. So for my lovely beginners, just some little heads up, I feel like, if you want to make this, I guess this whole process of you doing your wig very foolproof. I will suggest you buying a pre plucked, as you guys can see. This hair is already pre plucked me mean Deb, you don't got, no Elvis Presley. Hair lot going on. Y'All know thick hair lines at all. If you want to make this foolproof, I would suggest you getting a pre plucked already made way, especially if you do not know how to make your own wigs, because making or old frontal wigs in itself can sometimes be a hit-or-miss, especially if you're a beginner. So, like I said today's first episode of the prefrontal class 101, we are going to learn how to bleach and pluck like a pro okay, so first we're going to start off with the bleaching process. So right now, what I'm doing is I'm gon na use. My eye mixer a clean mixer, a bowl for your bleach. I bracele like to use a whisk instead of the brush to mix my concoction of the developer and the bleach more so because it it kind of whisk it and it makes them more, even without no lumps or bumps, and I like that, better than the brush. I feel like overall, you just get a better in a seamless application of the now, what's very, very, very, very crucial as leaching process is your bleach and your developer. You guys honestly um. I do have a fan fave when it comes to bleach. Unfortunately, I do not have that right now, but this is also a very good brand. This is the Collider colors from Clairol, and you can you can get this from the be displaced or my ultimate favorite is the blonde or blonde Wars a little bit more expensive? So if you want to get pretty much the same results, but you know for a cheaper price point, I would definitely suggest the Collider colors, but I believe I pay like $ 10 two o'clock dollars for this, pretty decent sized to every the culture of it. To be honest, I just like to work with like same brand. You know like bleach, and I just so that again it goes hand-in-hand through a mate for each other, for it to the use and you get the best results. So, of course, I'll be using my clear, our professional, pure white and 30 and 30 developer so again, 30 developer, not 40. 30. The reason why I say 30 is you get the time of it processing, but it has over processing too fast. You don't want your awake to over process too fast. You know you're not supposed to be dyeing your hair with for the developer period, but you know sometimes maybe a little a it's really. I asked wan na you know have to make sure that this is nice and fast and everything's nice worried about the developer. But it's not really suggested more so because I feel like you won't get like even come out like when it comes to the knocks time. So usually, when it comes to my front tools, I will start off with two scoops of the bleach so much it. Here'S one and then here is to alright. Now when it comes to like my mixture, you want to go for a very thick consistency and I'm going to show you guys how to get that. But one thing I would say is rule of thumb when it comes to doing you know the mixing, you know pour and mix as you go. Don'T pour a whole bunch because you can't take it back, go on it prevents you guys make sure you go in increments, I'm just gon na be pouring. It should be good. Okay, I'm gon na go ahead and start mixing good. So again you want to go on increments. When you are reaching your a hair, you guys or just you know, do your concoction as you guys can see it's already getting too thick. So that means that got ta add more and you're. Pretty much is eyeballing it. You know like there's no exact measurements, that there's no one to one or two to one like how safe you use, like, I guess, like the Willard Sharma toner, but he used to the one for the developer. There'S no measurement when it comes to this. You know with it: okay, as you guys can see the remains creamy consistency going on alright. Now here's the test to see if you are ready or if you need to add a little bit more to by the bar or a little bit more bleach powder. Okay boom, so we're going to pick up ours, I'm gon na test it you see that it is not dripping whatsoever, but it's not dry either. So this is a kind of consistency you want. You want a pasty kind of consistency that takes a long time for it to drop without it being too dry. You know Silvo. This is the perfect consistency that we have for our bleach and now we're going to move on to our bleaching process all right now. So again, like I said, we're going to try to make this as foolproof as possible, so right now what I'm going to do when you see these little free hairs, that's in our lane. We don't know what that. So what I suggest you to do is to use your costly free spray, so I've got to be pretty spring. You can find this funny piece place or Amazon and one take my comb. What I'm gon na do is I'm going to spray the hairline all right and then I'm just going to use my comb and then just comb it down like that cool. We already see it. It'S a funny-looking meter than what it was before because I got a well. I think these companies they already come with the baby here, so the baby hears me out front, so they can tell you they hey. I got the baby here, it's beyond you know. So it's harder for you to push those baby hears back, but you're she's, gon na use your spray and use your comb and just kind of comb it back. No, I already done look all the hair to out the way you want to make sure that all hairs are out the way, so you can avoid bleach getting onto unnecessary restraints. It'S not cute! You know okay, so now what you're going to need is a butter knife excuse the fact that much using actual butter knife, but I'm only gon na use it for me to breath I'm used to eat afterwards. I usually use a plastic one by kind of phyto. In here it's laid outside, so we're gon na supply us with this okay. They also want to make sure that you have your gloves on deck. Protection is everything because I promise you guys and stuff burns and it's going to end up getting like no matter how careful you are somehow some way and always ends up getting me so now for my vegenaise honestly, your life is going to be your best friend. I do not recommend ever trying to inspect them. I would never recommend you trying to bleach awake on a dome cap reason why I say that a domehead reason why I say that is because listen, simple, science, what goes up must come down. So if it have this upside down and you're putting the bleach on it, gravity is going to defy itself and it's the the no matter how thick your bleach is. It'S gon na start crashing down because again cause of gravity, so honestly, you're gon na have to shot a little bit with this, especially when it comes to a wig. It'S easy to do and it's just a frontal long, because you're just able to lay it on a flat surface without you applying so much pressure and on it you know so yeah, just a little heads up, you guys cuz. I'Ve tried this method before putting it on a dome head and all the time and never fails. I always end up getting over bleach knots and it's annoying, and then you have to go and with black dye and no again, I'm trying to make this as foolproof as possible. You guys so yes, me personally when it comes to bleaching. My knots I like to tackle the front part first because, to be honest, that's what kinda really matters the back part. It doesn't really matter more so because you could always use concealer to conceal it if it didn't bleach properly, and that's only if you didn't please properly, you know so book, so I'm gon na kind of hold it like this. So you kind of have a clear view or power looks and try to zoom in okay, cool I'd like to okay, so cool. This is how we're looking so going to go ahead and take our pick our shape all right, and you want to make sure that you're doing this very very gently, guys very gently, oh yeah, that awkward like this, because I want to show you guys you want To make sure that you have a very light hand when it comes to applying the bleach now. This is a very weird angle, but this is only a complete teaching and, to be honest, you can do this, you can hold it like this and do it this way more. So because you get to see in the front how much bleach is you know being applied or if you're penetrating it a little too deep into the lace and it's starting to bleed so you're able to fix it immediately before it starts processing. So, even though this is an awkward position, I will suggest you actually doing this, so you actually see what you're doing and you know not make any mistakes while doing it and again, I'm just tackling the front first and you want to make sure to have a Very very light hand and try not to apply too much product in one spot too. Exacto also claws the bleach to bleed into the hair again. This is not for the impatient hearted and you have to be very patient when it comes to this, especially if you're a beginner. It'S again, you want to make sure this is foolproof as possible and in all reality you guys you don't even necessarily have to the entire front um, depending on what style, you're doing, you'd be doing a simple style, whether if it's like you know middle part, a Side part, you collegiate part out your part and then bleach the front and then, wherever the part is that's mucilage. It just do that. You know, especially if you're gon na product, you know that's a little typical, a goldmine of coming here. Science as well trying to save product and stuff, but if your client does you know, want to do multiple styles and probably have to you know bleats entirely, but for now, what's this the entire thing, that's a little tip Darwin to tell you guys just in case, If you were, I guess in a rush, you know, and also another thing when it comes to bleaching, you always want to make sure that your bleach has either a violet or a blue undertone. Do not want no way complete. You guys, because white bleach tends to make your hair very grassy, while the blue or the purple components have components that would, I guess, lessen the brassiness and tackle the restless as well. So it's like a two and one, but either way I still go back and with the shimmer like shampoo after I do that, and I'm limit show you guys on what I process after that and I'm gon na I'm just going to come back to you guys After I'm dying, but I'm going to let this sit after I'm done for 30 minutes and then we're going to go ahead and wash it out afterwards. Are you guys? So if I bet you Venice yet, but I just wanted to come back to tell you a couple of tips so when it comes to bleaching or not, sometimes you may notice that your way, especially on the sides, the hair ends up kind of, like you know, Say it right this way, like I don't explain at home, you try to get closer. Okay, so see how okay we got the hair in the middle. Where is that it's just going back, but we got some of the hairs and it's slanted to the side. Now, honestly, when you are bleaching your hair, you want to make sure that, while you're bleaching, it you're just lifting the hair up like this and kind of trying to redirect it. So it can stand up straight so that the hair or the bleach won't bleed onto the actual hair. So make sure you do that for both sides, so that you know that there's no bleach sitting on top of hair and that you're not getting any bleeding in your bleaching process. Okay, I'm also too, when it comes to the bleaching process. You want to make sure you let it sit so right now I don't got no um aluminum foil, so legit, I'm just gon na. Let it sit. I'M not gon na sit upwards because, like I said again, like gravity defies itself so you're gon na. Let the lace on like the hair, it's set up to legit use, only placing it darling and then this let it do this process. You know you don't want it to be fixing it down where it's like this, because then again what comes up must come down. You don't want your bleep crashing down onto your, so just monitor it. You guys just keep on monitoring it until, like you see it changing, and sometimes they don't even take 30 minutes depending on the kind of grade of hair that you've got already so just keep on watching. If you see it turning brown, that's good enough and you can start like washing it. So right, I'm just checking to see if this you know turning - and it's definitely is turning in a setting fast and by the way, the kind of color that you're going for when it comes to the knots and what a golden brownish kind of knots you guys, You don't want to chew toy light, because then it won't mimic your Scout. So again, 30 minutes should be more than enough time for it to turn, and if you see it turning bastard again, you can wash it out because every hair is different, all right, yeah. So that time is up the only thing I'm gon na do off-camera is just rinse it out. So what you're going to do is just rinse it out, and I'm gon na show you the rest of the process after I come back. Okay, alright guys. So I went ahead and rinsed it out, and this is where I got so. These are the nuts as you guys can see. It was a big success, um still a little brassy, so we're gon na go in with the purple shampoo. But before we do that, so I did notice for people that do care. So you guys could see. The front is bleached perfectly there's you know, but for my people that you know are say are going for like they're, trying to braid their frontal and a bothers them at the fact that the knots on the inside didn't bleach as much. You can go ahead and breathe holy, you guys, so that's what I'm gon na do. I'M not gon na be lazy, because I do want to demonstrate to you guys that you can bleach it twice. So the only thing I'm going to be be bleaching is the inside part. I guess like um, I'm going to be reading bleaching, not the front, because the front is fine. I'M just gon na leave bleach and eat everything, that's from the hairline and back so I still got some police leftover. I'M going to do. Excuse me, while I don't wear gloves, being lazy right now, but just gon na go ahead and by some more bleach all the other parts that didn't get me and sometimes actually recommend it. If you that you do with your knocks twice more so the fact that most of the times the first round of personal around everything is in Bleach and that's perfectly fine - you didn't do anything. Rome is again it's the hair and it's the knots because sometimes because, like in the back, the knots are thicker than the ones in the front. I believe those ones in the back are like double knot. It and the ones that in front are single knot. It just to give you that natural look in the front, but yeah. Sometimes it takes a longer time for it to process in the back. Because of how thick the knot is, so you can always go back and read diet. You guys don't be scared. Do not be scared, it is okay, okay, and that just goes for usually like any dyeing process for the most part, save your dying. Your bill here usually go through more than one process anyhow, so just think about it like that, don't get your panties in a bunch! You guys we got this, and this is more so for my extra ammo people that want every single not to be touched, and once I'm done with this one's gon na leave it on for again 30 minutes or until it starts training. And, to be honest, I'm only getting over there because you can't part nothing over here. So even it's say the non-sena really bleach that well over here. What'S a day, you don't want to worry about it because we're not you're, not you're, not doing anything. On that side, okay, I'll, okay, really wish. I had an open employer look-alike. This would have made them over faster, but for my people that do have aluminum foil me free feel free to use it and put it underneath it's like a processable, the faster okay, all right, you guys, as you guys, can see you're fully bleach now yeah. My sis is looking good there's a little bit of bleach residue cuz. I just rinse it out, but it's okay, cuz they're gon na wash it out even more as you guys can see. No they're not have taken completely all right yeah. So I'm gon na head into the bucket of warm water and um. I kinda wanted to do this process instead of just me putting the shampoo on the hair by itself because um I got crappy lighting in my bathroom, and I wanted to show you guys fully hands on without me. Struggling so again we're gon na be working smarter, not harder right, I'm going to be taking my chevrolet shampoo, mister purple shampoo, and this will help with the brassiness of the lace, because you guys can see it's a little bit orange and on the grassy side. So I'm gon na go ahead and pour this inside and you can find the purple shampoo. To be honest, I think you see this glass door or again Amazon. This cost 1099, from where I got it from probably gon na, be a different price where you probably get it from, but right now I'm gon na go ahead and mix that up. I can't take a water and I was kind of running out, so I decided to bring my blue shampoo and this is from Draco and this is to help on with orange. So this is to help yellow. This is to help Orange. So I'm gon na go ahead and mix the visit them just so in katako, both of them. Okay, now I'm going to dip my wig inside make sure that it is catching all of those knots. You could dip the whole thing inside and kind of like Loki already. You could kind of see it coming down already as soon as I dipped it in it's kind of funny, yeah we're just gon na. Let that sit for about 15 minutes make sure it is fully inside and was saturated with brassy goodness. You know all right again: 15 minutes, okay, so I actually left it on, but over sunny minutes and we are looking but we're looking good y'all, looking excellent eh. All right, so I want to go ahead and just watch this or French, this wig out and yeah. Are you guys you guys will see me with the finish result? I guess okay, you guys so now. These are the finished results as you guys, we are looking Freddy, a good idea. What awful and you guys, probably much tips and tricks. You should definitely get these results. Look at him will be a tricky room just yet the same. Oh boom boom, scalp, iana, scalp, okay, so marrow on to the plucking. I look so busted y'all, please do not mind. I mean do not mind me hit okay, guys so right now, what you want to do and honestly the key to plucking is to have good tweezers patients and also to you, just want to make sure that you put your weight on a mannequin head that actually Mimics, your head size and the reason why I say that is more so because you want to make sure that your wig is taut like looking look at how this wig is looking like right now, there's no prickles in it! There'S! No because it fits the head size exactly right, so you want to make sure that there's no brake hose and stuff to them when you're plucking you're not pulling or like you know accidentally causing holes because there's a little fold right here and you pluck right there And boom you just created a hole again and also till you just kind of want to have an idea of how a little like run your head, because if you put it on a smaller manikin head, it's not mimicking how a little we're going ahead. If you get I'm trying to say so, make sure that you put it on a mannequin head that fits on the mix the size of the wig cap it overall, I should get a wig that fits your head. So, okay, so right now and I'm doing this, I'm going to go ahead and keep in my wake down cuz again after security ain't Ness any no such thing as being too secure. Okay, and they handbook excuse my phone guys. My hotline is clearly blinking, alright y'all. So now on to the plucking, your lap will be a best friend and the reason why I say that is to be honest, pluck there's a lot more easier when you do it under lap versus when you do it on gara wingspan. Overall, you just get more control. I so blew me off. This is, will be long til, I'm gon na swim in a little bit a lot of it. Alright, you guys so now onto the plucking. Now, the way I pluck it's like a mixture of how people look, I guess like different styles - I guess okay, so I'm going to explain to you how I plug right. You want to make sure that you have your comb, but you also want to make sure that you're happy it squeezes we're gon na make sure that these three areas are not too sharp, but not too dull as well. A good brand for tweezers is tweezerman. Of course, you could also use equate, which is like a generic brand, that you can find it. I believe Walmart so equate, or just these are from the piece of my store, there's no name on it, but just make sure that they're pretty brand new. You don't have to choose sharp, because you don't want to cause hopes. Okay, alright. So what I do is mine is a mixture of like powerful people like I guess, both both styles of clucking clucking czar, you guys. So we have the people that go part by part. They part of the part where it's, I believe, like you know, that's like pretty plucked and they pluck behind. Once you see that it's not this dense bubble, that is not dance anymore. Then they go ahead. They do it again and I don't do that way. Reason why I say I don't do that. One is because I thought sometimes you end up over plucking and again I want you guys to work, smarter and then harder, and I thought I got times you don't notice when you are over plucking, which is normal. You guys, I even I over punk up to this day, you know sometimes I'll just get lucky and at other people will just go ahead and just go behind the hairline and just keep on looking until they get the density. Without you know doing the parts and stuff - and what I do is I do a mixture of oh, so I'm gon na show you guys great well, I'm gon na go ahead and take my call. I'M gon na go ahead and and where I'm gon na do is I'm gon na work in sections? So I'm going to look on one side, I'm going to go work in the middle and then I'm going to go work on the nethers on that next side. So again, I kind of like split it up into three sections, just that I'm not all over the place and the process don't take longer. You know so boom. This is what I'm going to do. All right. Infant go take out the part that is precooked because again as a beginner, the last thing you want to do is over pluck the front to the part you're balding. That is not a cute luck! You guys, unless you go on for the the little bill. Look then by all means glad you know, but all right so right now I want to make sure I get out every single piece that it is pretty plucked out of my way, just so that you guys can pluck in peace. I'M gon na go ahead into. Is I am going to take my tweezers and I'm gon na plug directly behind not in front but behind again you want to take away the Destiny from the back of the closure, so the for the culture, the back of the frontal, so that it gives the Illusion that the front looks like it's, you know being like, I guess like great-aunt. Let you give that and guess I agreed again effect in the front versus in the back, because if you're gon na continue to put at the front what you're doing you're taking out the front and then the back is still dense and then boom, you just created A whole big ball spot. No again, you want to make sure that you put directly behind so right here, boom right there right there y'all, and what I do is I kind of pluck. You want to make sure that you that you're plucking um with the tip down the slant should be at the hair. It shouldn't be where the point is that, because you're not plucking anything and on top of that two you're going to be able to create homes - and we don't want that again - slant down which is a slant - is hitting the lace while you're clucking. What I do is, I kind of drag it out a little bit, not too much while I'm so I wan na show you all right so and what I do is I kind of do like at least five different plucks before I move the hair out of The way so I'm going to show you guys so it's gon na be one. Two okay got a five boom. What I'm using is not the floor. I would say beforehand of my hand the side of my hand, so remove the hair that I am putting out, and this is mix it this would. This is actually what makes it easier they using the comb. She'S got to pick up the pole and put it in battle. We'Re gon na save that for later, okay, so again, so behind the hairline one, two three, four five, that thing five is a good amount just to make sure that you're not over plucking one. Oh just keep on doing that just keep on doing that it honestly. I would like to like, within this section that I've cut off, I like to work in subsections, so I'm just going to work mainly over here until I see that there's a significant change and I'm going to move over to over here. Okay and like I said when you're doing it, you want to kind of drag it. So your Oh you guys to see begin to somewhere. It'S looking pretty plucked already you guys and honestly. You always want to make sure that you're working with wet hair, you get more hair out. So if you feel your hair drying up just going with its braid routing this full of tap water, wet it up and come in. Second, this one two three four right and it's pretty much better days, but I'm gon na show you guys the whole entire process. I don't really nothing out if you guys had any questions on how to things, and I don't know if I could see a little different. Let me get in somewhere image, it you're just looking for any place that looks dense. Okay. So if you see a certain area, is anybody looking a little like already pre plucked move on more further back? Okay, so we're kind of a DC man just start to belt out a little bit move even further back or just hit places where you see that it is dead and it's not hard at all and the reason I do it is instead of like me. I guess like parting it in each section is because you see what you're working with and you're, not over plucking to the point like where you finally pull the hair back cuz, like god, damn I messed up you're, seeing everything as it goes. Okay, so it's really foolproof again, I want to make sure that everything is foolproof for you guys so y'all gon na be like a pro okay. Maybe I remember the hand is playing the place of the call just so they have to constantly pick it up and down and all this extra stuff and in all honesty, if you want to test out to see if you over plucked or not, you can always Place the the wink on top of your head and see how it looks and if you like this tool bolt or I mean I don't know how to help people's to low. But you thought: there's two big thick put it back, that medica head and then continue to pluck and that's more if you want to play it safe, but honestly I'd rather my hairline be a little bit thicker than what I would anticipate it for because frontal shed, Regardless you know, pretzels are made to last forever they're, actually a luxury, actually a luxury hair style they're not even meant to be worn for so long. You know so boom you get in somewhere. I think we getting somewhere usually I'll, play music while I'm doing this, but I don't want to get no copyright strike. So I'm a just four legs and two just for my people without the music so unfortunate, but it's okay, but for all my impatient people, music, is definitely suggested just so much you don't catch a something so impatient. Alright, so I got what a decent amount for me to comb out the hair. It'S kind of done wing part about coming up, and this is how much hair we lost. It looks like a lot the reality that Loki isn't, but it's okay, you're just gon na keep on and looking and looking until you get your dues, our hair, to look. You know now feel like you try see subs. You can pluck a little bit longer before you and use it for your forehand to push the hair back. You know, okay, I think I've tackled enough for me to pull the hair back and yeah. That'S not funny, okay, so right now, what one do is I'm going to push this hair back right here on the sides, real, quick, just to see how we are looking? Okay, all right, we want to let it see all right now, as you could see, this side is fuji. This eye is looking pretty good in certain areas, especially in this part that is still dense. So now we're gon na trust ourselves and we are going to hit the dense area. So I see that right here is looking pretty dense right. I'M gon na go behind the hairline. Look that out. How do you do it three times you've got a finger to snare it out. Okay, see it's still a little bit dense, pluck it out boom and again going to convince. If you don't trust yourself, you guys do at least one to three plugs. That'S probably even enough: okay boom boom; okay, all right! It'S looking less dancer ready, okay on to the next part, watching our peace. Okay boom. All right now on to this part, remember behind the hairline. Okay, using your forearms right just keep on going until you see the areas that were dense, don't look as density mark a and the good thing about after you bleach. Your knots is because of the bleach it kind of becomes the knot and it's easier for you to plug, which is why everybody cooks before also puts on bleaches before they plug. Ok, is it anybody make the process a lot easier for you and you want to work smarter, not harder. That is what the goal of this entire thing. It'S work, smarter and not harder and boom. Do you guys see that me get in somewhere? Oh this place up a little bit. Does alright is looking a little dense, okay boom all right now I think it's time. Questions are comb to comb out and see on progress, and we get some will we get in. We get in so we're. Okay, butter phone - and, to be quite honest, I really feel like this is enough. If you want to go further, you can, but I feel like you're gon na risk yourself over plucking and in essentially creating a bull spot. This is perfect. To be honest, especially if you want to do your little baby, is you could comb out? Your baby is still have the great plugs hairline going on without and looking too involved. So I'm going to leave it like this again, you don't want to over. Pluck again, if you feel like it's still not enough or that you want to put more by all means, but that is our risk. You are taking okay and I'm just going to show you guys the difference between the sides. Real quick! Oh my god look here. A little too dense, very quick, so this is how the pluck side looks as you guys can see. This is how the plug side is looking very says: the unplug side, there's a big difference. Look at that boom sleek IANA boom, Elvis Presley, sleek, Elvis sleep Elvis sleep, oh yeah! You guys it to be honest. It'S pretty much the same exact process all around. I am going to show you guys how to do the middle part on the middle section of the hair and I'm gon na leave this time, because it's the same thing on the side, but I do want to show you guys, the middle part. Okay, so go get it into bed all right, all right, so again go ahead and part it out our our pre plucked hairs. If you want to call it got a little dry, so we're gon na go ahead and spray it without spray. Okay, all right now we get so then for yours all right now, again we're gon na go ahead and look behind not in front Bubbe on na rear. Now, are you all right? Okay, there go you're gon na give the illusion at the front. Look like a spinning out so another for the front. So, like a spinning out, you got it thin out the back knocked it up the front because they you won't get a bowl spot. Okay, so all right and again like if you feel like you get comfortable, you got your momentum up. You could do longer ones before you use your hand to UM touch out the hair that came out back, okay, you're, a real, confident, and usually you guys honestly. I might go online, you don't have to pluck out as much in the front, then how you do at the size reason why I say that usually your parts are gon na be around here. Scuse my ashy hands. You guys know don't mind me, okay, i so usually your part is gon na go around here, especially like frontals and like this, where, like there's like a two inch parting side and all the six inches like here, it looks like mostly in the middle you're, not Gon na pluck and as much okay, we just wan na say that is you will not want to have a bald spot in the front, especially doing a little cutter. I said: alright, you don't want to have so much of a goal spot in the front. Everything else extends that's not a cute look so again, you're gon na out less than how you would on the side, it's okay and, in general, most hair lines, healthy, hair lines at that. Doesn'T look like that stuff like it's spinning out? Okay, but yes, you want to have that gradient effect, so it doesn't look a biggie, but you don't want to have it too thin out to the Plumber, like you look like you're losing your hair, it's not it! That'S not the look we going for, especially if you feel like you are losing air you're wearing this frontal. So you know as a protective style. You don't want to look like what she was coming from. You know Iggy, I'm trying to say we're not trying to bash anybody, but I'm just trying to keep it real with you there, okay, so again and as you guys will see, if you already started to see a difference again, we're not add so much and you Wan na make sure that you're not plucking in the same spot cake every single time, you're plucking, you're plucking in a different area. Okay, that will prevent you ever getting a boss fight legit, I'm just going across like that boom boom boom boom behind the hairline boom. Yeah see that already I don't know if you guys see what I've seen, but I hope y'all, seeing what I'm seeing. Okay. Okay, honestly, I thought this is good enough. That'S all you need y'all legit, all right now we're going to push the pre-cut hair back to double check, to see how it was looking Dan see that come on come on foolproof. Oh, that looks even better than what it was living with before a cage. Again. Do not want to have it out. I don't know why that look, especially because I know a lot of people are working class people and down wan na keep these photos longer than what people actually we're done front for so with that being said, do not plug too much cuz. You got ta, kill the longevity of your way, the last annual, if you wanted Selassie okay. So please just listen to me. Okay, listen! Let me lay down, listen, alright! So now I'm going onto this little side before I end this video all right. You see that all the hair is looking a little Dutch. You can clearly see that line of demarcation between the pre-flood side versus the non people exciting again, I'm gon na go ahead. Take our tweezer slant down wan na make sure you're getting it behind. Okay. This is such a small section, one doing like look that it got already thinned out. Okay, you don't need to pluck so much boom. Oh yeah. This is this is easy, easy it's gon na take quite this. You probably I'm gon na, get the first time around, but I promise you guys the practice and patience I'm going get. You got me BB, plucking, like pros. Okay, let it a little bit me that I should try it for me. You guys see that already come on. This is full off. Look at that hairline. You guys come on come on, yeah see there is. This is how we are looking. This is all you eating. This is Lucia all you need you guys again. Let'S go. I can see it being you know it's getting a little less dense go a little further back just remove that hair. Okay, and that is it you guys all right yeah. So if y'all want to see how it will look exactly again and how the plight wants to lay it slay it and stuff, because there is a little puffy right now, so I'm gon na go ahead and use my hot comb. I turned it on with it. There to heat up it's already heating up, I'm gon na go ahead and use my heart and I'm just gon na press it down. So you really get to see how it looks and I feel, like you really get to see if you like, I guess over plucked or not okay, but with my method, you guys this is not over, but apple, all right. You guys - and this is how we are looking perfectly free, beloved okay - sounds going to compare and contrast again with the pre-flood side versus the donkey foot side. Okay, so make sure this is damn okay, baby. Are you doing something all right so go? This is our pre plug side, oh she's, looking so cute, so ravishing uh just a dream. You know so beautiful, so beautiful, okay, alright - and this is Elvis parsley. This is a non free plug side. You guys can see a major difference, a major major difference. Just look at that difference: y'all, Oh Elvis, slinky, on huh, okay, maybe listening - and I want to thank you guys for watching episode, one of the free lace, frontal class. I wanted to bless you guys, because I feel like honestly what y'all constructive criticism since I'm drawing me in the comments to my past videos but again notice. The past yeah eisah taught me that you not need to fight my craft, and I just want to thank you guys for just everything you know like being there for me through day one when I'm over here, covering people's noses and stuff way with a wig cap. So now, like, I thought I progressed so much in these months and I feel like it wouldn't have been possible look but of course about God, but also without you guys. You know I want to thank you guys so much for that and I feel, like I told y'all you know so, and I feel like a lot of these classes he's so expensive and I already has the money for it. You know so yeah you guys. I just wanted to bless y'all there's a little present to you guys and I will be dropping a video. Hopefully every week on, the episodes of, like you know, do the free lace front of class cuz. This takes a long time, but yeah you guys. I hope you guys enjoyed this video, please, like comment subscribe to my channel, it helps my channel. I want to see my Africana fan grow, hopefully to a million. You filled me out, but I forgot my assets too much, but I hope you guys enjoyed this video. My comment subscribe and I'll see you guys in the next segment hope you got whatever needs that go sleeky. It'S lakeyanna. It was fresh you're filming my come on. Robbins you want to subscribe to me. Come on. I just i bodied this come on y'all. I freakin body this you guys what the free kill hit that so yeah. I hope you guys enjoyed this video. I hope you guys found this very informative. Any questions, questions that you do have that you thought I didn't cover in this video. Please ask them, hopefully I'll be able to cover them in my next videos and


Comments
Lameca Peer: I haven’t even finished the video yet but I appreciate you so much!!! I’m aiming to start my own wig business soon & you helping a sista out! God bless you
Fatima Bah: This is so helpful! Thank you I love that’s it’s not sped up and the vid isn’t cut. Makes it feel like we’re there and it’s an actual class
tiffanyjackson521: Omg I literally learned how to pluck my frontals from your tutorials thank you so much I wasn’t holding the tweezers right at all I couldn’t understand why hair wasn’t coming out and BOOM I TURNED THE TWEEZERS AROUND thank you for doing it in real time most of the tweezers videos are sped up I appreciate you so much
莉尔·乌兹: I love the detail & effort you put into this video
Shellz Lee: I absolutely love that you did this. I feel confident to go and try this now with your tips. Felt kind of lost before. So helpful! Thanks so much.
Eden: You’re amazing for this
Lia Simmonds: I don’t really comment on videos. But I want to say thank you so much for taking the time to make this video. I have learned so much more in this video than I did watching so many others. AMAZING. Keep making videos please
Perrcy.edos66: Thank u so much! This is do kind of you . I bought my first curly wig some months ago and I completely destroyed my frontal . But I will order a new wig and follow all your steps ! Thanks sissy
Asya Dixon: The fact that I was thinking about bleaching my wig on my own and you just posted this is crazy !!
Armani Wes: Omg I hope this really helps because everytime I try to bleach knots on my frontals, it always ends of seeping through to the hair and bleaching the roots of the hair. I make sure the bleach mixture is thick but I guess not thick enough. Thank you Beautiful Queen for sharing your tips ❤️
Kimoley Squire: Wow I think I can finely pluck an bleach my lace frontal to perfection
Kia: Ur video was the best tutorial on this subject i hv EVER seen! U didnt speed it up at all and showed EXACTLY where the tweezers are supposed to hit..THANK UUUU SO MUCH!!
Katlego Masibi: The plucking video I've beeeen searching for! I've learnt so much from this! Thank you!
Elaine Knight: Thank you so much for this, this was the best detailed customisation video I’ve seen
Cynthia Patton: Thank you so much!! I appreciate you!! Looking forward to next class!!
Beautyqueen Dennis: So glad I found your channel! Thank you so much. Definitely helpful
Cre8theFuture: This video came just in time. Thanks so much!!!
Jane Nsirim: What u have done in this video is just so amazing,u really came all out with this.Slow and steady,the BEST VIDEO EVER.....Thank u so very much...
Fatimata Diallo: Thank you ❤️ I learned so much more in this video
Renee Nelson: Thank you for the video. This is very helpful as I am trying to start up my own wig making business. God bless you.
Yolanda Wynn: Just finding your videos.....I bow down to your greatness lol, thank you soooo much for the fantastic tutorials!!
Destiny Jay: this video helped me soo much! ♥️
Yekiya: Thank you so much ! I learned a lot ! New sub
Koils Natural: 9:04 this tutorial was so detailed and informative even Tupac was happy
Alexandra Achille: One of the best tutorials hands down… thank you
Janisa1 Simmons: Best video on YouTube for bleaching and plucking so glad I found you
According2Cathy: I never understood why wigs needed to be bleached and plucked. You are such an excellent teacher that explained both reasons to me beautifully. You are gifted and I hope you get your cosmetologist license, if you haven't done so yet. Thanks very much and I definitely enjoyed your video.
Sea Otter: Appreciate this
Kandii's World: You’re BOMB.COM for thisGreatly Appreciated
prettyBrownskin_: Thank you for this!
Tatiana Buezo: God bless you for doing this ♥️
Grace Rebekah: Nah anyone ever tell you how amazing you are love ya for this!!!
Esther Lameille: Can you teach us how to layer the hair and add bombshell curls ?
chelsey: do you pluck all the way to the end of the frontal? thxx
Quiesha Denise: Your so amazing for this thanks love
Cathy: so after you bleached the knots did you dye the hair black? how do we go about dyeing the hair? like dye the hair first then bleach or bleach then dye the hair? nonetheless this video was very informative and i cant wait till my wig comes to attempt this for myself thanks sis
Rici Sutherland: Thank you so much for this ❤❤❤
Aniyah Pinkney: i’ve needed this video for years!!!!
Nàomi Jàyy: thanks girl I love it
Brooklyn Haynes: Yo my wig just came in and this video came at the right time
Nikky Celinee: Thanks sis ❤️
OG tt: This was so good !
•• C H I ••: I love this
Justice Mccain: You are so real for this
Princess Speaks: its the " Elvis, sleek " fa me. thank you for this. I learned a lot of tips!
ally Adjei: I love this ❤️
Amara Emele: You’re really bomb for this ❤️‼️
mm: Thank you so much‼️
Summers Beauty World: Thank you for this‼️ How long does it take you on average to pluck? This doesn’t seem that long and it’s not sped up!
Alexis Starr: Thank you boo❤
Erika Q: Can you use 20 volume developer instead?
T'Ara Johnson: You are so appreciated!!
SlimJim123: Great video!! Thank you for putting us on game. Btw, what’s the name of the Blue shampoo? I didn’t get it in the video.
Ninah Velez: You have such a bomb personality it’s so pure and your so funny and nice definitely I’m happy I came across you I have been on your page for hours
Jade Starr: Okay sis you’re literally the best
victoria: Do you bleach the actual roots or just the inside? I missed that
Nanalightbright: God bless you, for this
Tateakka Cummings: I just found you chanel today I watch this video twice I just want to thank you this was the most informative video ever
Nashay Virgo: You bodied tf outta this sis
JazNicole: I love you for this thank you ✨
Simply Abena: Wow thanks girl
Heavenly Smith: Do you have to bleach the knots? If not, what’s an alternative?
Nanalightbright: Do you do the purple shampoo technique on colored hair, as well?
MADD LYFE: love this
A B: Man SO DETAILED...LOVE IT!!!! YALL SLEEPING ON HER!!
Ahlani Ward: Yess! Your so talented
Ulumma Njk: God bless you for thisssss❤️❤️
Queen Queen: Thank you
Erika Q: You really the GOATTTT!!!!! I found you like a month ago and you sold me on day one lol. What hot comb do you use though?
imapromisetokeep: Wow that’s so much for this
Starr Jae: Thanks for this video
Boss Kay: Yassssssss all I need in one video
Itx Papabi: Thank you.. first to watch
Kennya Ducasse:
Zainab Jimoh: Yasss putting the girls on
Twig Itsmetwig: You are awesome
Vincent Houston: Thanks sis
tiffanyjackson521: Best video hands down
Official Cess: "I don't know how to help you if it's too bald"
Starr Jae:
J Gemini: God bless you ❤️
Mya523: Thanks for the tips . Could you do a video on how to melt the lace properly. I have all types of lace tints and it’s still not blending with my skin right .
Valerie Jackson: What if I have a 360 how should I bleach that if I can’t put it on the mannequin
Wiggins Hair:
Lona: Thank you. I’m Sleekiona or Elvis ❤️
Ny'Asia Johnson: I love youuu ❤️
Lovely Lenish: The Little Bill look
Daphynee Blake: What’s the name of the brass shampoo she using .??
Tahana: Oh yesss
Fatoumata Dukureh: You install wigs on other people?
Orignal Dorothy Curb: I messed up my lace front
Rashyia: Monetize so I can pay you
T'Ara Johnson: How do we know what size mannequin head to get?
Tamika Davis: 9
Tamika Davis: 9