How To Get A Sweat Resistant | Waterproof Secured Wig Install | Highlight Curly Wig|Unice Hair
- Posted on 05 August, 2021
- T Part Wig
- By Anonymous
●▬▬▬▬▬▬▬▬▬♛UNice Hair♛ ▬▬▬▬▬▬▬▬▬ ●
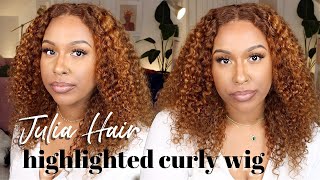
I am using honey color curly wig in the video: https://bit.ly/3rbzshl
https://www.unice.com/ ➤HOT SALE wigs: https://bit.ly/3hHFrYp
Can Not Miss!! Invisible HD lace Wigs available : https://bit.ly/3iaBDh5
Hair Information: Honey color 24inch curly lace front wig 13*4 150%
Using Special Code To Get 10% OFF:myunice
Quadpay & Sezzle Now. PAY 4 Equal payment Within 6 weeks!
New Trending Affordable head band wig: https://bit.ly/3i9ww0R
Recommend human hair bundles with closure: https://bit.ly/3xJ5qnE
Download “UNice” App on your phone➤
https://link.unice.com/appdownload-you...
Bargain Now! To Get FREE HAIR on “UNice” App➤
https://link.unice.com/bargain-ytb
Exclusive Price Hair ONLY for “UNice” App Users ➤
https://link.unice.com/exclusive-youtu...
Aliexpress UNice Hair Store ➤ https://s.click.aliexpress.com/e/_pvse...
Amazon UNice Hair Store ➤ https://amzn.to/2zxP2gm
Instagram @unicehair: https://www.instagram.com/unicehair/
YouTube @UNice: https://www.youtube.com/c/UniceHair
Facebook @UNiceMall: https://business.facebook.com/UNiceMal...
Want To Promote? Order Problem Contact: [email protected]
#unicehair #unicewig #bettyou
Welcome to IAmBeautifulHustlerTV .
Be sure to SUBSCRIBE & TURN ON YOUR ALERTS
Follow My Socials:
Instagram:_Beautifulhustler
@thebeautifulhustlerbrand
@iambeautifulhustler
Twitter:_Beautifulhustl
YouTube :IAmBeautifulHustlerTV
✨For Sponsorships ,Reviews,& Questions
Email:[email protected]
Contact : 786-571-1313
——————————————————
To BOOK APPTS
TEXT 786-571-1313
To Purchase Hair & Products Www.ibhslays.com
Allow 3-14 Business Days For All Orders
——————————————————
#Youtuber #YoutubeVlogger #YoutubeReviews #Hairtutorials #Miamihairstylist #Miamihair #Duluthhairstylist #TravelingHairstylist #YoutubeTutorials #GeorgiaHair #GeorgiaHairstylist
#Atlantahair #Atlantahairstylist #Celebrityhair #CelebrityHairstylist #SouthCarolinaHairstylist
#thebeautifulhustlerbrand
Stupid guys, i didn't, is this camera on me? Yes, that's stupid, use your common sense quit playing. I didn't do this stuff. This is not me, i'm fighting for my life, hey guys and welcome back to my channel. I hope you guys enjoyed my little tick. Tock promo video that i told you guys i was working on and i'm going to show you how i installed that beautiful curly highlighter wig and it is provided by you, nice hair. This highlighter wig was super super dope super pretty. It was definitely giving you know. Beyonce vibes definitely definitely and because the hair is already brown like at the roots. You really don't have to bleach the knots, but i do recommend that you do go in and pluck a little bit more. That way, you can have more of a more of a natural hairline, so i did go ahead and do that and i will be showing you guys how to create a waterproof um install waterproof, sweatproof uh resistant install on yourself. So, for starters, i already have my ball cap method. On i mean you know my ball cap on and everything like that, but i will do an updated waterproof video with a like start to finish with the whole braid down and everything so make sure you guys do have the notifications turned on for that, but we're Gon na go ahead and get started, as you guys see. I do have my ball cap on already in this video, so the first thing i'm doing is just placing the wig onto my head and i'm cutting off the extra lace off the sides um. I usually do this step after i beat on tack the wig now, but i just decided to do it first, just to make sure that the wig, actually, you know, fits my head perfectly so now that i did that i went ahead and before i even you Know started this video and cleaned my hairline with the 99 alcohol. So you did see me just take some of their skin protectant and just spray it on the front of my hairline. So now that i have that on there and i let that you know pretty much dry into place, i am taking that ruby, kisses foundation and applying it on the inside of my lace and i'm just going to go ahead and get started with the layers. Now for this install, if you are a person um who does sweat not a little bit but like a lot like a heavy sweater or you work where you always, you know maybe in the sun a lot or you know you just a person who wants. You know like to get your hair wet and everything like that. I highly recommend five to seven layers: okay, seven being the max do not exceed seven layers, honestly um, because just don't like just don't um and don't worry, because i know some people like oops. That'S a lot of layers, but we do have our lace remover. That can help you safely remove your lace and it is a oil-based remover, which is, you know, actually good, because you're not drying your you know your skin or your hair follicles, and none of that out. You actually be able to remove your wig nice and safely, and, as i mentioned, it is all based so for a waterproof, slash, sweat, resistant, install. There are a few key points that you want to focus on. First of all, you want to make sure that you are applying enough glue um for each layer, and you are spreading that glue about an inch wide. I like to say about half an inch onto the cap in the other half of the inch onto like your skin hairline area, because you really want to make sure that you are applying enough glue widthwise. That way, you have like a nice foundation to what your wig is laying on and it will. You know, help maintain that wig to stay on in place and also as you go through each layer. You want to spread the glue out as neat and as flat as possible. That way, you will have an easy transition on adding more um glue between each layer and um. It was another tip i wanted to give you guys. You want to make sure that you do not skip that very, very first important step, which is cleaning the hairline. Some of you guys try to skip over this step, and you just cannot you have to make sure that you do clean that skin because having oily skin or makeup or dirt, like all of those things, prevent your lace from sticking. So before you even begin, your sweat proof or waterproof install make sure that you clean the hairline thoroughly. I typically clean my hairline at least two times before, applying my lace and three times. If i have on makeup before i actually do my wig install so the key factor make sure your skin is clean and two make sure you are spreading um. You are applying enough glue between each layer and key number. Three make sure you are spreading it out. Nice and evenly and number four, which is the most important, make sure you are using enough layers now i do have a video if you just want to do a nice little light hold, whereas one or two layers um and i've done some regular hold videos. You know three to four: that's you know get you a couple weeks. You know wearing air, but if you really want that, like baby stuck like chuck waterproof sweatproof, you do need to use five to seven layers. Okay and in this video specifically, i use six layers and honestly, you can still achieve a waterproof um install without even using six layers, and i will do that in the updated start to finish a waterproof video that i want to do, which will include the braid Down and the ball cap method, so um make sure you guys, like i mentioned, stay tuned for that. But, however, now that i have that last layer on and it has turned clear - i'm going to go ahead and pull my lace right into that glue and trust. Me y'all it no matter how many layers you are using for your install once you place that lace into that glue. It'S secured it's just that's just what it is. It'S gon na be secure. It'S gon na stick you're gon na be fine and honestly, like i mentioned all the time, it is hard to install your own wigs on yourself. So the fact that you actually can have a glue product that actually sticks and you don't have to worry about your wig flying up every time you try to stick it down. It just makes the whole process so much easier. Okay, so wig is secured and now i'm just going to take the blow dryer on the heat setting and i'm just going to blow dry that lace right on in, but do y'all see the color tones in this wig. It is super super pretty like you. Have your main color, which is like a nice little sandy brown, and then i see some highlights of 613 and some highlights of 27, and this wig was super full and density like i love a full curly wig. Now it's kind of tricky in this video, because the finishing look that i did like um for the um event that i was going to the next day, because i did this about you know really late at night and then i woke up and i had to Go to a networking event and i actually switched the style um. So in this video you will see, like me finishing off this tutorial, like the little top ponytail and the two little curly strips in the front, but for the event that i actually attended. I ended up making it a regular side, part like what you seen in the beginning in my tick tock, video, so y'all. This video was a little all over the place. I'M not even gon na lie, but i still decided to bring you guys this content anyways, because no content goes to waste um. It might be something in this video that you needed to see that i did not show in another video. So that's why i still decided to drop this video. So, like i mentioned um towards the end, you will see me doing one style, but my final look with my makeup and everything will be the side part that you've seen in the beginning of this video. With that tick tock, so um yeah - i hope you guys are enjoying this video so far. Now that you see i tied it down with that melt belt and now let it sit. I just went in with that lace, glider and i'm just razoring off all of the extra lace. Now you have to be careful, because this wasn't no hd lace, okay and it wasn't transparent lace. It had somewhat it was giving like a light brown - maybe medium um, lace, color to me so um. I did not want to go with a foundation that was too dark, so i went in with the foundation just that i normally use just not as much because it's easily to make my lace look too dark, so um. Now that i cut that extra lace off before i add more foundation um to make it blend just a little bit better um, i am going to just tuck down those little cracks and crevices that are still lifting on the edges that i did not get to Apply the glue to which is totally normal y'all. We all know everything don't get tacked down the first time. Sometimes you got to go back in on those edges and work that glue in there, but once i get everything tapped down, i will go ahead and pull down the hairs in the front for my baby hairs and then i'm going to add a little foundation. The same color i use just um to darken, not really darken the lace, but to just blend the lace in more and then i will show you guys how i created my baby hairs, which i wasn't the biggest fan of in this video. I'M not gon na lie y'all, but i'm still gon na show you guys how i created my baby hairs using our newest product, the um glueless and baby hair gel. So the lace melt liquid, gel okay. So don't get the lace, milk, liquid gel and the lace smell adhesive mixed up. One is the glue. One is a gel okay, so i will be using that lace melt liquid gel to construct the baby hair. So just stay tuned for more and yeah. You guys will see it so so so now that i went ahead and removed that milk belt, i'm just going to take that lace, spider once again and just go ahead and um begin to raise down the baby hairs. And then i'm going to go in with the lace, milk, liquid, gel and just go ahead and do my baby hair, so um. The key to baby hairs really is just making sure that. Well, it depends to me honestly there's no right or wrong way to do baby hairs. Let me just say that, because everybody likes um, their baby hairs differently, so you can't say the way somebody do. Some baby hairs is wrong. Some people, like their baby, hairs shorter. Some people, like their baby, hairs, thinner some people like their baby hairs. Fuller, some people like the fluffy messy baby hair, some people like the baby, hair salt, some people like their baby hairs. You know a little more firmer in place, so there's really no right or wrong way. Just do baby hairs the way i guess that you like, and as far as like working on the client, you can ask them like the kind of baby hairs they want or some you know some clients just be like girl. Just do your thing whatever you do, you know fine with me, because clearly, i've seen your work, so there's no right or wrong way, but this little thing that i'm doing here um is a tip that arrogant, hey, released in his class. I didn't take the class y'all, but i know somebody else was gon na spill: the beans on youtube child, of course. So this is a technique that eric and tay use. Now you have a choice of curling, your baby hairs upward um, which is a little more safer because you i i really curl it underneath, but when i'm doing like a client but for myself yeah, i'm going to curl it upwards because i ain't trying to burn My forehead or whatever, like that, especially because it's already hard enough to do this in the mirror or in a phone camera and trying to get it right. So if you can guys go ahead and purchase you like that, really really! I don't even know what kind of flat iron it is, but it's really really tiny. It'S perfect to curl the baby hairs before you style them, which will make it easier for you to actually swoop them. Instead of trying to create the soups on your own with just like your product and your fingers, curling the baby hairs before you actually um style them helps. And if you really like the fluff, the fluffy baby hairs, i would say curl them upward, because once you swoop it, the hair will kind of fluff. You know like to the side easy or you can um curl them underneath it. Just i don't know just be a little different. Sometimes i guess it depends, but i'm just trying to go for simple baby hair. Today, y'all like i wasn't really trying to do the most um and i was just really trying to be done. To be honest because, like i mentioned it was late, and i know i had to be up early to go to that networking event but um yeah. I am using the baby hair gel and i'm just going in swooping and smoothing swooping and smoothing until i get the desired baby hair look and then once i am done with that, i will go ahead and get into the styling and, as i mentioned like earlier, In this video, the style i did here and the style was actually my final look for the next day was two totally different styles, but i still decide to show this part of the video just in case. You actually want to wear your hair in this. Look. Now i did this style before for my birthday earlier this year and the hair was just like um, really really, it was just longer and it was just in a natural color, and i think i just did like less baby hairs. So pretty much um, even though this is not a full lace frontal with full parting space. I still kind of finessed it to look like it was so um the tracks start higher on the sides because, like i mentioned it's not a full lace front too. So i kind of had to like pull the hair up and then pull the hair in the back where the tracks was to kind of like hide the tracks. So you don't see it um, so um pretty much. I just grabbed some of the hair in the front. I really care to make no straight parts or nothing in the back, because it's not no full frontal, but once i got it um to where i wanted it, i just used a little um. I just used my wax stick and just a little holding spray to kind of like mold and smooth everything into place. So you can just do the same thing that i did here and i'm also just using like a rubber band to secure it. And then i'm going to kind of pull it tight. Just to you know, make sure it was nice and secure, and i am going to get these curls like defined using our define me curling mousse from our um. You know from our collection, but before i get into that, let me just go ahead and you know smooth this ponytail area up just a little bit. I didn't want to make it super hard, because i know i was going to end up changing the look anyways, but i'm just you know. I just did it kind of neat enough, so you guys can get the picture here. So i am going to take a little piece to do the wrap around the ponytail, because i really hate when rubber bands show on these type of styles, it's better to just blend that rubber band in with the real hair. By doing a little um wrap around that, you would, if you were doing like a regular, a weave ponytail. So i just take a thin layer and holding spray, and i just keep wrapping until that. Rubber band is invisible and i just go in with the blow dryer and just blow dry it. So it's like yeah gone okay. So now that i did that um, like i mentioned, i'm just going to take the mousse and i'm just going to add some of that mousse to the hair to define the curls and then i had kind of did like a hold on wait. I'M not done yet. You know i do a little transition because you supposed to come back on with your like face, beating stuff yeah, i'm gon na do that, but um it's gon na be a whole new hairstyle. So just beware like this is pretty much what you're gon na get as far as the final look for this, because once i add that mousse um that's pretty much gon na, be it and yeah did y'all get the most. Oh, my god, y'all smell, so good. Don'T it smell good y'all and don't get them crushed popping. You see how i just took that mousse and i combed it right into their hair and it get those you know it got those curls, nice and popping and defined. So i'm just gon na do a little bit of that towards the end of the ponytail and the hair to just um define it. I don't really want the wet look um. I just really don't like the wet look for these type of styles, like i feel like. If you go to the ponytail, it should be nice full and fluffy, but to each his own. So i'm just going to add mousse and no water whatsoever, um just to define those curls and then like i mentioned, i would do the whole little i'm supposed to go and come back but it'd be face, but it's going to be a whole new look. So just stay tuned for the finishing results and that pretty much finishes that look, but i'm going to go and come back with my regular sapphire and a little might be um. So this is actually how i wore my hair to networking event. But overall i hope you guys still enjoyed this video. Thank you guys for watching and i have another video coming so stay tuned.
Comments
Dej Marie: This hair is literally perfect for the summer transitioning to the fall . These girls better get their lace ready for end of the summer parties . I hope you’re healing well
Delnesha Smith: Your videos are GREAT and I love all the tips you’re giving. I will definitely be installing my own wig soon.
Mellecia Maynard: Girl the products right behind u we need a restock we need our lace to slay like yours
Robin Robinson: Hello I’m praying for you to have a speedy recovery. I’ve been waiting on this install. It is baby. As usual you made this very detailed.
Kemo Bennett: you never disappoints shae....and I thank you so much for still posting during your recovery....love you, peace out.
stephine brown: Looking so pretty!!!I am glad you are healing up looking good!!!❤️❤️❤️
Christine Zapata: Love this color and you nailed it!!!!! Can’t wait to see you
Louise: Love the color it's beautiful
Aquanetta Holmes: Yes. Praying for a speedy and safe recovery ❤️ But ma’am, you always deliver Are you laying the hairline directly in the glue or a little in front. This one looks like directly but others it looks like a little in front of the glue. Does it make a difference ?
Almighty Maccc: #HIGHLYREQUESTED YESSS I’m here for the WATERPROOF METHOD #BeautySquad
lneal2800: Wheww! This is beautiful!♥️hope you are doing much better sis!
J Gurl Luvs Me: You always killing it with the lace luv❣️
Destiny Green: This color and texture is giving lil Kim vibes and I absolutely love it!!
Julia Shaw: Yassssss to the color hope your recovering well
PreciousJobel: Your glue is everything. All my clients swear on it. Love you love your work as well. Hope u feeling stronger. @beautifulhustler
O'Shea Brown: We missing you and those slays right about now but praying for speedy recovery hustlergang
Ayrianna White: glad to see you back posting content!!! LETS GO !
Truthbetold: Beautiful
Cutlass Supreme: This is Crazy. Sometimes yeah its cool; but i just hate that there is a percentage of black women who feel that they need this extra enhanced artificial style of beauty. Yet & still, i wouldn't mind my significant other going all the way with a look like this. Just as long as she knows that she doesn't have to rely on this form of beauty to be beautiful.
Student0fLyfe: Chileeeee, u understood the assignment and u SLAYED!!!! …..yassssssss!!! ❤️
It’s Ohthatstoya: Yess i need this lace glue
Kelly Davis: Absolutely beautiful❤️❤️❤️❤️❤️ Off topic but do you know how to remove dye from a curly hair wig without the curls dropping out. Really need some help
Marissa Frazier: We missed you ! Hopefully your on great spirits . Wig LAID
TheButterfly🦋: Don’t like it in the half up half down but the last look was beautiful
Valerie Naylor: Gorgeous
Jackie Carnegie: Hope. Your better missing you glad to see you again loving the stylexxxx
Princess Toyia: Yessss sugar plum. I'm so glad you uploaded. I love the tik tok!!! You better be taking care of yourself. Love you friend. ❤❤❤❤
ThatSexygurllllT 🦋: Where can I buy the Glue and Spray at ??
Kia: When is the restock Queen? I see ur adhesive but the remover is out. Can you remove it with other adhesive removers? I want to get ur adhesive so bad but idk if i hv to hv ur entire system to get ur results.
SlimJim123: Can you pls restock the melt belt this week? I need it bad!!
Shakita Brown: Hey sis hyd? I love your hair .com like always❤️
octavia little: Yesssssssss Shae!!!! ❤️
Stacy Ann: I want to purchase your glue but I’m always late
Menaa Gulley: It’s the intro for me
Morgan Denise: Where did u get ur nose hoop from?
Tava LaSha: ❤❤
deseraymiles87:
Ramamoorthy Mangai: Hi very beautiful
kash.baby.zyliah: Misssss you!!
123reletive123: The into
DollFaceDeluxe: " is this camera on me?".. i died.. i luv u so much..
Jasmine W: Nice, products sold out
Brandie Riggins: I don't know who disliked this video, but THEY LIARS! There's nothing about it. As always BHQ.... You a Slayer