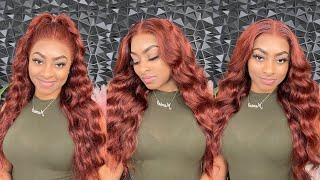
Arrogant Tae Inspo|Ponytail With Fishtail Braid |Best Pre-Plucked Straight Wig|Julia Hair-
- Posted on 13 August, 2020
- T Part Wig
- By Anonymous
Use Special Code get Extra $10 OFF: y3tb
●▬▬▬▬▬▬▬▬▬♛Julia Hair♛ ▬▬▬▬▬▬▬▬▬ ●
I am wearing a straight wig https://bit.ly/3amsj5n
Hair detail: 13x4 lace frontal 150% density 26 inches
To see AllyiahsFace short bob wig 14 inches https://www.youtube.com/watch?v=Kzjaqm...
☛Up to 50% off for New arrival u-part wigs https://bit.ly/2PMUfWH
☛New fake scalp wigs https://bit.ly/3gVuLCo
☛Easy and affordable headband wig https://bit.ly/2XQoalp
https://www.juliahair.com/ ➤Hot-Selling 10A wigs https://bit.ly/3am0Cd8
New arrival wigs &hair bundles https://bit.ly/33T8odb
7A great hair with closure & frontal https://bit.ly/2Cnz4Yd
☛Up to 25% off for Top selling hair https://bit.ly/3fP4KDv
Affordable hot selling short Bob wigs for summer https://bit.ly/30RoO47
Can not miss Beautiful Colorful wigs & 613wigs https://bit.ly/2XUGYzX
AliexpressJuliaHairstore : https://bit.ly/3iAnzvX
Subscribe #JuliaHair monthly giveaway on YouTube: https://goo.gl/6z9tvz
Follow IG @juliahair_no1: https://www.instagram.com/juliahair_no...
Inquire Now: WhatsApp number: +8615038958671
Welcome to IAmBeautifulHustler TV
Be sure to SUBSCRIBE & Turn ON Your Bells✨
TO PURCHASE MY HAIR & PRODUCTS FROM MY BRAND: (TheBeautifulHustlerBrand )
Use Link Below ⤵️
WWW.iBhSlays.com✨
We Ship Internationally ✈️
TO CONNECT WITH ME ✨
Personal IG: Iambeautifulhustler
Business Instagram:_Beautifulhustler & @thebeautifulhustlerbrand
Twitter:_Beautifulhustl
YouTube: IAmBeautifulHustlerTV
CONTACT ME✨
☎️ 786-571-1313
Email : [email protected]
Party, hey beauties and welcome back to my channel today we are doing a. How can i say the stylist. This is a arrogant, inspired, look uh! He did this look on jada um. It is a lace wig install with a ponytail with the fishtail braid. On the end, with blunt ends, i know it sound a little bit like a lot, but i will show you guys, of course, in this tutorial now. Today'S hair is sponsored by julia hair, one of my favorite companies. They sent me over this beautiful 26 inch wig. Yes, it came pre-plucked and everything um super super full love, it love it and i just went in just a little bit more and plucked a little bit more. You know i went ahead and hot comb, the hairline back, so it's easy um to install now. As i mentioned, the style we were doing was the ponytail with the fishtail braid um, and it's going to be like blunt ends and today i'll be installing it. On my girl, mulan so first and foremost, i've already started with her bald cap, i'm just going to go in with some liquid foundation in color 375. um. I ran out of my ruby, kisses um level 16 palette. But if you are using ruby kisses, you will use a level 16 for this skin tone or for her skin tone, but because i don't have it, i did go in with that. Um fit me foundation and i applied it on the inside and top of that lace and that's the color we'll be using today for her lace, melt now, um first things. First, i already went ahead and cleaned her hairline with the beautiful hustle lace, prep alcohol, and now i'm going to go in with my large bottle of lace, milk adhesive and i'm going to apply five layers today for her installation. I really love this install. It was something different that i have not done on my channel um. I'Ve done, you know, like top ponytails, but the way this ponytail is for this style. As you seen in the thumbnail, it's like a straight back ponytail and then i did the fishtail braid and y'all listen. I had to watch my youtube video to refresh my memory on doing a fishtail braid, because i have not done a fishtail since 2012, so this is really like a throwback braid, but you know you know how tasty a piece of stuff hit them. Hairstyles come right back around, but however um i went ahead and applied all five layers, and now i'm just going to go ahead and pour her lace down into that glue. Now you do want to wait till that cl uh. That glue turns completely clear and that way it's you know you can lay down your lace, nice and neatly without any white residue seeping through your lace and then you know, messing up your whole install so just be patient, make sure you clean the hairline and you Spread those layers of glue out nice thin and evenly, and that way it would turn clear with no issues. So now that i have that lace pulled down, i'm going to have her hold each side and i'm gon na go in with my blow dry in my comb, and you know blow dry that lace on and also you know, i'm gon na be adjusting the camera. A few times um in this tutorial, so i can get really up close and personal with the sleigh, and i do have a little bit of new techniques i've been doing before you know. I'M applying the melt belt to you know really melt that lace in so tune into that as well. But, however, i hope you guys enjoyed this tutorial. Thank you guys for staying tuned and keep watching. It was good. So here is new technique. Number one um before i apply that melt belt um i like to now hot comb um the hairline of that lace, because with that heat, just like how i use the heat setting to blow dry, the lace in when you use the hot comb that real real Real heat also helps with melting that lace right on in so i did go ahead and hot comb um that lace back and now i'm going to go ahead and tie down um that front. You know front end of her lace and i am going to let that sit for 10 minutes. So i can really really uh cure into her scalp and also um be tacked down and after 10 minutes, i'm going to go ahead and remove that and then i'm going to go on with my eyebrow razor and razor off the extra lace. Now the key to getting that really really melted, um hairline um for one you want to cut all the extra lace that is not needed and most of the time, if you apply the glue in the right place, um it should most of the wig should already Be tacked down um, it won't be perfect. I mean for right at this point right here. I really got up. I put enough glue uh to cover most of where that lace needed to lay. So it's not much, i would have to tack down, but i did cut. You know razor cut as close as possible to the hairline. That way, i can get those really uh, melted and natural results, and i'm just taking my fingertips and just pushing that lace in to make sure that it's melted and i'm just making sure i'm bringing that lace from you know make it sit comfortable around the ear And i attached a video on the side, so you guys can see. This is no filter, um. How that lace, melted and that's before i even tucked everything down. So now i'm going to go in and take everything down and it will be even more like secured and melted other than that little footage right there. I showed you so um. This glue is awesome and i'm not saying just because it's my glue, but you know it's all in the sales, it's all in the reviews that i get like everyone. My products do not last 12 hours. They sell out every time extremely fast. So if it wasn't a good product, people want to be buying it, and i have a lot of the same buyers over and over again as well. So it's like you know, i remember you know i memorized the names at all the time. So i know those who really purchase my glue every restock like i have y'all names down. Okay, like every time i see it, i'd be like yep, that's my girl, yep, that's my girl! So for those of you who have supported me um since me releasing my products january 1st, thank you. Thank you so much and to the newbies y'all missing out. Okay, like this glue, is really the bomb um. If you have any reviews on my glue be sure to um, you know you could dm them to me. You can comment down below in the comment section because i screenshot you know the reviews and i do post them on my brand page and as well as my main page, so make sure you guys take the time out to do that. Um but nevertheless um her wig is being secured. So now that i went ahead and laid down that wig on that side, i'm going to go ahead and repeat the steps to the other side and i'm just going to get up close and personal with you, because i really want you know you guys to see In detail - and you know in clear vision, exactly what i'm doing and now i'm going to go ahead and begin to section off the back part from the front um. You do want to leave here to make sure that you do cover up other tracks in the back. This is like any of my other ponytail installs. As far as this part just make sure you section it off nice and even from ear to ear and have the checks to cover the back part, and then i will go in with my glam wax stick and hot comb and really press that back out. Nice and neat, and that way um you know i will begin to hot comb that down nice and flat and begin to how come the front for the ponytail as well. So now that i have all of that hot comb, i'm just going to section off the back by planting all of it together and i'm going to go ahead and get the front part all laid down and get ready. You know get it ponytail ready. So for the sideburns, i'm just going to leave the sideburns down straight because i'm going to end up just raising it down just slightly shorter, but as far as the baby hair, she just wanted two swoops in the front. Um, like you, know the two big swoops. How uh jada kind of had it, and i will attach a picture um to show you the style that i'm referring to um? You know so you guys can get a visual of the look that i was going for, but once i get everything all nice and sleek and hot comb back using holding spray in my glam wax, i will go ahead and show you guys how i do the Fishtail braid in the back of the ponytail, what's good and as you can see guys, her lace is looking super natural super laid and we are not even done yet. We haven't even tied it down yet for their second step melting process, and it is t okay, like don't sleep on my products. Y'All, like just don't sleep because a lot of people sleep, a lot of people go for the hype, um who's, trending and everything like that, and you know it's just like. Never sleep on the underdogs. That'S all i'm gon na say, like everybody has their time to shine, and you know everybody has their season and my season is very very near. So don't try to wait till y'all feel like i'm big and then oh, let me get it now like. No, you can get your quality products now. Don'T wait till the glow up to show up and support. Guys like this glue is the bomb your laces will be melted, your lace will be stuck, you can get wet like. All you have to do is follow directions. Follow the steps follow everything i show you guys in my tutorial and you on my tutorials and you will get the maximum results and you know um yeah, just don't sleep on the beautiful hustler brand. That'S all i'm saying i do have quality products. I only use my products when it comes to doing my hair and anybody else's hair. So every picture you see, that's all me, that's what i'm going to say and no. I do not feel to my work. My pictures are anything like that. So what you see is what you get, and you know i love doing this tutorial, so you guys can really see what's going on because you can't filter tutorials. But if you can, i don't know nothing about it, but i don't need it so, like i said guys, what you see is what you get but, however, right now i'm just gon na go ahead and um. You know i flat ironed the back, because you have to do this part first before completing the ponytail, because the hair in the back needs to be neat. So i went ahead and hot combed it and, as you can see, i went in with my glam wax and um. I just sprayed it. You know i rubbed it on there and i'm just gon na go through my hot comb. I mean go through the hair. One more time with my flat iron just to get it nice and sleek, and just making sure it's nice and straight, but shout out to julia hair uh. This wig was really really bomb. As you can see, this hair is soaked with no problem. This hair is nice and soft. It'S full like. I am loving. This 26 inch straight wig that they sent over to me and it is a lace, frontal wig, which means you can part it um. You know anywhere. You know as far as like it's just like. If it was a regular lace frontal, but now i'm gon na go ahead into doing you know getting to doing the ponytail part. As i mentioned, for this style, you have to sleep the back down first, because this hair has to go on top and right now. I'M just going to quickly grab me, you know some small black rubber bands and i went ahead and pulled the ponytail in just so. I can kind of like pre-prep everything to be laid, and next i'm going to go in with the holding spray spray across the hairline. I'M spraying it on the hair as well, because you know i will need that to help me sleek everything down and i'm just combing everything away, um from the hairline um. This helps just make sure that you know all the hairs are laying down flat nice and neat, but i put that wax stick and that hot comb to use to get that really nice silky shiny straight um. You know look as far as the ponytail area, so uh once i go ahead and spray that thing down again. As far as on the hairline, i will go ahead and tie that down with the melt belt as well, so so and now that that milk belt is on um, the wig is security. So you know i don't got to worry about pulling too too tight and you know anything like that and it's hurting or every you know anything so um. I always you know it's pretty good. It'S pretty. You know it's just best that you do um. You know use something to secure that lace as you're pulling and groping the ponytail, because you know the glue hasn't cleared completely yet so you want to cure completely before doing any tugging and everything like that. So i went ahead and i put the rubber band on there and i'm going to show you guys how i do you know it's making sure it's nice and flat and me and i'm going to show you guys how to do the fishtail braid and i also Did the wrap around part around the rubber band y'all know i hate to leave the rubber band showing so i will um you know, get that all together but um right now, i'm just going to go ahead and remove that melt. Belt and y'all know it's gon na be a lace slate, of course, but y'all know that already like. If it was melted before then i don't know what she called it, not because it's just it's teasels it's tea and i'm gon na adjust that camera some more. So you can really really see um what's going on and that lace is. This is her hair. So that's all i'm gon na say about that. This i have but moving forward, i'm gon na go ahead and i told you i was to cut those sides down. Just a little bit shorter um, she wanted to leave like the little long straight sideburn thing so um. Now i'm going to go ahead and razor down that baby hair, but not too short, because she did want the long um swoops in the front. She didn't want. The short baby hair, so if the person want longer baby hairs, you just don't cut it as short, so, instead of cutting it down less than an inch just leave it an inch or just a little longer - and i didn't really go into details with the swooping Part because it's just you know, i use um the holding spray and i just swooped it into the hair on both sides. Just quick and easy like that, and you know i'm just securing it and blow drying and making sure it's nice smooth and it's neat and using that blow dryer on heat, to do that as well. So now that i have her baby hair, complete, i'm just going to make sure it's combed in with the rest of the frontal part of this wig and just making sure everything is nice and neat. As you see here and then i'm gon na focus on that fishtail, like i said guys it's been years since i've done one. So i had to refresh my memory but um yeah. We definitely slayed the fishtail braid um. I just want to say it. It'S very! Very simple, like it is easier than you think um. I actually want you guys to you know if you um want to try this out this style, make sure you guys tag me stop and repost and um. You know everything like that and, of course, i'm doing a wrap around, as i mentioned before, around that rubber band. It just gives it that nice, seamless and neater look so once i get that thing all secured, i will go ahead and begin fishtailing and with the fishtail braid, all you do is take the ponytail. You split it into two, and once you split it into two, you just grab tiny sections from each side and you pull it inward and you just do that all the way down. You go section by section little piece by little piece on each side and you just pulling each little section into the middle and you just grab it more from each side and pulling it to the middle, which i will show you guys more in detail. Once i begin it and then i will just speed up the process and show you um what i did. You know what it looked like going towards the end of the braid. Thank - and here is what the fishtail braid looks like once i'm complete and i left the end straight and i just secured the end with the rubber band and i'm just taking some holding spray, and you know just spraying it so it's you know everything is nice. Neat no flyaways and um, if you guys feel like you want me to go more more in detail with the fishtail bridge. Just let me know down in the comments, and i will be glad to do so and i'm just taking a a flat iron and flat ironing that piece out but um. Now, i'm just gon na have her stand up, so i can cut the ends. Um. Even blunt, like i mentioned, this is a 26 inch wig and you guys see how long it is on her and she's. Maybe five five, maybe five four um - maybe even a little bit taller than that, but you definitely get your money's worth because this week look way longer than it's supposed to be like. It was literally on her butt as a 26 inch and she's way taller than me so um here is the finishing look. I hope you guys enjoyed this tutorial. Let me know what you think about this install down below and thank you guys for tuning in

Comments
Zippora Grace: Your season is around the corner sis periodddd. Love your motivation! Im definitely buying this glue. Greetings from Belgium xx
Breyana Thomas: I’m getting this hairstyle tomorrow I can’t wait I love it❤️❤️
Tha 1 Gurl: When I say I have watched all of ur videos . You nail every hair style very simple and sleek
modelchiic17: Menopause is real and my wig stayed on for 4 WEEKS PERIOD !!!!! That GLUE is everything thank you !!!!!
Wonuola Abisola: All I can say is SIS YOU DID THAT
Anne Reddick: That looks nice it makes me want to buy a wig !!
ChicStyleYoYo: This is bomb!! You did your thing forsure, great video
Shell Shell Beyond Beauty: Oh I'm definitely a buyer boo. Yayyy. Mishell Govan that's me. I just got more products. Your glue is the real deal. My wig has not moved in 2 weeks and still holding on strong. Not one touch up either.
Red Tucker: Love it.. So pretty!
Riyborg: This is so beautiful
Tracey McFadden: it would be nice to see you do another fishtail braid where you can see it from the top
DollFaceDeluxe: Yes Ma'am.. This Is To Pretty!!!!
Des Technique: Do you post when more products will become available on Instagram? I missed Saturday’s restock
Renee Fox: Flawless!
kkimberly2004: *You did that right there!*
KennedyNoel: So does the back of the wig stay lifted?? How do you hide it??
Wanda Love: Love love love your work
Beatfacelay: Your glue is the bomb !!
Ezomo Progress: i love this
Kersha Beaver: Nice job
Dev A1: Omg! This is so me tryin to eat while gettn my hair done, probly eating hair & all
DaMiracle Blue: For all the repeated buyers can I get me a chance to get some. Thanks
Ashley Nicole: Can u do a sewing machine tutorial plzzz I need it
Meyah Monae: She is so cute
Braids Queen: Hey beauties, this is BRAIDS QUEEN OFFICIAL ACCOUNT. If you guys have any questions about wigs, leave us a message, we`ll reply to you ASAP~!
Braids Queen: Hey beauties, this is BRAIDS QUEEN OFFICIAL ACCOUNT. If you guys have any questions about wigs, leave us a message, we`ll reply to you ASAP~!
Marlange Laine:
Krista Lee: When will the products be back in stock.
channel: 100k lets goooo!!!!!
Yara Faith: Love the hair but honeyyyyyyyy that look like some Caribbean Soup!!! Lol
Char J: Can you do mine come to Chicago
skyla arielle: who she was fussing at ?
Deshawna Reeves: perioddddddddddddd