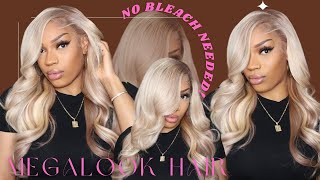
The Perfect Blonde 613 To Ash Blonde Wig Tutorial Wowangel Hair On Aliexpess 250% Density Wig
- Posted on 20 February, 2023
- T Part Wig
- By Anonymous
Hey guys! In this video I will be dyeing this 32 inch, 250% density lace frontal wig from WOWANGEL from a yellow 613 to a beautiful ash blonde color with dark roots. I hope you all enjoy this video and remember to LIKE, COMMENT, and SUBSCRIBE.
HAIR LINK:
https://s.click.aliexpress.com/e/_DnmV...
CONTACT ME:
Instagram: madamebrittney
Email: [email protected]
Hey guys, I'm Brittany, rivers and welcome to my channel. So today I'm going to be taking you through how I got this ash blonde hair color from a 613 wig. This wig is from Wow Angel, it's one of my favorite AliExpress companies and no it's not sponsored. This video is not sponsored. I bought this wig 100 myself um. This is their 250 density, 32 inch, lace, frontal wig and I just love. Oh I'm missing a nail. I do not know I just love, love love all of their wigs. This is my second time buying a 613 wig from them, but the first time I dyed it orange I did like a ginger color, and this time I wanted like something ash blonde and cutesy. I saw Savannah James with her blonde hair and I was like yep it's time. I need a beautiful ash blonde just like that. So this is what I got you guys and I like when I do like one. I want the roots like a little bit darker. So, if that's what you like, but not like, I don't want them to be dark brown like 1B. I like them like a very dark blonde and then it kind of goes into the platinum blonde. So I think that's like a really cool touch. I try to do most of the time, but I'm going to take you all through how I dye this hair, how I colored the hair and all that, but I hope you all enjoy this video remember to like comment subscribe, subscribe, subscribe. Follow me on Instagram, at Madame Brittany and let's get into it foreign. So here is the wig. As you can see, it started off like a normal 613. It was just beautiful but very yellow, like uh. I just love, love love their hair, like so silky and thick all the way to the ends like it was giving, but I just can't do that yellow and they do have real HD lace on their 613, wigs, which I love. I'Ve already done like a full review for them and stuff, so make sure to check out that video. If you want to see all that the colors I use were by Wella, I say you're good with four, but I have some extras. I just set out everything. I have but that 8N slash a11 is like the key here, so I get that color and then get the lighter colors in the nines. So, as you can see, I had a lot of dyes, but the eight and the Seven are the key, but I use 40 volume developer and 20 volume developer, but I say you're probably going to be good at the four die range. So I have the water boiling over here in a pot because, firstly, we're going to tone our very yellow wig. I like working in these like dish pants. This is a 13 by nine pan from Kroger. It'S just perfect. I always watercolor hair in these. I sometimes just keep one of them and just reuse it okay, so I'm going to go ahead and pour the water in and if it doesn't look like it's a lot of water and because that water is just so so hot. I add water from the sink to like make it a little higher up. It can be cool or warm. It doesn't matter, but I sometimes like to cool it down because it's too hot to touch okay, so now toning, so I'm using the Shimmer Lights purple shampoo. I'M just I don't really measure this shampoo at all. I just kind of pour it. What I feel like is enough in there um it works really fast, so make sure you're paying attention to your hair stay near your hair, because if you leave it in too long, it's going to turn silver, which is good. But then it's going to turn like slightly purple, so it didn't take too long, definitely not more than five minutes. So I just dip the hair in like your water, coloring hair, and I just am always so amazed by how quickly this process happens. Like you can see right here, that hair is super duper yellow, like you, can see it very well right here and by the time like I just put it in there like, you can already see under the water a little bit, it's not as yellow anymore. It'S looking good so honestly, I might try a different approach next time, just tone in the hair and then just coloring the roots to make them darker. But this time I'm going to go all the way in and just completely so it still looked a little yellow. So I just dipped it in a little longer, maybe for like three minutes or so, and this time it's gon na be perfect. You guys it's going to give. You can already see it happening. Okay, so this color looks pretty good to me like I felt like I could work with this. This is what I wanted like up close. It looks good so we're going to head over to the actual dyeing process and one part I don't usually include in my videos, I'm going to make sure I rinse all that shampoo out. I'M not sure what the purpose of this is, but I just want to rinse all of that shampoo out, I'm not conditioning the hair or anything I'm just getting all that shampoo out of the wig and look at that to be dyed. Let'S get into it guys. So we're going to start with a 7 in 711 color. This will be our primary root, color and you're, going to make up the die so you're going to add the full bottle of Wella. So, for every one bottle of Wella you need two Parts is what people say of um developer forgot what it's called, but yeah. You need two parts, so that means feel that you I'm doing it off camera. You are going to feel this bottle with developer twice. So I use sporty volume developer. I actually recommend using like a 30 or something a blue roller just to be safe. You don't want to damage your hair. Um developer is peroxide and it is a chemical you guys which I'll be forgetting sometimes, but so now, you're. Just gon na mix the dye up until it's evenly distributed with the developer and the actual die and finish. This is how the dye looks, and there are some really nice professional ways to do this. Make sure y'all have gloves on you guys, but I'm just going to start at the roots or the beginning of the lace, frontal and add my die to there first and then I'm going to start parting, the frontal this color dye, the darkest color, is only going On the frontal region, so then I'm going to start just parting the front, so every kind of possible way. I could part it. I really didn't know if I was going to mostly wear a middle or side part at this point, but make sure you have a nice clean, cut middle part of dark dye, starting on the roots and just part, the hair throughout and bring the dye back. Maybe an inch is what I like to do, but I really don't think you can go too wrong here and another thing at least you're applying the dye it's going to get darker. So I know, while you're dyeing the hair, it looks like nothing's happening. Is this color too light which is like my first concerns when I did this, but it gets darker the longer you go, so you can already see the front getting a little darker, but I'm just parting through checking everything making sure I put enough dye on the Lace, frontal roots, so I'm doing almost like a little ombre effect. So now I'm moving on to the 8nw colors and the 8 and 11. So I'm not pouring out the extra die because I still have dye left over you guys. That'S why I'm telling you all! I had too many boxes. It will be good with just four, but I just use that same die and I just kind of eyeballed it to make it look like the developer when I mixed in the one bottle of dye in two parts of developer. So just I kind of eyeballed how much developer I needed, since I still had that old die inside of the bowl, and this is how it looked when I mixed all of it together got it to look similar to the way the dye looked at first and Mind you, these are new colors. So that's why it's not exactly the same color. It was so from here. I'M just gon na start where I stopped and add this dye all on the wig. So that's what I'm doing the rest of this time. I'M just gon na kind of make sure I have every single piece of the wig covered flip the wig over turn it around and kind of work from the back kind of part. The hair section the hair a little bit, move it apart with your hands and stuff, just to make sure you're not missing anything. At this point, you can also see the roots have gotten much darker. The hair is getting a little darker, like it's, adding some flavor to the hair. So now I'm going to go in with the brightest color, which is the nine in color, which is considered like platinum, blonde or something, and I'm going to fill in the part that I stopped. So I'm going to add the whole bottle to my dibose, some developer and just lather the hair in the rest of the die okay guys. So that is it for how I got this ash blonde wig. I hope you all enjoyed this video remember to like comment. Subscribe subscribe, subscribe, follow me on Instagram at Matt and Brittany, and thank you all so much for watching have a great day. You guys bye.

Comments
tammyrvrs: Gorgeous!
Kim Santa Maria: Why would you use 40 volune to darken the roots? 40 is such a high lift? Why wouldn’t you use 20 volume to darken the roots? Just curious?
Jorgie Porgie: 40 developer