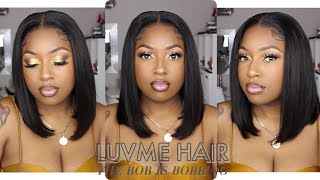
How To Customize Any Amazon Wig Very Detailed | Ft. Abijale Hair | Olineece
- Posted on 02 December, 2020
- T Part Wig
- By Anonymous
How To Customize or Slay or Melt Any Amazon Lace Front Wig Very Detailed | Ft. Abijale Hair | Olineece
Subscribe here help me reach my first 5000 subscribers!
⇢ http://www.youtube.com/c/Olineece
Turn on your notifications to be notified of my next video!
》》》》》》》》》》》》》》》》》》》》》》》》》》》
Hey all!
Thank you all for watching my video! All the specs of this amazon lace front wig are listed in the video! If you have any questions about this amazon lace front wig or suggestions feel free to comment below! Also please feel free to share and like the video if you enjoyed my content! Every like, share, and comment matters!
Love you all bunches and hope your day is going well!
Be sure to wash your hands and stay safe during these troubling times.
Black Lives Matter.
Olineece Croomes
XOXO
》》》》》》》》》》》》》》》》》》》》》》》》》》》》
Disclosure: Some of the links below are affiliate links, meaning, at no additional cost to you, I will earn a commission if you click through and make a purchase.
DIRECT WIG LINK:
DIRECT BLEACH LINK:
⇢
LIKE MY LASHES?
⇢ https://youtu.be/n38FOqVb-AU
SEEN MY LAST VIDEO?
⇢ https://youtu.be/00Klww7_k10
》》》》》》》》》》》》》》》》》》》》》》》》》》》》
SOCIAL MEDIA
⇢ Twitter: @outlabeled
⇢ Instagram: @outlabeled
⇢ Snapchat: @outlabeled
⇢ Business email: [email protected]
#amazonwig #amazonlacefrontwig #straightamazonwig
Hey y'all and welcome to my channel. My name is alanis. If this is your first time here make sure you hit those big red letters below and subscribe so today we'll be getting into yet another amazon, wig y'all know i love reviewing amazon wigs on my channel for y'all. So here are all the things that come in the package: a wig cap, not a real one. Exactly this. Thank you note and also these eyelashes, which were nothing too extravagant. Y'All just y'all know just don't expect anything too great, and here is the wig straight out of the bag. There was other packaging on it. Just so y'all know it didn't really actually come like this. I had just taken it out to look at it earlier um. This is what the wig is. Looking like, y'all no lies, this is her, so i did want to go in there and show you all the ends. The ends were extremely extremely thin for me, i'm going to end up chopping. Those off later trust me they're, gon na be gone because that wasn't gon na do it for me, um here, i'm showing you guys that there's a layers in the wig - and this wasn't necessarily like intentional layers. These were just the layers on the 13x4 closure. You guys so i just flipped it upside down, and i just wanted to show you guys that this was intentionally an 18 inch wig and only the hairs that are on the tracks made it to the 18 inch. None of the hairs on the closure actually made it to that 18 inch, so that was extremely disappointing. But if you hold your wig like this with all your hair, you guys will be able to see if you all have layers in there. So that's how i decided to show y'all um. This is how the construction of the cap looked. It looked amazing, just like any regular construction with one comb in the back along with um three other combs throughout the wig um. So nothing too crazy about that. This is how the lace look compared to my skin um. It was giving like this cool, ashy kind of tone, and the knots were super small, which was amazing in that sense that when you go in and bleach this or put makeup on it, it will be covered. These are not like crazy chunky knots. It'S only tied once so that's nice, and here is the hairline you guys so now, let's get into some customization of the wig okay. Finally, little guys, let's get into uh slaying this amazon wig. So the first thing i went in and did was bleach the knots. I used this bleaching powder um, it's just supposed to lift like super light, but i ended up bleaching. These knots twice anyways um. What you guys want to make sure that you are doing is pushing that bleach in to those knots. I don't know who came up with the idea that you do not push and you just want it to sit on top. That'S bull crap! You guys! You need to push this bleach into your knots, not too hard, but just enough so that it does cover the knots. If you guys want to use this bleaching powder i'll leave it in the description box below so make sure you check out there. But you want to push that bleach in, so that it is covering your knots. Some professionals use a knife. I just went in and used my brush per usual just to make sure that this bleach was covering all the knots on the wig. You guys, i actually ended up bleaching this twice, and this is how it came out just wanted to show you guys that the hair did not lift to like a 6 13. So if you guys were expecting that just don't, but it did lift enough for me to cover it um so that when i do apply it to my head, that it will blend in so this is the wig you guys. This was the natural hair pattern that i got after washing this and letting it air dry. I know i know just sometimes you get wigs like this and you just got ta do what you got. Ta do okay, it could be your birthday tomorrow, and this is the only wig you ordered. So i'm here to help you slay this amazon wig honey. I promise you we are going to get this together and i'm going to show you guys all this tips and tricks that some of these professionals don't want you using. But honestly you need to so. The first thing we're going to go in and do is, pluck the hairline. I know you guys have watched so many videos on how to pluck your hairline, but i'm gon na show you guys what works best for me in order for me to slay my amazon. Wigs so first i get all my materials together, as you guys have just seen, and i part her where i want her parted um. I didn't put this wig on my head at all. I kind of just eyeballed the part, so this is where i parted her um and then from there. I go in and pluck from how i wanted her parted. So if i were to do a side part you guys, i would pluck in how i wanted it to look in a side. Part kind of look in order to pluck you're gon na need some like visualization skills, so i would say, definitely go in and look on, instagram youtube, just pictures of wigs in general of how their hairline looks or just look at your hairline and how you would Kind of want it to look so. The first thing i did was saturate the hairline. You guys. The only thing that was in that bottle was water. It doesn't matter cold hot, nothing like that, but saturate that hairline and go in and pluck once you pull the hairs back, pluck and move your hand and then comb those hairs out. So you know how much you've plucked and just to check if you've gotten any bald spots. After that i went back in, i sprayed i plucked again and i combed um i'll, probably say that i will go through and pluck like up and down um one section. Probably about twice before i comb um, it's just like a repetitive process, but honestly doing this has worked for me and i've been able to like avoid any crazy, bald spots. You guys my main focus on this wig was getting rid of that boxy hairline. Since this wig was, i must say it was pretty well pre pre-plucked. Once i applied the water to it and saw um, it was just that hairline that i wanted to get rid of. So that's what you guys are seeing me do so when you are slaying your own amazon, wig you'll, know you're you're done with this process. Once you pull this back and it looks like a natural hairline, you guys as far as like a natural hairline, i guess it would be like if you saturated your own hair with oil and you combed it all back or maybe. If your friend has like super silky, hair and you've seen them like um comb, their hair back with water on it, that's what it should look like. Okay, you guys. After that, i took some spritz to hold the hairs in the direction i wanted them to go. So, of course, that water is going to dry out and it's going to appear that it's not really plucked anymore, but you really want that. Pre-Plugged delayed. Look that you guys have seen um in the past on other, like professional wigs. So i go in with some spritz and i would say going sparingly, you don't have to use as much as i did, but i broke the spritz sprayer on my bottle. So i don't really know how much was actually coming out, but use some spritz on each side and just keep combing through the wig to get the hairs to lay in the way that you want them to lay after this process. You guys are going to see what i'm talking about. You will be able to see that um very crisp, plucked hairline and it won't be a hassle when you're applying your wig. I actually love doing this to my wigs now, because now i don't really have to worry about like crazy, baby hairs or any of those flyaways. When i apply my wig, because all the hair has been melted in to the style that i'm going for - and i can kind of just like plop it on and know that it's going to be okay, this is especially useful because i will be using a blow Dryer later to melt this wig into my forehead, so you guys can see i'm just using some got to be um, you don't necessarily have to, but i'm using it for some extra protection and as you guys can see, you see that super melted hairline and this. This was amazing because i hadn't even pulled out my hop comb yet y'all, so this was just from me using those products and just me combing, the hair back after that. I just laid that down, so the hair would lay very nicely on the lace, um and it would lay in all one direction you guys. What is this? The second and third thing we doing. I don't know next is styling y'all. You want to style your wig off of your head. This is going to get rid of any lumps and bumps that you might not see when this wig is on. Like i said, you want to slay this amazon wig honey. So don't put this on your head and start styling it thinking that this hair is just going to act, how you want it to act. First i go in and i use my hot comb for the hair. That'S really close to the tracks, just because i've washed this wig, so sometimes that hair is like super frizzy or sometimes it just kind of goes everywhere. So that's just to get the hair to align in the right way that i want it to go. Next, i go in with my flat iron for this specific wig. I didn't use any heat protectant, but i do recommend that you use them um some heat protectant that i like is either mazani or some bio silk. That'S like not too heavy on the hair and it'll allow the hair to like still flow if you're doing curls or even if you're straightening your hair. So you guys want to make sure you're going in and you're styling this wig to a tee, get all those hairs to go in the way that you want them to go. I honestly could say i could have done a better job with this, because i know y'all see that bump right there. I know you'll see that because i see it but anyways. This is how she was looking. She was looking very, very luscious honey, but those ends were still getting me and to come to find out. She had some flyaways at the top. I just fixed those flyaways with some wax that i had laying around. This is key, if you guys have any amazon. Wigs most of them come with. Flyaways no lie, so you need to get you some wax, and this is how she was looking after i took that wrap off. Do you all see that boom bam honey whoa? She was fire look. I was stunned at what i did because i don't know about y'all, but not every wig turns out the same, but this one right here baby. I was like. Let me take a couple pictures of this. Let me get a video of this. You know this might be up for sale. No, i'm kidding i'm kidding, but she was looking great. So after the styling process um, i did go in and cut this. You guys can cut your hair wet if you want it to be um like a better cut and not as choppy or as horrible as i did, but i'm not a pro or anything. I don't do hair professionally, so i just went in and cut it. I was trying to cut off all those dead, slash, um, ugly ends that you guys saw because it was making the hair a little bit too stiff, and i wanted the hair to have some movement, and i also wanted the hair to just generally look nice. So next i'm going to apply this wig to my head. It'S my general same application process. You guys can definitely watch, but i'm going to get into the specs of this wig. So this wig is from amazon like i've said plenty of times before and like the name of this, video is all that y'all know, and this wig is from the ab jolly store. I'M not really sure how to say it, but the link will be in the description box below, if you guys want it. This is their human hair, straight hair for black woman brazilian unprocessed virgin human hair um. I have this wig in 18 inches and this is a 13x4 frontal. The price for this wig currently is 105.99 um. That is in reason to change, and this was a prime wig. So for me it did come in two days. They mentioned that this wig is 150 density and they give you some tips on how to wash the wig and take care of it. So you guys can check in the description box below for the link. If you want to see some more info about it, um. As you guys can see in the video i'm being very careful to melt this wig with any wig at all, you want to be very careful to melt it, but extremely careful with your amazon, wigs, because this is that thick lace. This is not swiss lace or anything. This is that sturdy lace y'all, so um. You really want to get this looking right or any wig that you do. This is a key part for slaying. Your wig y'all so just be sure, you're taking that comb and you're pressing those areas down with that comb and you're, getting all that crazy hair out of the way um i knew it was stuck on my head after i let all of that dry, the gel And the got to be glued and i went in with my hot comb just to finish the styling i'm going to let you guys watch the rest of this video and come back to you all in the end. If this has helped you with your amazon wig or is going to help you in the future, make sure you give me a big thumbs up, and let me know your comments on this wig in the comments below um so i'll. Let you guys finish watching and i'll be back with y'all in the end. So so this is the finished. Look you guys, i would say some key pointers when installing your amazon wig, to make it melt is to use heat and some powder to cover up that remaining lace. I really hope you guys enjoyed this video and i really hoped that it helped you out for you and your amazon wig. If you like this video make sure you give me a big thumbs up and hit those big red letters below thanks for watching guys bye. You


Comments
P Thompson: I love when u show us those amazon wigs and is honest about the specs and how u feel
Asia Mone’t: I have a lot of hair to review & this vid helped me realize i need to customize on my wig head lol very helpful vid
E C: Gorgeous!!
JaMya Perkins: do you know if this takes curls well?