How I Customize And Install My $80 Lace Frontal Wig ♡ Ft. Lumiere Hair | Blaican
- Posted on 30 July, 2018
- T Part Wig
- By Anonymous
♡♡♡♡♡♡♡♡♡♡♡♡♡♡♡♡
Lumiere Hair Details: 14 inch body wave lace frontal wig
❤website❤:http://bit.ly/2v1Au3Z
Product link: Body Wig:http://bit.ly/2uYfw4Q
Lace Front Wigs:http://bit.ly/2v2eHrT
Code:"lumiere" Full $3.01 off $3; code:"lumiere02" Full $135 off $5; Code:"lumiere03" Full $215 off $8
❤Follow Lumiere Hair Social Channels ❤
Facebook: https://goo.gl/RUH7Zh
Instagram: https://goo.gl/wsGq7y
Email: [email protected]
WhatsApp: 86-15638756551
♡♡♡♡♡♡♡♡♡♡♡♡♡♡♡♡
places to find me!:
Snapchat: astleyj
Instagram: http://instagram.com/blaican
twitter: https://twitter.com/blaican
email : [email protected]
--------------------------------------------------------
FAQ:
How old are you? 19
Race? Black
(Jamaican background)
Where do you live? California
What camera do you use? canon t5i
or sony alpha 5100
--------------------------------------------------------
Subscribe / Like / Comment :)
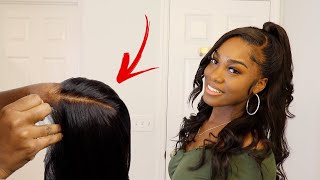
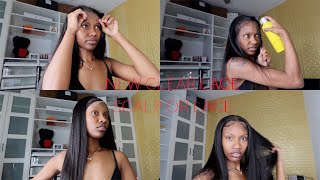
Oh, let me put all my hopes here welcome back to my channel today, I'm going to be showing you guys how I put on my my least frontal wigs and I'm going to be doing everything in this video. I'M going to be bleaching, plucking, I'm. Basically, it's gon na be customizing the way to my liking and then installing me so yeah, and also it's probably loud because of the fan is on. This is hot up here, it's my time, but it's hotter than I and I had to close the window because I don't want any outside legs to tune out and then I didn't show the part line style did, but I basically just put two crows two crows Flat iron right here, I love styling it like this. I really do like the natural curl pattern. I just like to add curls just when I have straight hair or wavy hair to the front like really loose curls like this on that kind of issue. It is days later from when I filmed this video, even though, if my lace is still laid, my god wasn't a video because, as I can do this, it is like a week later couple days later so yeah and I didn't use glue, I use godspeed glue. I didn't use like that actual way glue, one that you have to me leave on for like two weeks or something like that like I used it very simple because I didn't know it on that long because I haven't been wearing this for a long time. I didn't have like I'm thinking about right now. I have a whole like little unboxing, but I'm not gon na show. I'M just gon na talk about it right here since I had what came in the bag right here. So I don't think I mentioned this. Hair is from the millimeter hair, your company, it was sent to me by them right here. Oh, what comes in the bag was the wig of course, which I already had on two flexi rods and also a black wig cap, which I didn't use because I like using the tan wake-ups and also didn't use these. But I'm gon na happen to my collection, because it's always handy to have these, or at least to me I really like using them, but not for this kinda hair, like you know my natural hair. I really like this. It'S really perfect for storage, especially, I know a lot of hair companies and boxes. I like the boxes too, but this is also great for storage as well. What else? Also all of the wig information will be in the description down below this? Is a body weight texture by the way body, weight and 14 engine is a lace. Frontal way basically means it's. A frontal is from ear to ear release and also give you enough parting space. I would start the clip right now how the wig first came. So the natural pattern of this hair is such a beautiful texture and my opinion, like I just love the wave. If you have any more questions about the hair, just leave them down below for premium down below after you watch the video yeah in the video. Oh, my gosh, my nose and my lashes. It just everything was just so out of hand. Now my nails were a hot mess. My lashes were a hot mess, but, as you guys can see now, they're fix my nails are good. My lashes are good whoo. It was a hot men job. I was looking to have minutes during this, but you know what it's: okay, okay, I was really like. Oh my gosh, like I'm editing, this look like my bills. Apology, just cracked, I didn't have my critics on. I mean I'm polished right. My lashes have my lashes off. I don't know what was wondering all right: okay, now, okay, so first we want to start off with bleaching. Now what I'm gon na be using. Is this bleach and then a dirty volume cream? And you can find both of these at Sally's Beauty, which is where I got my from so basically how I bleach my hair. Well, my knots is everyone scoop of powder, I put two capfuls of developers and then I just mix it, and you basically want to get a thick consistency. You don't want the bleacher seat past the knots you don't want it to bleach the actual hair, because then you'll have to dye the hair to get it back. Black and that'll just be too much. So this is a consistency you should be looking for and then I basically just placed it on there with a plastic knife, because I feel like it works better. In my opinion, then, like the actual bleaching brush or dyeing brush and yeah, I never bleached a wig that was already made before this is my first time doing it. So it was new to me. I usually was just put makeup over the knots, but I decided to do this because I wanted to just do the whole things to see if I could do it. So I left the bleach in for about 40 minutes and it all depends on your skin complexion or how light you, like your roots, for my skin complexion, I like to leave it off for about 35 to 40 minutes, and then I wash it out and then I let it tone with the shimmer lights, which you can also find us at Sally's Beauty. This video is about Sally's Beauty, but like that's, where I get most of my my hair products from or either Sally's beauty's or your local, your local Beauty Supply purple shampoo I'll leave that on there for about 15 minutes and then rinse it out. I just tones the hair, so it won't be super brassy after bleaching. Oh then we go on to plucking and so yeah. I go ahead and I just start plugging the wig. This plugging is all personal preference. I like to try to mimic my natural hairline. So that's what I do I basically just are they plug party plug party plug? That'S pretty much what I do and you don't want to start plucking right at the hairline. You want to party first and plug behind the parted hair, especially if you're not used to plugging in your noodle to a game. You don't want to start plucking right at the you know, right at the exact hairline you want to parse on first. In case you make a mistake, it won't be too bad because you could still just cover the hair cover it with it. I don't know if that makes sense. I really hope that makes sense. Oh, I remember, as you pluck make sure you comb it out with like a rat tail, comb, make sure plug and then comb out. So you can see your progress because you don't want to over plug it and you don't want to under plug it, but you rather under plug it and over plug it because as you under plug it, you can fix it, but yeah. Now I'm gon na. I knew I was gon na we're in the middle part, so I went ahead and start plucking, the middle part, and I pretty much know like how to pluck and stuff so I like to have my part why I know how people like it, but my natural Part isn't like a super precise line, it'd be pretty messy because I'm not the best part. So I like to just mimic that it's just all personal preference, so you'll just keep looking and keep looking and keep plugging girl and so yeah. This is how the the edges look after plucking it after I plucked it and customized to my liking. This is how I like my hair lines, to look, and this is how the hair line look without doing anything to it. So you can see the difference of how it came and then also this is an. I was a natural part that akela came and then this is how I plucked my part so yeah. This is pretty much it. I'M gon na wet it because I know a lot of you like to see the hair like when it's wet. I don't know why. But people like to see that so I'm just going to wedding with some water just so I can see how it is just pretty much done. Plucking it. I'M just gon na show you how it look wet and then I did the edges too, but that's not more it. I just did it just for you guys to see how it look yeah. I wasn't gon na film this at first because I filmed it before, but I'm like, I feel like. I need to filming again so basically on a beige stocking cap that I got from my beach wool. Wig cap. I'M sorry, I'm says black. Okay, it's probably contributed a stocking cap. That'S probably confuse me on, but it's a wake up and it's the beige one. I put it on. Take my pocket this one right here and then I went ahead and just put it on way beyond your hairline and then I just put on some got to be glue, free spray, and I spray it right here and then that's basically. Basically, all I did so far and ignore my lashes fell off, but yeah I'm refilling it because the first one just it was my first time doing it and I feel like if I, if I show the first one that I did is gon na confuse. You guys, because my camera cut off my all right now that this is tried. I'M gon na just go ahead and cut it off all right. So I feel like this off. I'M gon na bring a wig down, and it's like that much my hair lying there, like it's kind of too far down we'll just see once I put on the wig so now after this, basically, you wanna. Basically, oh we're gon na cut the ears off to make sure that I have any other thick band on there that so ugly, don't cut you. How do you think I cut my hair? I don't do that down on that. My natural scalp is lighter than my skin color, so I think I'm gon na go lighter first and then, if I don't like it, I can always just let some dark. So I'm not going to really put a lot of foundation on it. Do you guys see so I'm gon na take someone has got to be glue jail. The black one and just put that like under I want to take it within my rat tail call me off and just glide the glue under for the job. I only put the pieces: that's lifting up you just press it down, just like that. That'S gon na make it really melt up in this game. Otherwise, here is a wig right here I was letting it air dry, as you guys can see it's kind of still down. So you guys didn't see me customize his wig, I bleached and I bleach the not plucked. It cut the lace off already. It'S just a quick rundown on this wig again, which I mentioned in beginning already. This hair is from Lumiere hair company. It was sent to me it's a 14 inch. It'S the body wave texture, wave pattern, I'll have all of the information on this wig down below. So make sure you guys go check out the information description box below as well as links for you guys to check out this way. I really enjoyed this hair so far. The hair is like super soft, as you guys can see. Even when there's wet, it is still a beautiful wave pattern. I like that, it's not too much hair, even though I told you guys in beginning the hair line was like really thick when I put it on when I first got it, but I rather it be thick, so I can customize to my own liking, then, for It to be super thin and then it's like, I can't just add, more hair to it yeah what else I'm just gon na put it on now. I just wanted said, like you know, refresh my memory yeah, I'm sweating like a mother. Is I like it. I'M gon na use my got to be ultra glue, styling gel, to glue down, because I don't want to really glue and glue it down with, like my actual lace, okay, so the first thing you want to do is go ahead and apply that got to be Glue gel and I didn't apply with my fingers because it gets really sticky and most people say that it makes your it makes the glue right when you apply it with your fingers but anyways, then you want to go ahead and blow-dry it, and then you want To wait till it get tacky. If you don't blow dry it just let it dry until it gets tacky, and then you want to go ahead and place the lace onto the glue and just press it down with the comb. This is gon na make sure that the comb is really just make sure that the lace is really pressed down to the scalp. So you want to blow dry and press until you feel like the glue is dry, and then you want to work in sections doing this. You don't want to put the glue all over your hand and then try to apply it like that, like I don't recommend it that way do sections. So, basically just do it. The same in each section apply some glue, let it dry get tacky and then apply the lace on it. So yeah you just apply it on there and then just blow-dry it and just get the extra touch-ups with the with the glue and the blow-dryer and just press it with the back of your comb. That really helps so after that they want to just go ahead and fix it up, and you could tie down the edges with a silk scarf. But I couldn't find myself our Thursday, but that's what I usually do. It really secure the wig for about 15-20 minutes and then take it off, and then I hope you guys enjoy this video give me a thumbs up and subscribe and subscribe to my channel and also by the way. This is the same way that I wore on snapchat when I had to slink back into a bun, and I had a side part. This is that wig. I don't insert a couple videos or pictures if I still have it, but this is that way. No other life, it was actually did you feel and why you did this but move on. I didn't film myself doing the side, part or the middle part, but this is eyelid. I basically just wet it just to soften it up and make it like flat and then brushed it and scoop the right into a bun like it was so easy. Wig was pretty easy to work with as well hope you guys enjoy this video subscribe to my channel and I'll see you guys in my next video what you think. I just said that, but yes, oh yeah,

Comments
black berry: Love lumiere, bought twice from them ,everything looks nice~
Lena Lerma: I wish I would’ve gotten something like this. Mine was totally opposite of what I got. Your wet wig looks thicker than what I got.
Jessica Lourdes: I have purchased from Lumiere Hair, the product is not as described or shown in these review videos very disappointing! currently in the process of returning the wig I purchased ! And on top of everything I’m being made to pay shipping back to CHINA!!! I hope my review saves a lot of ppl their time and money !
Dom: So beautiful
X.O Day_Day: Beautifuly detailed and described thank you
Trinity NahDaé: Looks amazing
Shae Tv: great video beautiful !! i just bought an 18'' for $90 review coming soon
laura danielle: Facial structure face on the whole beautiful
sugarcubez: damn off topic but your brows look bomb af
Diane Enaid: What’s the parting space?
CHARR KR: You are my favorite youtuber !
Beauty salim: This product came so fast, I was shocked. I ordered this past weekend and it arrived Tuesday. The seller has some of the best communication I have ever seen, the color is beautiful. The wig is soft and shiny. The only thing I hate is that I didn't buy a longer length because I believe this wig would be even more bomb in a longer length. Definitely will buy a 24'' in this store next week
bubblesnbambam: Hi, what is the hair texture?
Gail K: Would have been great if the density was mentioned
Callher_Mkilla: Pour ceux qui parle français, j’ai aussi sortie une review sur Lumiere Hair sur la chaîne YouTube! Review très sincère ! Je suis nouvelle sur YouTube, un petit support serait apprécié! ❤️
Coley Ming: The hair is so laid
EmpressV: No photos of the back?
Brooklyn Haynes: Buying that same wig
iiam Bri VLOGS: 1st