How To | Install T-Part Closure Wig Without Glue (Beautyforver Highlight Wig)
- Posted on 18 October, 2021
- T Part Wig
- By Anonymous
subscribe to the mailing list to receive newsletters.
6% extra discount code: BFhair006
DIRECT WIG LINK IN VIDEO:
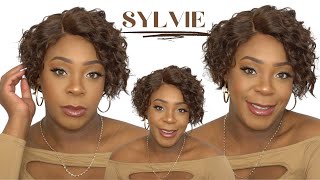
TL 27 lace part wig
https://www.amazon.com/Beauty-Forever-...
Other popular products links:
88J ginger orange color lace part wig body wave:
https://www.amazon.com/Beauty-Forever-...
FB30# Color Headband Body Wave Wig:
https://www.amazon.com/Beauty-Forever-...
T part lace front TL412 jerry curly wig;
https://www.amazon.com/dp/B09FPZV1MN/r...
#installgluelessclosurewig #closurewignoglue #quickiestclosurewig #tpartclosurewig #tpartclosurewig #gelonlywiginstall #wiginstallgelonly
Hey Doll Baddies, I haven't uploaded in a month chyyyy!! OMG I miss you guys so much. I ain't leaving y'all no worries, DOLL BADDIE GANG TAKING OVER!
Don't Forget to Like Comment & SUBSCRIBE !
Business Inquires ONLY (email) [email protected]
Sub Count: 42,793
______________________________________________
LET BE FRIENDS:
IG: http://instagram.com/ellaabaddie/
IG: http://instagram.com/shopellabel/
SC: ellaabaddie
Hey there baddies, what's up i'm back again with another video and today we'll be working with beauty forever on the box on the back of the box, it shows how to maintain your human hair, wigs and also how to measure your wigs um to make sure that You have the correct length that you purchased and so on and so forth. So this is from amazon. What came in the box is some lashes in their wig cap and the wig will be um. Installing today is going to be a glue list. You need a little patchwork highlight in the front 16 inch 150 density straight um, tea part wig, okay, so this is inside of the wig cap. As you can see, it does have three combs and then you can see it. Has this um the little fake silk base closure part, but we ain't gon na use that that definitely needs to get removed. So what i'm gon na do is take my little scissors and be careful that you're not ripping. You know the lace or anything like that, but just cut the seams of the clear little thread so you're able to get rid of them so that you was able to just get straight to the lace part. So i don't really be liking. The whole fake base. Thingy, so that's why i'm taking it out, because i still want to be able to bleach my nose and do my own defining of a part. I don't need the base part, but if you like it, you could definitely keep it on there, but i feel like it doesn't give the look that it's supposed to so yeah. So, as you can see, this is a tea party closure you need. So i am going to um bleach the knots off camera and um. You do have a little bit layering, as you can see like the 16 inch, is not consistent all the way down, but it's okay. This week is going to be very crowded y'all. Can you see so it doesn't really matter so right now, i'm just taking my razor comb and i am removing um the lace and then i am going to be. I am going to make this ugliest unit. So, of course, i'm going to be using my got to be glued gel. I got my wig cap on you. Don'T have to do the ball cap method for this, which is so good because you ain't got to do all that extra work just put that cap on put the um gel in front of the cap spray. Some free spray blow dry it on warm heat. For about 15 to 20 seconds, so it could become tacky then just treat it like it's real glue for real, but it definitely helps so give a better hold when it has a little bit of tackiness and it's a little bit dry. So you're going to go ahead and take the wig and make sure you put it in the middle part, because when it comes to a tea party, you need to make sure that that part is in the middle. It'S centered you're not able to adjust it. Even if you make it a little crooked because it's designed for it to be right in the middle and it barely already ain't got no lace like that. So you need to make sure that when you place it on your head, it is in the middle. In the center um, so yeah, you want to go ahead in any parts that didn't adhere with the gel. You could go ahead and fix up the corners and then right now i'm going to be taking my barracuda iron and flatten it out. You definitely can use a hot comb, but being that it's a tea part, it ain't that much lace - and you know the wand - is also an alternative. If you don't have a hot comb to get your stuff flat, go ahead and use the wand. This is not a one: it's a bare core iron, with a clamp but same difference. You know you have the heat all over the iron as such and right now, i'm doing a little pull test and y'all could see this week. Ain'T moving shout out to that free spray. Wig is not going anywhere so right now, y'all can see what it's giving and we are going to begin styling. So i'm just going to take small sections of the hair spray, wisdoms free spray and just bear curl. My whole entire head, so y'all need to make sure y'all go ahead and check out the links below for this week use the code to get money off, and this wig is so inexpensive. It'S less than 120 dollars, so yeah definitely check beauty forever out. For this unit i do wish the density was. You know, fuller, it's only because i love to care. I need me a thick wig at all times, unless it's above you know it ain't supposed to be too thick now, but i just love full hair. So if you, you know want something lightweight, this will be good for you, because it's not too much hair and it's just the right amount. If you don't want too much hair, you know if you like, a lightweight with me, i'd rather some thick her so yeah. I just wish it was a little bit thicker, but nonetheless it's real cute. I like it um. I do think the patch, i'm not sure. If you know each wig is different. Y'All gon na see once the hair is styled. I feel, like one side had more blonde. Like i don't know, it was real weird, the way it was placed like they weren't completely symmetrical, but that's just the detailed perfectionist image out, but i didn't do any extra enhancing of nothing the way the wig came. I just left it as such and it started right now, i'm about to do some baby hairs and this wig does really give you know it has a great lace out the scalp and for sure it was given like frontal vibes. If you ain't know, you wouldn't know like you, if you ain't know you would you wouldn't know, okay, so yeah, i'm gon na go ahead and do my baby hairs, mold them into place, and i'm also now going to take my concealer, i'm using a lighter concealer. Obviously than my skin tone and i'm going to put it down the middle of my part to define it, and i'm also going to make sure i take some of my black spray in really crisp out the part. But before we get to that step, we're going to flatten it out somehow, with the barrel curl iron and y'all can see right here. I just went ahead to my rat tail comb, make sure you put in a whole bunch of pressure so that the spray on paint gets exactly where it needs to be just spritz it down to the final part flatten it somehow, but as y'all could see a Little bit y'all see the way my hair is curled. I feel like it was one side they had more blonde like they weren't sitting the same. It was still cute, but i just feel like i don't know when they dyed it. They weren't like flowing the same y'all, see you don't know, but yeah go ahead and juice um freeze spray, your crust set it and that basically sums up this video, i hope y'all enjoyed. If you have any comments, questions or concerns, you have another deal to go ahead and put it down below. This is how you install a glue list unit with no glue at all, no adhesive, very quick, simple to the point. Less than 15 minutes and yeah i'll check out in the next one don't forget to like comment and subscribe to be a part of the diabetes you


Comments
Y2K baby: Could u do a detailed video of how you get those curls ?
LaShai Lenard: