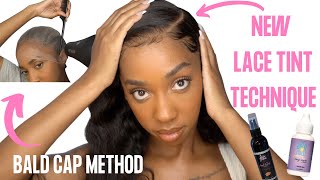
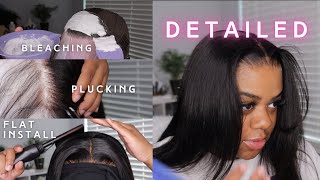
Frontal Wig Install For Beginners| Step By Step Tutorial
- Posted on 17 February, 2022
- T Part Wig
- By Anonymous
Mone’t Wig: https://koreejsboutique.com/collection...
Frontal Wig Install For Beginners|Step by Step Tutorial
What'S up dolls welcome back to corey j's boutique, so today we're going to be using our monet wig to show you all how to install your hd lace frontal. This is a 16 inch lace, frontal wig hd from corey's boutique.com, if you're interested in learning how to install continue watching right now, okay doll so per usual. First thing: first, you're going to need to make sure um that your hair is braided down flat. If you have thinner hair, you can do bigger braids. If you have thicker hair, i will suggest that you make sure that your braids are decently small okay. So, in order to preserve your hair and also just make sure that it's um braided in a healthy manner, i hope that makes sense um. I just make sure that i pull the previous braid up into the current braid, just how i um just did so. Basically, just making sure that the end of one braid is always inside of another braid. This way i just protect my ends and i protect my customers ends, while their hair is um in a wig okay boom. So now that her hair is braided down flat, i'm going to take my got to be glue spray and i'm going to spray it on her wig cap, i'm using a light beige wig cap um as for the color, and we are pulling it over her eyes. Just to make sure that the wig cap lays flatter - and i do use a significant amount of got to be glue spray, because we want to make sure that the cap stays securely down. If the cap is not all the way down. If the cap is rolling up, your install is ruined so make sure you also thoroughly dry the cap after you spray it with got to be glue as well. So now that her cap is dry, i want to show you guys, monet up close and personal she's. Extremely beautiful you guys this beautiful brown color, okay and then she has hd lace on her, as you guys can see very thin, ultra thin hd lace from corey's boutique dot com. Her ends are thick. Okay, this. This is a beauty, so now we're gon na use. Our corgis boutique makeup palette and the color that our customer and the color that best suits our customer. We'Re going to first make sure that we get the color all over the lace, the bottom of the lace and then we're going to make sure that we get it all over the cap as well. So what you guys just saw me do was spray um, the frontal, also with the got to be blue spray. That'S a good method for sealing um, your lace, tint or whatever you choose to use to color your lace also guys. Now i'm just cutting off her wig cap around her hairline, make sure you guys take notice to your customer, your client, their hairline, to make sure that you're cutting the cap at the right space. That also starts with the got to be glue as well. So i had someone ask me: how do i keep the wig cap on? This is how i just basically cut off the excess cap, and then i sew it down with a needle and a thread to seal the front of the bar cap. I basically just take the smallest amount of um, my glue, which i'm using ghost bond and then i'm just literally um rolling the cap forward with the end of my makeup brush to make sure that it's sealed around the edges. It'S going to just create a more seamless look on up under the way. Now, i'm going to take the same color that i use on her frontal and i'm going to put it on her wig cap, starting from the back and going to the front. I always start from the back, because i don't want too much makeup and oil to be on the front of her wig cap and then it doesn't allow the glue to dry and stick because sweat. You know oil anything like that. That will make up it'll all make sure that the glue is not sticking and we want the glue to stick so. Another thing that i do is i dry the makeup on the cap as well just for that extra security and then my wigs do come with elastic bands. So i'm just using the elastic band to place her frontal and then you guys are going to see me really just moving the frontal from left to right, eventually um, so i can make it even with her ears. Now again, this is our monet hd lace, wig from coreyjaysboutique.com the wig is 16 inches. She is layered. She is very beautiful, very beautiful peanut, buttery brown color, okay. So now, let's just get into gluing it down, i'm going to roll her wig back. So it's basically on the back of her head, but the front is pulled back that way. I know where i'm placing it when it's time when it's time to place the wig um and i'm just taking little dots and i'm putting it all around her head now. Sometimes you guys, if you've watched my videos before you've, seen that i sometimes cut the wig in three um for this one. I just wanted to go ahead and just do it all at one time and it both works effectively. Um. The only thing is that i think doing it in three just kind of takes a little longer. So if you want to speed your process up, if you're more advanced with it, i would say: go ahead and just do it all at one time and i'm going to use four layers of ghost bond on her hair, as you guys can see, i'm waiting until The layers dry clear to apply another layer, and i'm going to do this over and over until i have my desired amount of glue on her head okay boom. So now it's time to place her frontal do not be afraid to ask your client for help um. You definitely will need them to hold the lace down because um when you stick the lace to the glue, it doesn't automatically adhere, it needs to dry, essentially um and it needs to stick so it needs to be held down and also a good thing about it. Not drying right away is that you can actually move and readjust your frontal if it's not right so um. If you guys keep watching eventually, you'll see me readjust this side, i'm doing it right now, but i didn't realize um. The higher parts was just too far back and i'm going to end up readjusting it um and then, after doing so guys again, i'm going to dry her lace so that it completely dries and is stuck in place. While you dry your lace um, i would suggest that you guys use a tool such as a comb to make sure you're pressing the lace down. You just want basically a meltdown right, so in order to get that, you just want to make sure that your hair is completely glued onto that glue. The lace is really down into it, and so i'm just using both ends of my comb, to make sure that everything is intact and in place. Now i'm going to have her put on my cordy j's boutique satin wrap um just so that the the lace can dry a little longer. These are all things that really just reinforce um your lace, frontal wig. So that's what i'm doing here and now i'm going to just take it off um and then we're gon na go ahead and cut her lace off okay, so lace, cutting is a very important step. Y'All, and the first thing, i'm going to say is make sure you cut your lace at three parts before you start with this along the hairline. So if you guys see just right here, that was only one of the three parts that i have to cut off. Um, so i would like literally cut the lace three times by the eyebrows. Actually it's two times so it's really by by both of the eyebrows, cut the lace and then cut your lace off in three sections. I hope that makes sense y'all. I i hope you guys can follow what i'm saying and what i'm doing so, as you guys can see, i'm cutting my lace in sections along the hairline because you don't want to just cut the whole hairline straight across that's going to create a very bogus looking Hairline um, i do have a more thorough video on lace cutting on my page, if you guys are interested to go watch that, but you know you want to make sure that you're cutting along the hairline and you're cutting in three different parts so now boom we're At part three for me, so yes, if you just um snip the waist by both eyebrows and then cut one two three along the hairline, that should give you a nice natural, looking hairline so after the hairline is cut. I like to take some of the hair and kind of pull it back like a pull test. Anything that is lifting i'm gon na go then um spot glue it down. So that's what i'm doing right here. The sides normally don't go down too well. The first time so i just take - and i put two to four more layers on it, depending on how much it needs um and then i glue it down as soon so again, i'm taking a tool and i'm pushing the lace into her scalp, as you guys Can see is creating a beautiful meltdown um and then i'm going to take the blow dryer quickly again and just go over the edges just to make sure everything is dry and intact and now for the final and really important, um, really an important step. The baby hairs, so the baby hairs are important y'all because they cover um the edges of your lace and thus create a more natural look um, especially up close and personal. So, even if you don't want a lot of baby hairs, you need at least a little fuzz or something just to make that look, realistic. Okay and i'm cut. Excuse me: i'm cutting my baby hairs pretty long, because i'm going to take a flat iron and i'm going to curl them. I just started using this method for my baby hairs and, let me say i'm having a much better time getting them to swoop, because that curl that you put in it really just gives it a natural, a natural swoop. Okay, so you guys are gon na see me. Take the um little baby flat iron. I got from my local beauty, supply store and i'm just curling it like a flip like flipping them up and then you'll see how easy it is for me to do my baby hairs um. As for how i lay my baby hair down, i just use eco style honestly, sometimes i'll use mousse, but mostly i use eco style on my edges. Okay, dolls! So boom there, you have it our 16 inch, hd lace, frontal wig. Her name is monet. She is being modeled in this video installation by no other than corey j herself. Okay, this wig is so beautiful. Look at how full and thick she is. Thank you guys for watching make sure you guys shop, corey's, boutique.com, best wigs period subscribe and be back for more. You,


Comments
Nye M: Love it