Shake N Go Malaysian Iron Texture U-Part Wig And Knotless Crochet Braids || That'S Laudie
- Posted on 05 February, 2016
- T Part Wig
- By Anonymous
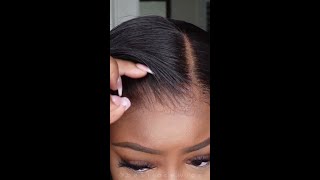
This is a video on how I created a u-part wig and installed knotless crochet braids in the front so I don't have a leave out or have the need for a closure.
I used Shake N Go Que Malaysian Iron Texture Hair. It's synthetic hair. You can apply heat to it but for curls you need to use the hot water method. i purchased at my local beauty supply store, not sure where you can get it online. I used most of the hair to make the wig. I had a little bit of an 18 inch track leftover
The hair I used to install the knotless crochet braids is Harlem 125 African Braid Durban Twist that I blow dried and flat ironed. This is Toyokalon hair and its awesomely matches black hair when heat is applied so i do recommend. I also got this hair from my local BSS
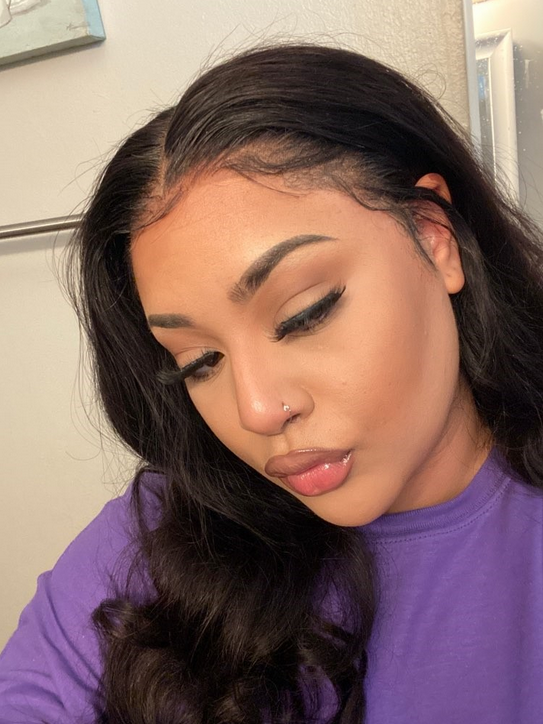
I hope you enjoyed the tutorial and it was helpful! I will upload another video on how to curl this badboy.
The knotless crochet braids can last you about 5-6 weeks. The wig should last you longer. You don't have to use clips, you can sew down the wig if you please. You can also use a dome cap if you want..whatever floats your boat.
Here's a link on me giving a tutorial on how to curl this hair
Thanks again! Smooches to you all!
Hey everybody welcome back to my channel for this video. I will be demonstrating how I create a new part way and how I install now is crochet braids. So if you're interested in the style stay tuned, the hair I'll be using is shaken. Go Q. Malaysian iron touch strip hair. All the hair comes in this one package and I paid about 21 dollars for it. This is the weaving cap that I'll be using I'm going to be sewing the hair on with needle and thread. I started with the 22 inch bundle. As you can see, the weft are pretty thin, so I cut the track to fit just the sides of one strap to the next and I started to sew above that strap and I'm going to stack about three or four tracks of that size. To the back of the weaving cap, just to insure that I have some fullness back. There also note I'm using the bundles from the longest to the shortest so I'll start with the 22 inch bundles. Once I'm done with that I'll go down to 20, then once I'm done with that I'll go with the 18 for this you part week, I did not use the closure, so this is a progress. Thus far, I'm after I stacked a couple of tracks. I began to start forming that you shape, so I'm showing you, ladies, the spacing on how I separate the tracks, and I use those T pins to help stop where I want the tracks to end for me and you're. More than welcome to use eye shadow or anything that you need to mark up the weaving cap, if you need a visual on where you need to stop so at this point in the game, I am down to the last track of the 22 inch bundle. So here I'm going to demonstrate how I complete sewing on the track that stops in the middle of the leading cap, and I will demonstrate how I attach the 20 inch bundle to the demon, I'm not going to cut the track. What I will do is I'll. Do the fold-over method and I will continue to sew the hair up and then I'll flip it back and I'll continue to show what it will do is it will expose a portion of the track that looks frayed also like show like short hairs, but since it's Not the end of the: u part: wig, I'm fine with the hair showing that little fringe of hair Preda. If you purchase this hair and you do the flip over method, you'll understand what I'm talking about so right, where the 22 inch bundle ends. I begin to attach the 20 inch bundle since I'm going to be cutting the hair down all of the hair down. The difference in lengths doesn't really bother me that much and that is showing you the overview of my progress thus far can see my you part. Coming to life, so at this point, where I'm going to do now, is I'm going to start filling in to you, so I'm gon na teach eclis cut tracks and form that you and bring it close to the edge of where the tracks end in the front. So that's another overview of where the hair looks and I'm just gon na keep adding hair. I, like my you to be very small, because I actually don't like too much hair out. That'S not in that wig. So I'm gon na add a couple more tracks and I'm gon na be done with making the wig. So there I go after a long hard day of making that wig um. So I am showing you. How am i you looks. I cut away the neck where I didn't sew on change the length and I'm also showing you that I've put clips in the wig. So this is a still shot of the way just to show you where I put my clips at, I put three at the top two we would say, or east and west at each other and two at the knee of the wig cap, it's after discretion. If you want to sew hair all the way to the where those two flaps are, you can actually cut those two flaps where the east and west clips are and not sew up to that point totally at your discretion. I have four small braids in the front of my head, those little braids that I'm gon na use to install the knowledge, crochet braids, and so I clip in my u-part wig so that I can guide myself so that when I'm installing the now, let's go say Braids, I give myself ample coverage and it covers the: u part, wig the hair that I'm going to use to install the now -- is poche. Braids will be Harlem one. Twenty five African braids Durban chest hair. I used about seven pieces of the hair that I couldn't have and it took small sections of the hair. So, as you ladies know, I am a one knot, type of girl from showing you how I installed, and that was push a braid and that's it. The hairstyles done go home, know what you want to do now. Is you want to blow-dry the Nautilus crochet braids down to get them flat? So that's what I'm doing now to go ahead and get them smoothed out. So I know you, ladies, are going to ask them just gon na tell you for the blow dryer I use high heat and for the Flatiron that I use after I blow dry, I'm doing it on medium heat. A please test ran your hair and we're almost to the finish line, ladies, but we must air and that's the final look of the Nautilus push a braid smoothed out with the new part, wait under it. So for you, ladies, that, don't believe what a curly look. Don'T want a straight look indefinite leave the hair like this, I'm going to proceed to frame my face, so I'm going to take a razor and I'm just going to lightly bring knowledge crochet braids around my face. Previously I had cut the wig down. I cut the whole weight down to about 18 inches, so gdu scissors or razor is there I go just being silly and that's just the close-up of how those - and that was close shave wait. Look so I understand what this hair. I try to use hot rollers for the whole hair. The you part wait will not take hot rollers, so I just applied hot rollers to the not logical shave part, and this is going to be the final look of the novice crochet braids being curled. Only in the front nd, u part, wig is dingy Street and this is the final look. The? U part, wig took me about three and a half hours to make the knowledge crochet braids took me about 20-30 minutes to install and style, and so for the? U part wig you're going to need to use the hot water method in order to trail this hair because those times are not working for it, but I'm slamming I'm being sexy, I'm giving them life. So you know you can do two parts here. You can do that deep side, part or you can do the middle part, so I do hope you, ladies enjoyed this tutorial, and it was helpful if it was please like it. Please share it and I will catch you on the next. One. Take care. Girls,


Comments
belissimahoney69: This is such a clever technique..havent seen it anywhere!!!!!!!!!!!!!
Jamaican Queen: I loooooovvvvveeeeee this tutorial. Girl you got these styles going. Gonna seek for this hair in my neck of the woods and give this lovely style a try. Keep up the wonderful work. Don't let negativity get you down.
Let’s Get Cooking With Lamise O: I loooove it! You did a great job!. I need to try doing my own wig. I'll be trying this before I go to Vegas
Natural Hair Khronicles: Yesssss I love this please keep up the wonderful work. I love your different methods of crocheting n the upart wig. I just made my first upart wig with my old Brazilian hair. You gave a lot of ideas. Your channel is one keep up the great work. Stay blessed
ZiaZia: Looks beautiful as always love it
Lulu E: You did your thing. It came out great. I'm going to try this
Darkerberrie: you look amazing!!! you be killing these crochet braids!!!
Lina Louidor: I was just thinking about doing both. THANK YOU FOR THIS VIDEO!!!!!!!!!!!!!!!!!!!!
Allure So Nizhoni: I loooove ur videos.. ur so creative.. n yes girl u SLAY it everytime. can't wait 4 the next video.
Chioma I: Very clever! Thankyou for this x
TexasPinklady: Loved it...Can't wait for your next video!!!
Mayacon: this is genius... you are amazing... i found my vacation hairstyle THANK YOU ♥♥♥
A Piece of Kait: I really love that crochet idea.
Lumari: Mind blown, thanks for sharing girl
Guts McGee: Love your videos, they're always so creative and helpful. Do you think the hair would curl with heated rollers? I really want to try this hair but I want to curl it and hate hot water dipping..
Sapphira Redmond: love this I'm going to look for this hair I'm going to try this with my upart
Vikki Smith: Thank you so much. I do like it. It looks very natural
TheColcol9: What a good idea. Thanks for sharing.
Assata .M: Simply GORG! Girl, I have looked high and low for this hair! Do you think the same look can be achieved with Noir Marley hair??
Mrs Nelson: Looks great!!!
MsMiracle37: Gorgeous!
Glow Wherever You Go: Gorgeous!!!
Sabrina Williams: You did a great job! Yazzzzzz!
Yoyo Lolo: Oh hell yeah im a tad bit balding so im gone slay this thanks so much awesome technique
princessnerra: very pretty!
caribbeannature: yes it was love! thank you <3
Kristen610: Yaaaaaas doing this today!
lee chasi: Good job as always
NicNacAttack: Nice job, have you tried this look with human hair too?
Liyah Glizzy: Omgggg you slayed to the gods yasssss
Kimberly Simpson: That's cute.... So do you have a tutorial on how you cut the wig to make it 18" or did you just cut it straight across?
scales inc: another home run girl!!! yeah!!! God bless you. Yakisha S.
Maureen Auguste: So pretty
ladynefertitibk: fabulous technique.
lyshae dow: Yaaaas hunni!! #GLADYOUREBK
The Positive Peach: literally just brought this hair. lol thanjs for vid
Daniela Silveira: Linda
Roniesha Benjamin: u look cute